2. Configuration
Datastore Configuration Overview
This guide describes how to configure an Edge One™ Datastore to store edge data locally and it includes the following sections.
- Requirements for installation of the Datastore.
- Create a Datastore Project indicates the initial steps for creating a Datastore project.
- Configuring your Datastore describes how to discover and connect your Datastore.
- Selecting a Data Source describes how to select the project’s data source that will feed the Datastore.
- Creating a Data Route describes how to create a route to store Edge One™ data in a datastore table.
Requirements
The following are the requirements to connect Edge One™ to a Datastore.
- Edge One™ and the Datastore container module need to be installed on the gateway or virtual machine running Edge One™.
- You must install and configure the target database either on the same machine running Edge One™ or on a local machine or server.
- The following databases are supported:
- Note that the Edge One™ Datastore project must be running in order to store connector data in the local database.
Create the Datastore Project
The following steps are required to connect and configure a Datastore project on the Edge One™ platform.
-
Login to the Edge One™ platform.
-
Select “Gateway” then Projects on the left panel navigation bar.
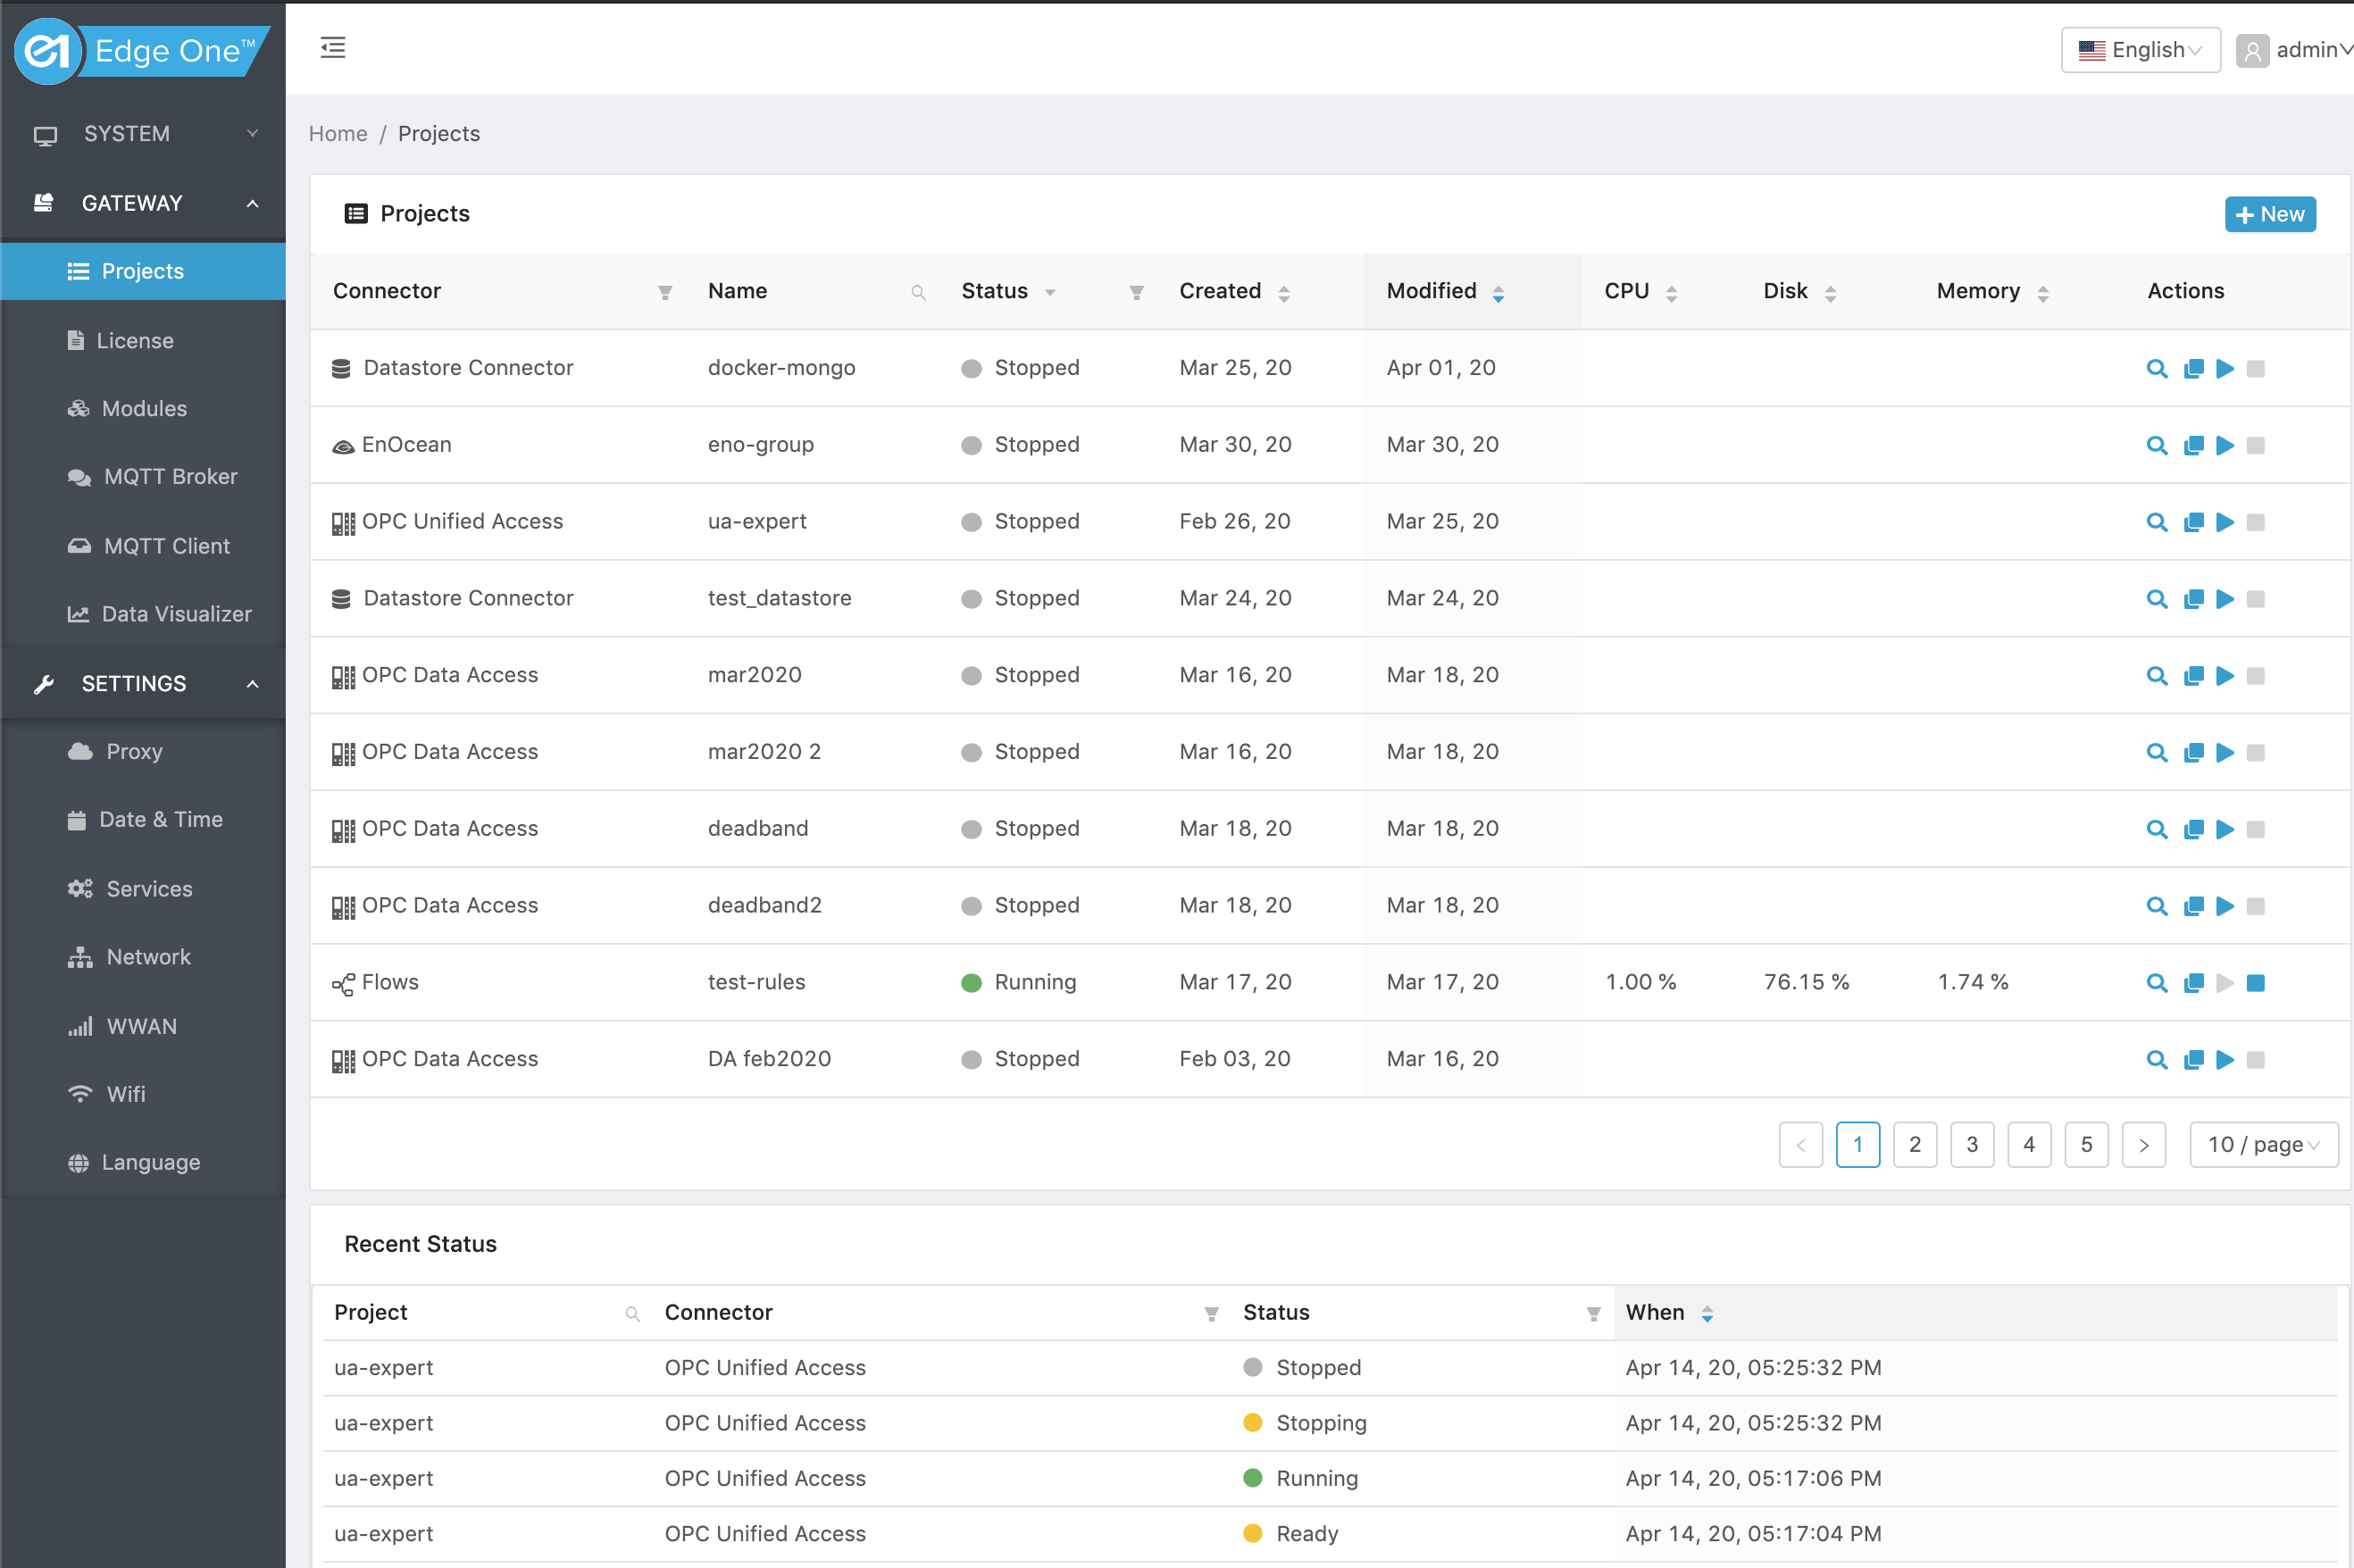
-
Click ( New ) on the Project’s title bar to create a new project.
-
Click on ( New ) on the Datastore module row.
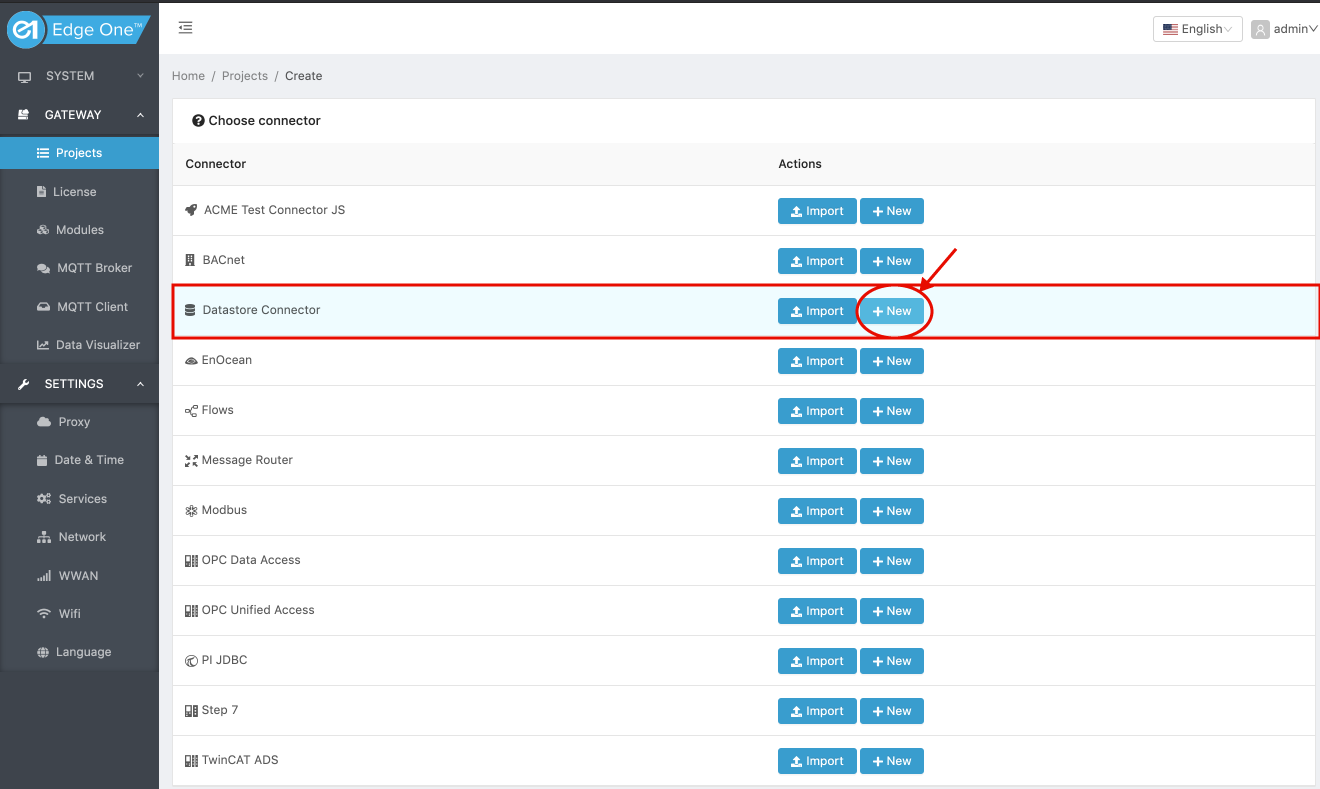
- Configure your Datastore.
Configuring the Datastore Project
The following section discusses how to configure your Datastore project.
- In the Edge One™ Project tab:
- Enter a name for the project.
- Enter the Project ID that will be used to access the Datastore if you want it to be different than the project name.
- Set the log level.
- Silent - No logs will be printed on the console. This is the default log mode.
- Error - Reports only important and blocking errors that can cause malfunctions.
- Warning - All warnings for abnormal, non-blocking events as well as Errors will be reported in the logs.
- Info - All messages relevant to the current system status as well as Warnings and Errors will be reported in the logs.
- Debug - Full verbose mode. All errors, warnings, and information will be reported on the log console.
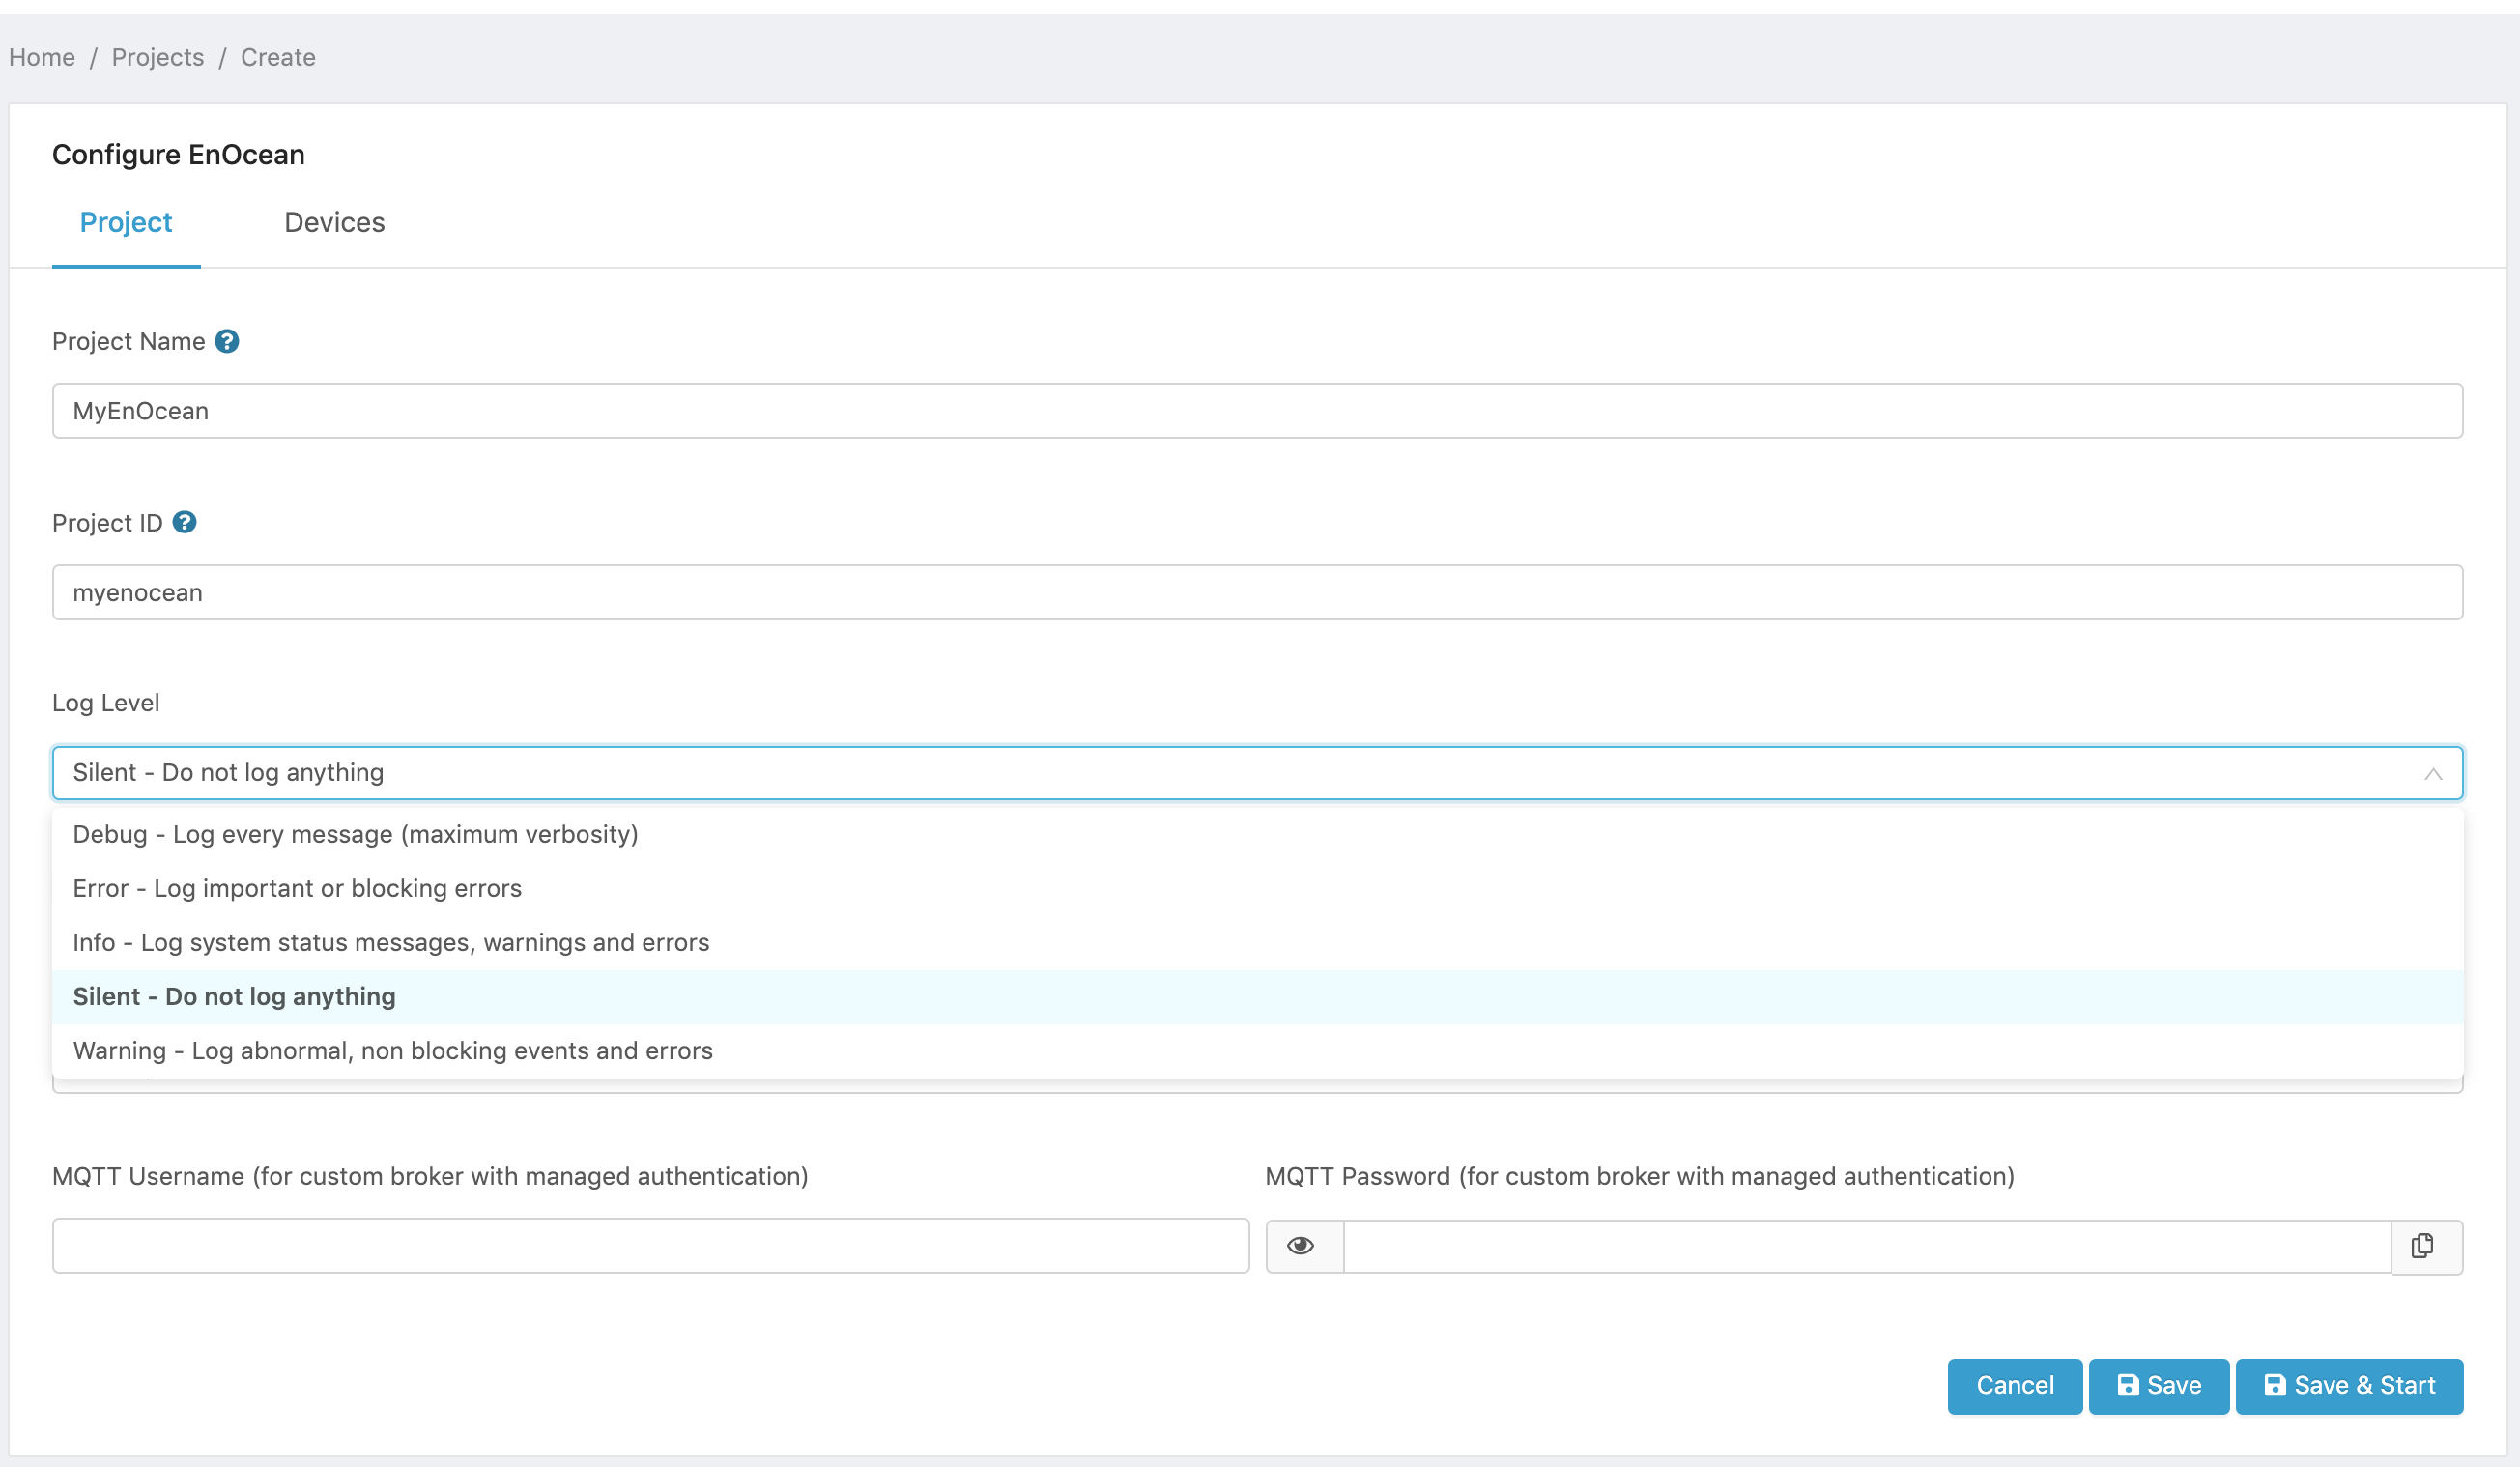
Figure 1. Datastore Project log level.
- Select whether or not the project will be started automatically when the Datastore container is started. To start the project manually using the web interface, set the Manual mode switch to ON.
- If an external, custom MQTT broker will be used for the project, and the broker has been configured in the Settings->Server->MQTT Broker page, enter the User Name and Password authentication credentials for the target broker.
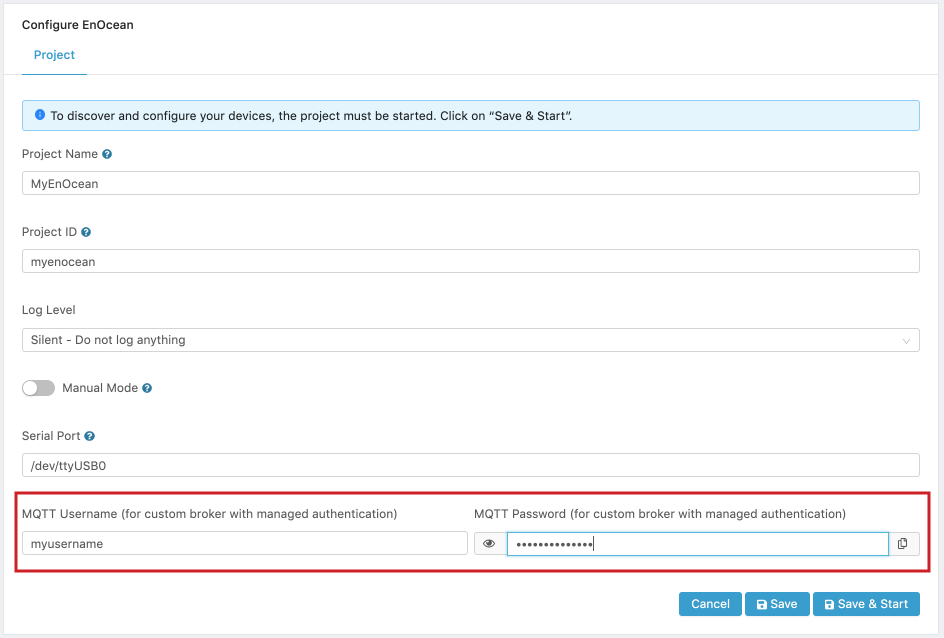
Figure 2. Custom MQTT Broker Credentials.
- Next there are four options for the project:
- Next which allows you to continue the project configuration.
- Cancel which cancels the configuration of the project and returns to the Projects page.
- Save which saves the current configuration and allows you to return later to complete the configuration and pairing of devices.
- Save and Start which saves and start the Datastore project. This option should only be used once the project has been fully configured.
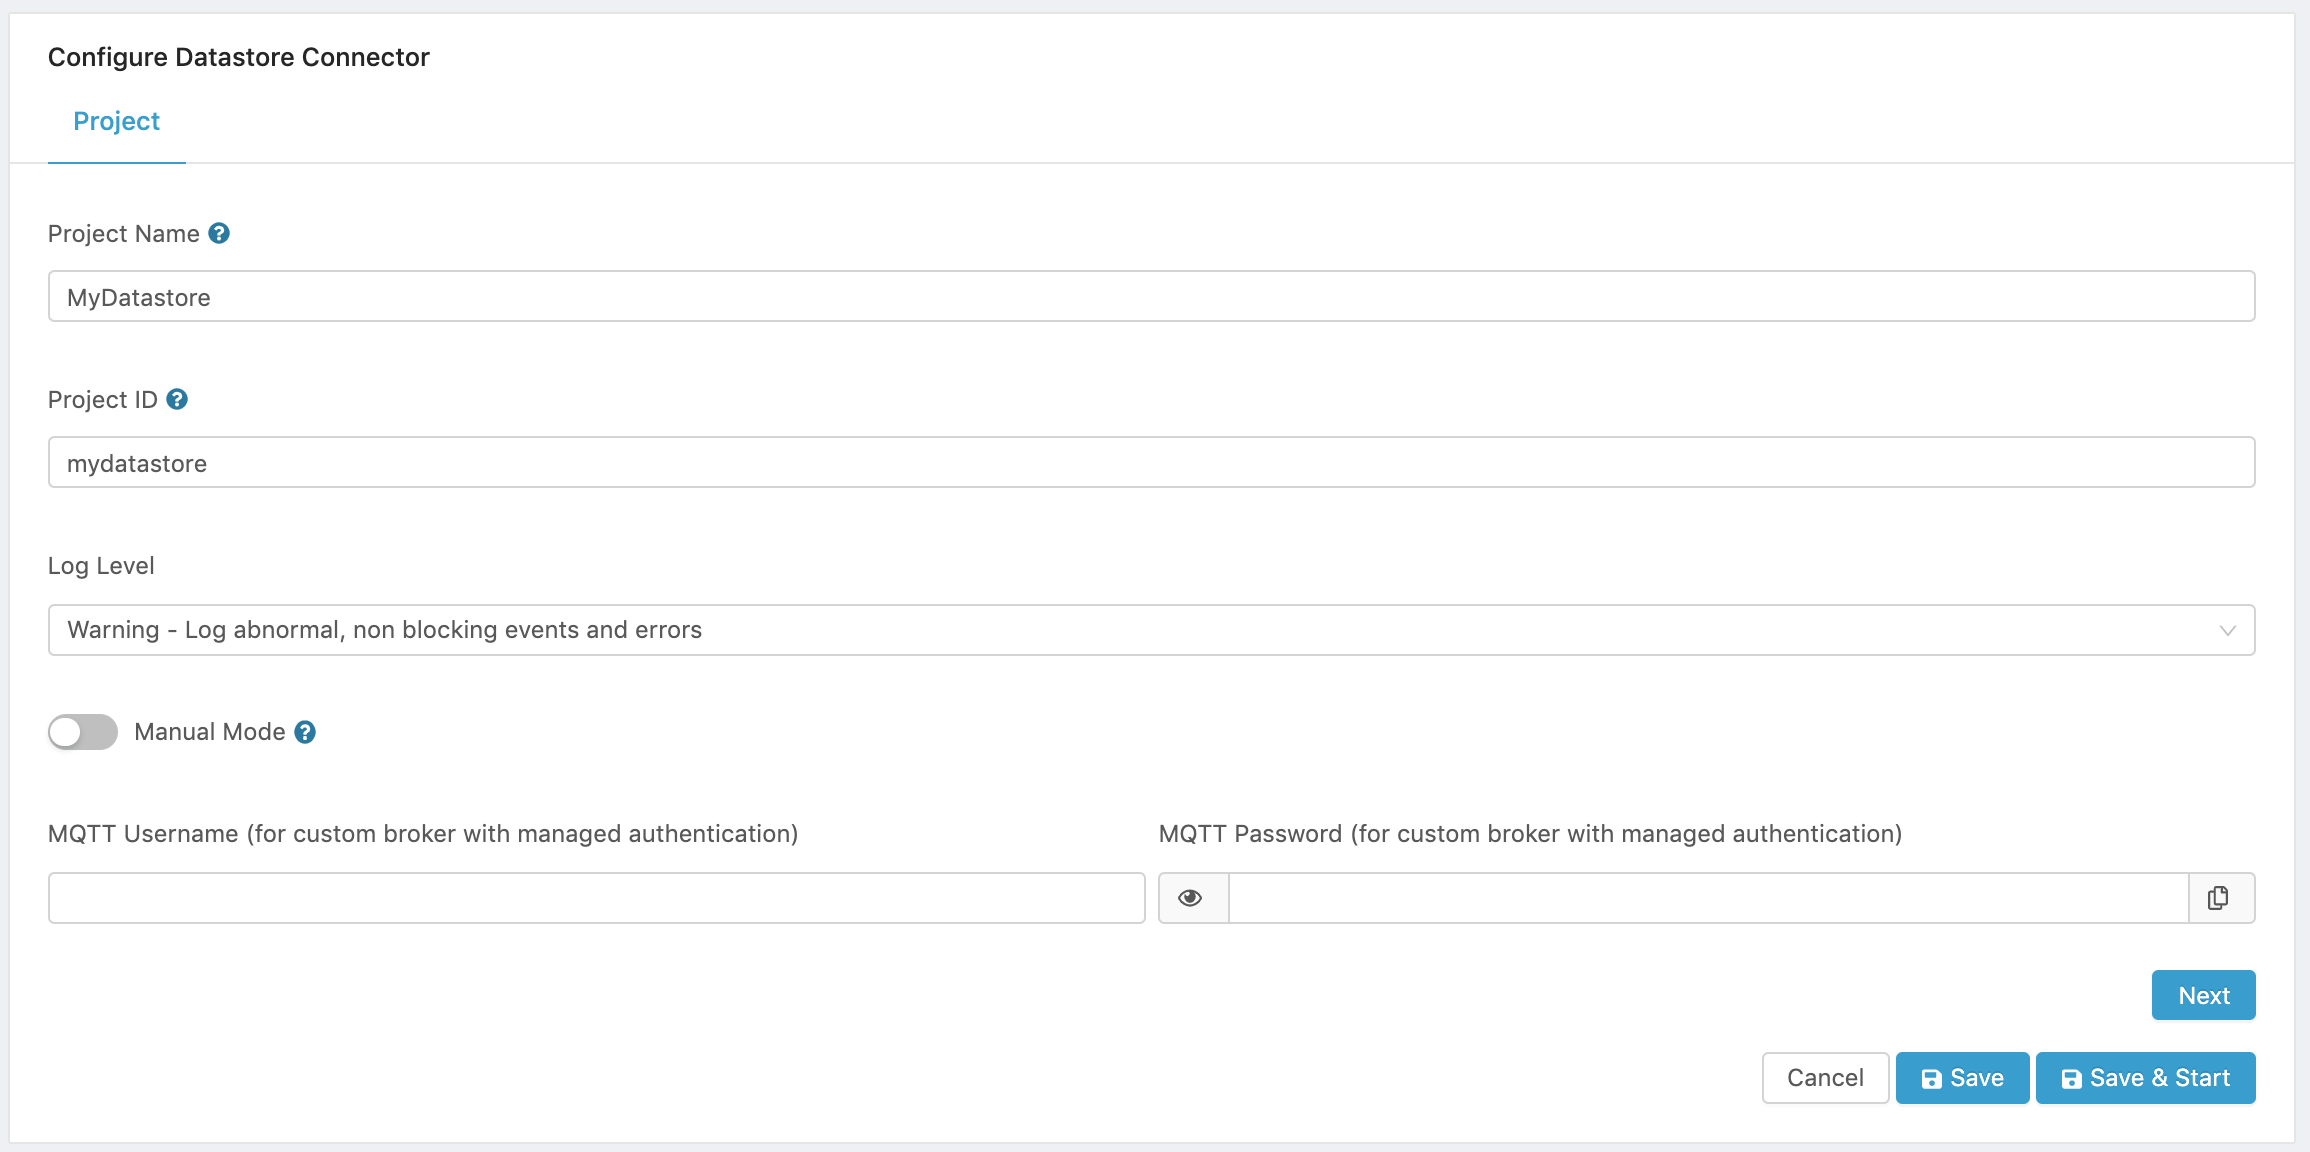
Figure 3. Datastore Project configuration.
Configuring the Database
To configure the target datastore:
- Click on Next in the Project configuration page.
- Select the Database from the Database type dropdown menu and configure the database specific parameters as described below.
Cassandra Configuration
Edge One™ Datastore enables connections to a Cassandra database. Cassandra was created at Facebook and is a distributed database from Apache that is highly scalable and designed to manage very large amounts of structured data. It provides high availability with no single point of failure. It is a type of NoSQL database. Here are some of the notable points of Cassandra:
-
It is scalable, fault-tolerant, and consistent.
-
It is a column-oriented database.
-
Elastic scalability − Cassandra is highly scalable; it allows to add more hardware to accommodate more customers and more data as per requirement.
-
Always on architecture − Cassandra has no single point of failure and it is continuously available for business-critical applications that cannot afford a failure.
-
Fast linear-scale performance − Cassandra is linearly scalable, i.e., it increases your throughput as you increase the number of nodes in the cluster. Therefore it maintains a quick response time.
-
Flexible data storage − Cassandra accommodates all possible data formats including: structured, semi-structured, and unstructured. It can dynamically accommodate changes to your data structures according to your need.
-
Easy data distribution − Cassandra provides the flexibility to distribute data where you need by replicating data across multiple data centers.
-
Transaction support − Cassandra supports properties like Atomicity, Consistency, Isolation, and Durability (ACID).
-
Fast writes − Cassandra was designed to run on cheap commodity hardware. It performs blazingly fast writes and can store hundreds of terabytes of data, without sacrificing the read efficiency.
To store data in a Cassandra database, follow these steps:
- Configure the database parameters:
- Contact Points. Enter one or more Cassandra node hostnames or IP addresses separated by commas that the connector will use to connect to.
- Local Data Center. Enter the Cassandra Datacenter to use. A Cassandra Datacenter is a group of nodes, related and configured within a cluster for replication purposes. We connect only to hosts in this data center with the query plans.
- Keyspace. Enter the Keyspace for all the connections in the project. A keyspace in Cassandra is a namespace that defines data replication on nodes. A cluster contains one keyspace per node.
- Connection security. Turn on the Use a secure connection switch to enable TLS/SSL connection to the database.
- Self-Signed certificates. Turn on the Accept self-signed certificates switch if the database accepts self-signed certificates.
- Username is the username used to access the database.
- Password. is the password used to authenticate the access to the database.
- Scheduler Interval. Determines how often the connector will store data in the database. If Edge One™ reads data from a project every X ms, this setting should be equal or greater to X. The default is 500 milliseconds.
- Configure the primary keys that will be used for all the project’s tables.
In Cassandra, each table requires a unique primary key. The first field listed is the partition key, since its hashed value is used to determine the node to store data. Any fields listed after the primary key are called clustering columns or clustering keys. These store data in ascending or descending order within the partition for the fast retrieval of similar values. Each primary key column after the partition key is considered a clustering key. All the fields together are the primary key.
You must, therefore, configure how you want the project data configured in your Cassandra tables.
Table column Description Use as Sort Order Position ts Timestamp of the data Select Don’t use / Partition Key / Clustering Key Ascending / Descending A number that defines the position of the timestamp pid Edge One Project ID Select Don’t use / Partition Key / Clustering Key groupid Edge One Group ID Select Don’t use / Partition Key / Clustering Key qos Quality of Service for the connection to the Edge One MQTT broker Select Don’t use / Partition Key / Clustering Key datakey key for the data JSON Select Don’t use / Partition Key / Clustering Key datavalue value for the data JSON Select Don’t use / Partition Key / Clustering Key
Here is a sample configuration
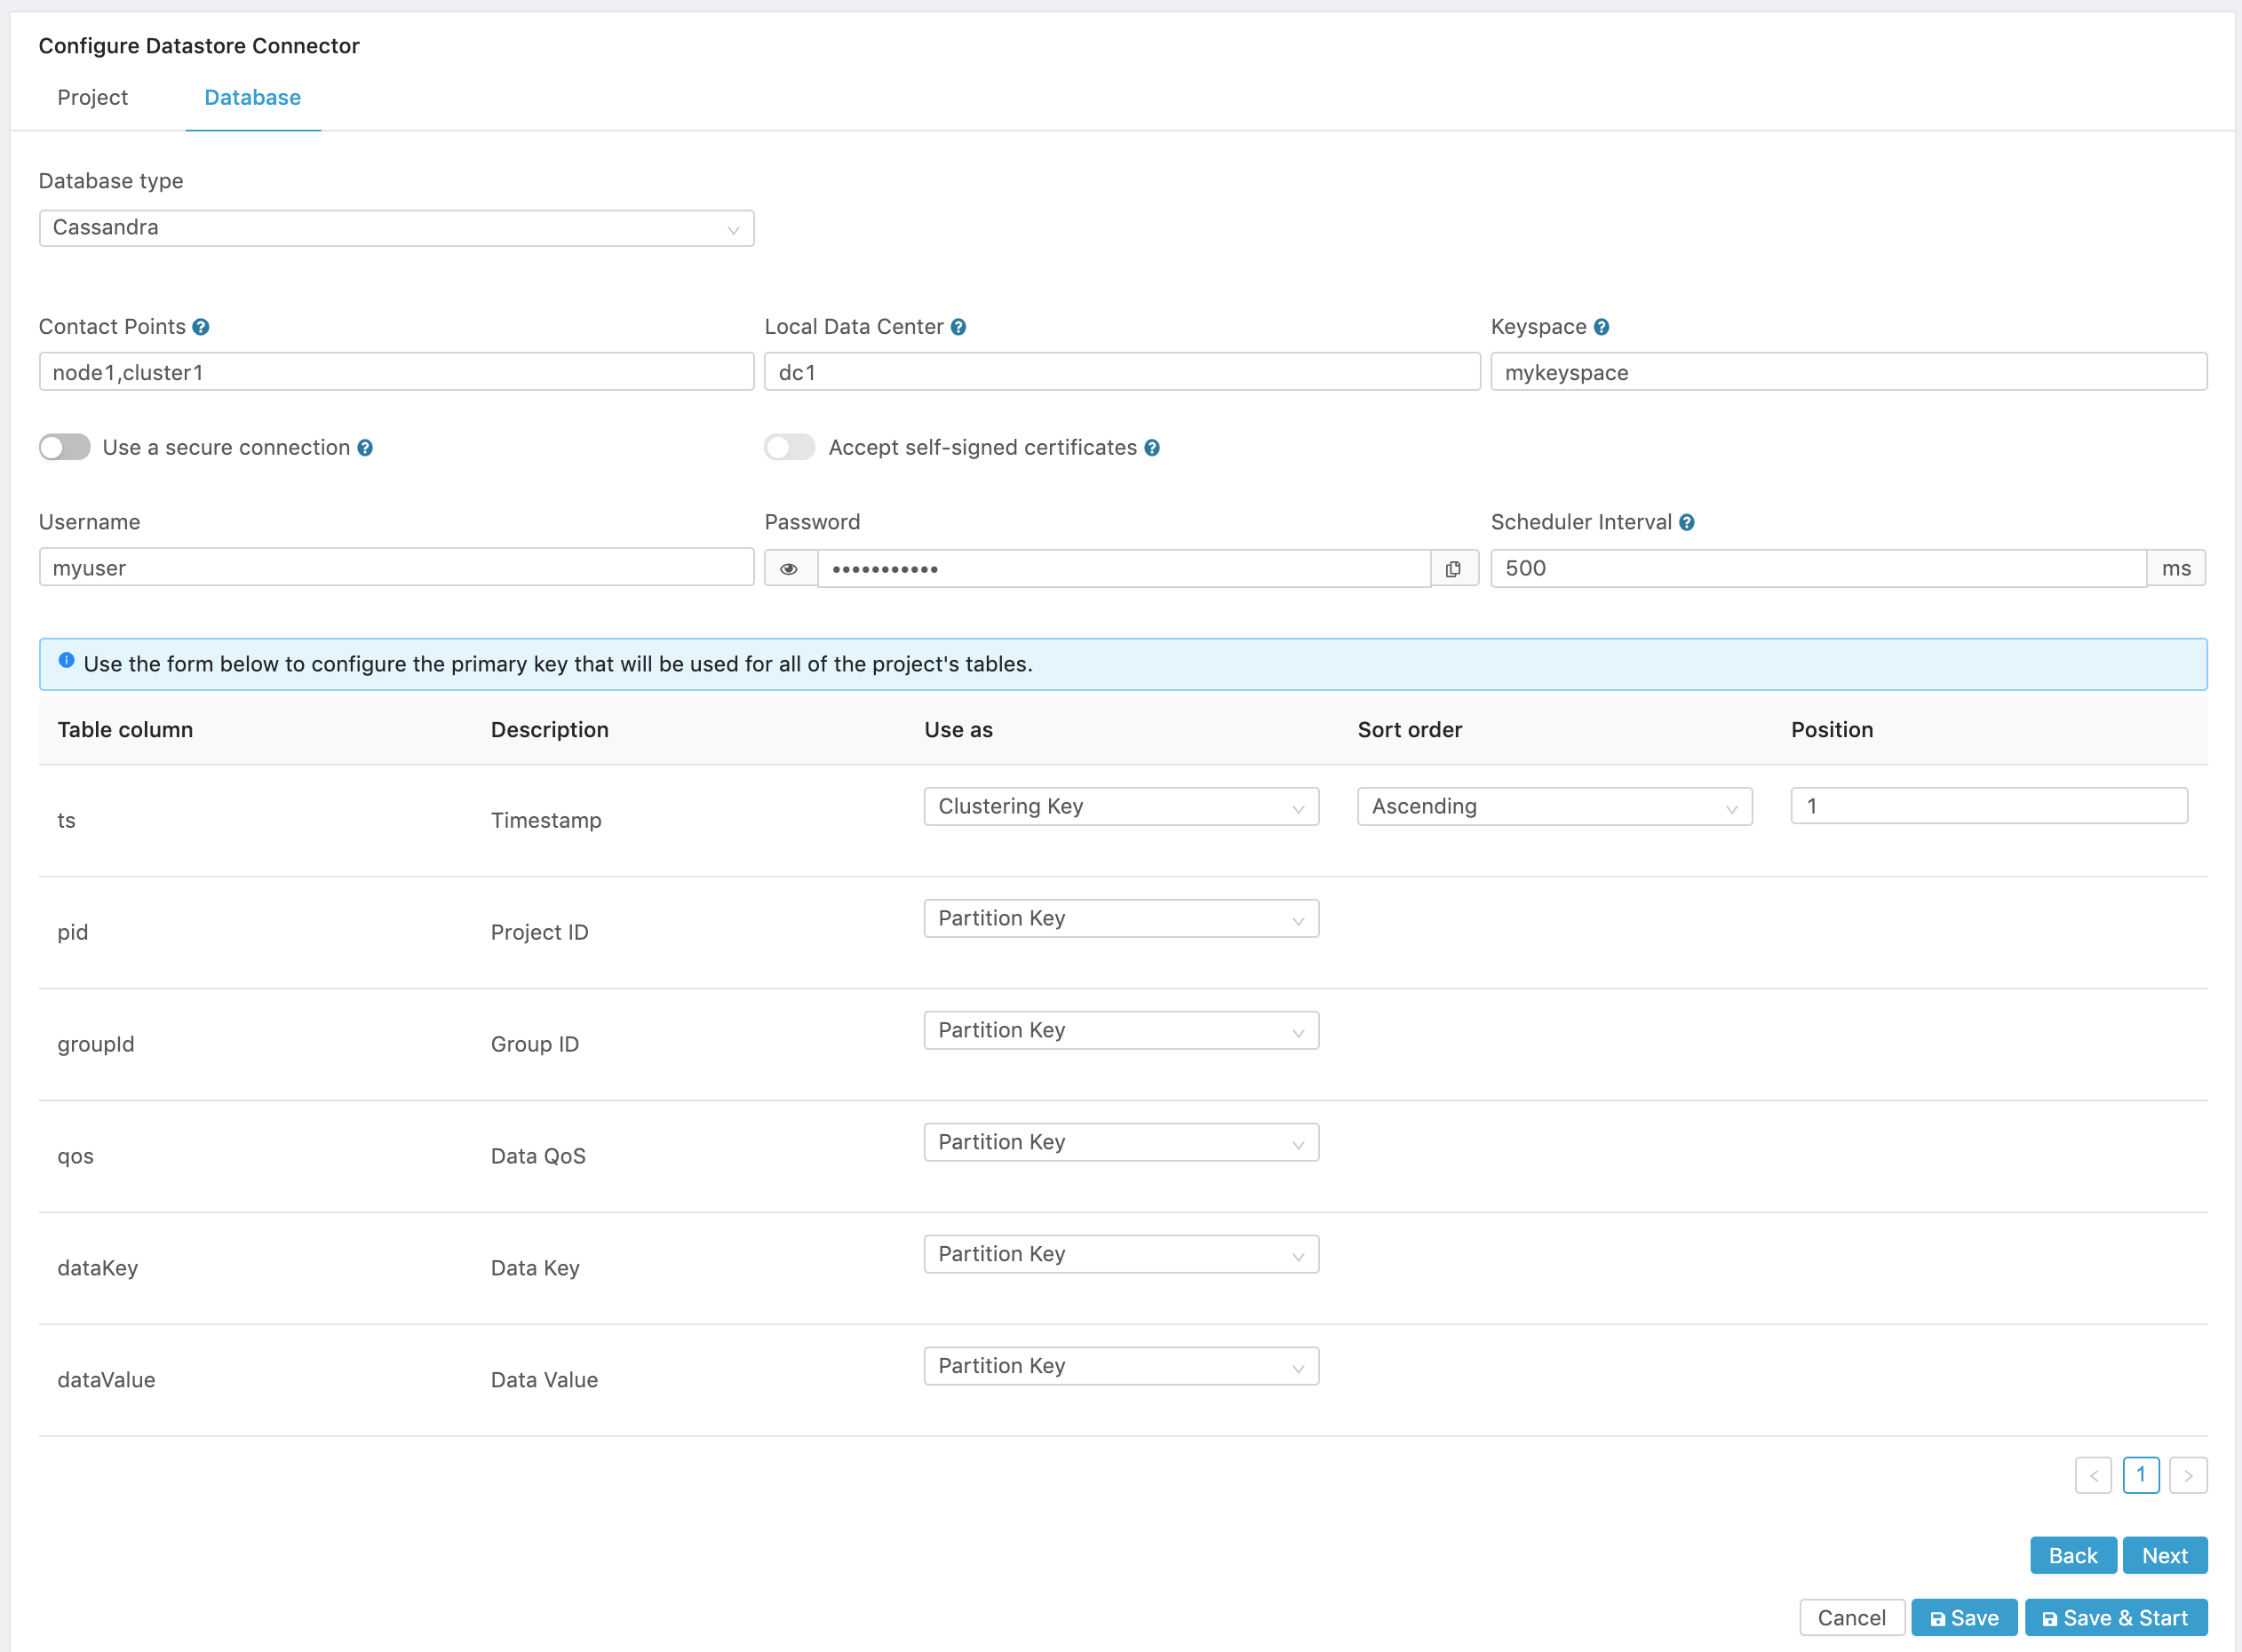
Figure 4. Cassandra Configuration.
- Click on Next to select a data source that will be used to feed the database.
InfluxDB Configuration
The Datastore connector also allows the storage of project data into an InfluxDB database. Here are some of the characteristics of InfluxDB.
-
High Performance. InfluxDB is a high-performance data store written specifically for time series data. It allows for high throughput ingest, compression and real-time querying. InfluxDB is written entirely in Go and compiles into a single binary with no external dependencies. It provides write and query capabilities with a command-line interface, a built-in HTTP API, a set of client libraries (e.g., Go, Java, and JavaScript) and plugins for common data formats such as Telegraf, Graphite, Collectd and OpenTSDB.
-
SQL-like queries. InfluxDB works with InfluxQL, a SQL-like query language for interacting with data. It has been lovingly crafted to feel familiar to those coming from other SQL or SQL-like environments while also providing features specific to storing and analyzing time series data. InfluxQL supports regular expressions, arithmetic expressions, and time series-specific functions to speed up data processing.
-
Downsampling and data retention. InfluxDB can handle millions of data points per second. Working with that much data over a long period can lead to storage concerns. InfluxDB automatically compacts data to minimize your storage space. In addition, you can easily downsample the data; keeping high-precision raw data for a limited time and storing the lower-precision, summarized data for much longer or until the end of time. InfluxDB has two features that help to automate the downsampling and data expiration processes — Continuous Queries and Retention Policies.
To store data in an InfluxDB database, follow these steps:
- Configure the database parameters:
- Host name. The InfluxDB host name. If you want to run InfluxDB locally as a container in Edge One, configure it first under Settings->Server->Datastore.
- Port. The TCP port used for the connection to the database.
- Connection security. Turn on the Use a secure connection switch to enable TLS/SSL connection to the database.
- Username is the username used to access the database.
- Password. is the password used to authenticate the access to the database.
- Database Name. is the name of the database that the connector will connect to.
- Reconnection Attempts. Determines the number of attempts at reconnecting to the database when a connection is lost. During the loss of connection, data is buffered in the connector and stored in the database once the connection is re-established.
- Reconnect wait time. Determines the interval to wait before an attempt is made to re-connect to the database if the connection is lost.
- Scheduler Interval. Determines how often the connector will store data in the database. If Edge One™ reads data from a project every X ms, this setting should be equal or greater to X. The default is 500 milliseconds.
- Configure a custom retention policy. Setting this switch to ON allows to set a custom policy for data retention.
- Retention policy. This parameter is enabled if the Configure a custom retention policy switch is ON. It determines the time interval after which data will be automatically deleted from the database. It must be a number followed by and identifier with w:weeks, d:days, h:hours. Examples of retention policies are 8w, 52w,50d,8h. Leave it empty to retain data indefinitely.
- Replication. Determines the number of independent copies of each data point that will be stored in an InfluxDB cluster.
Here is a sample configuration
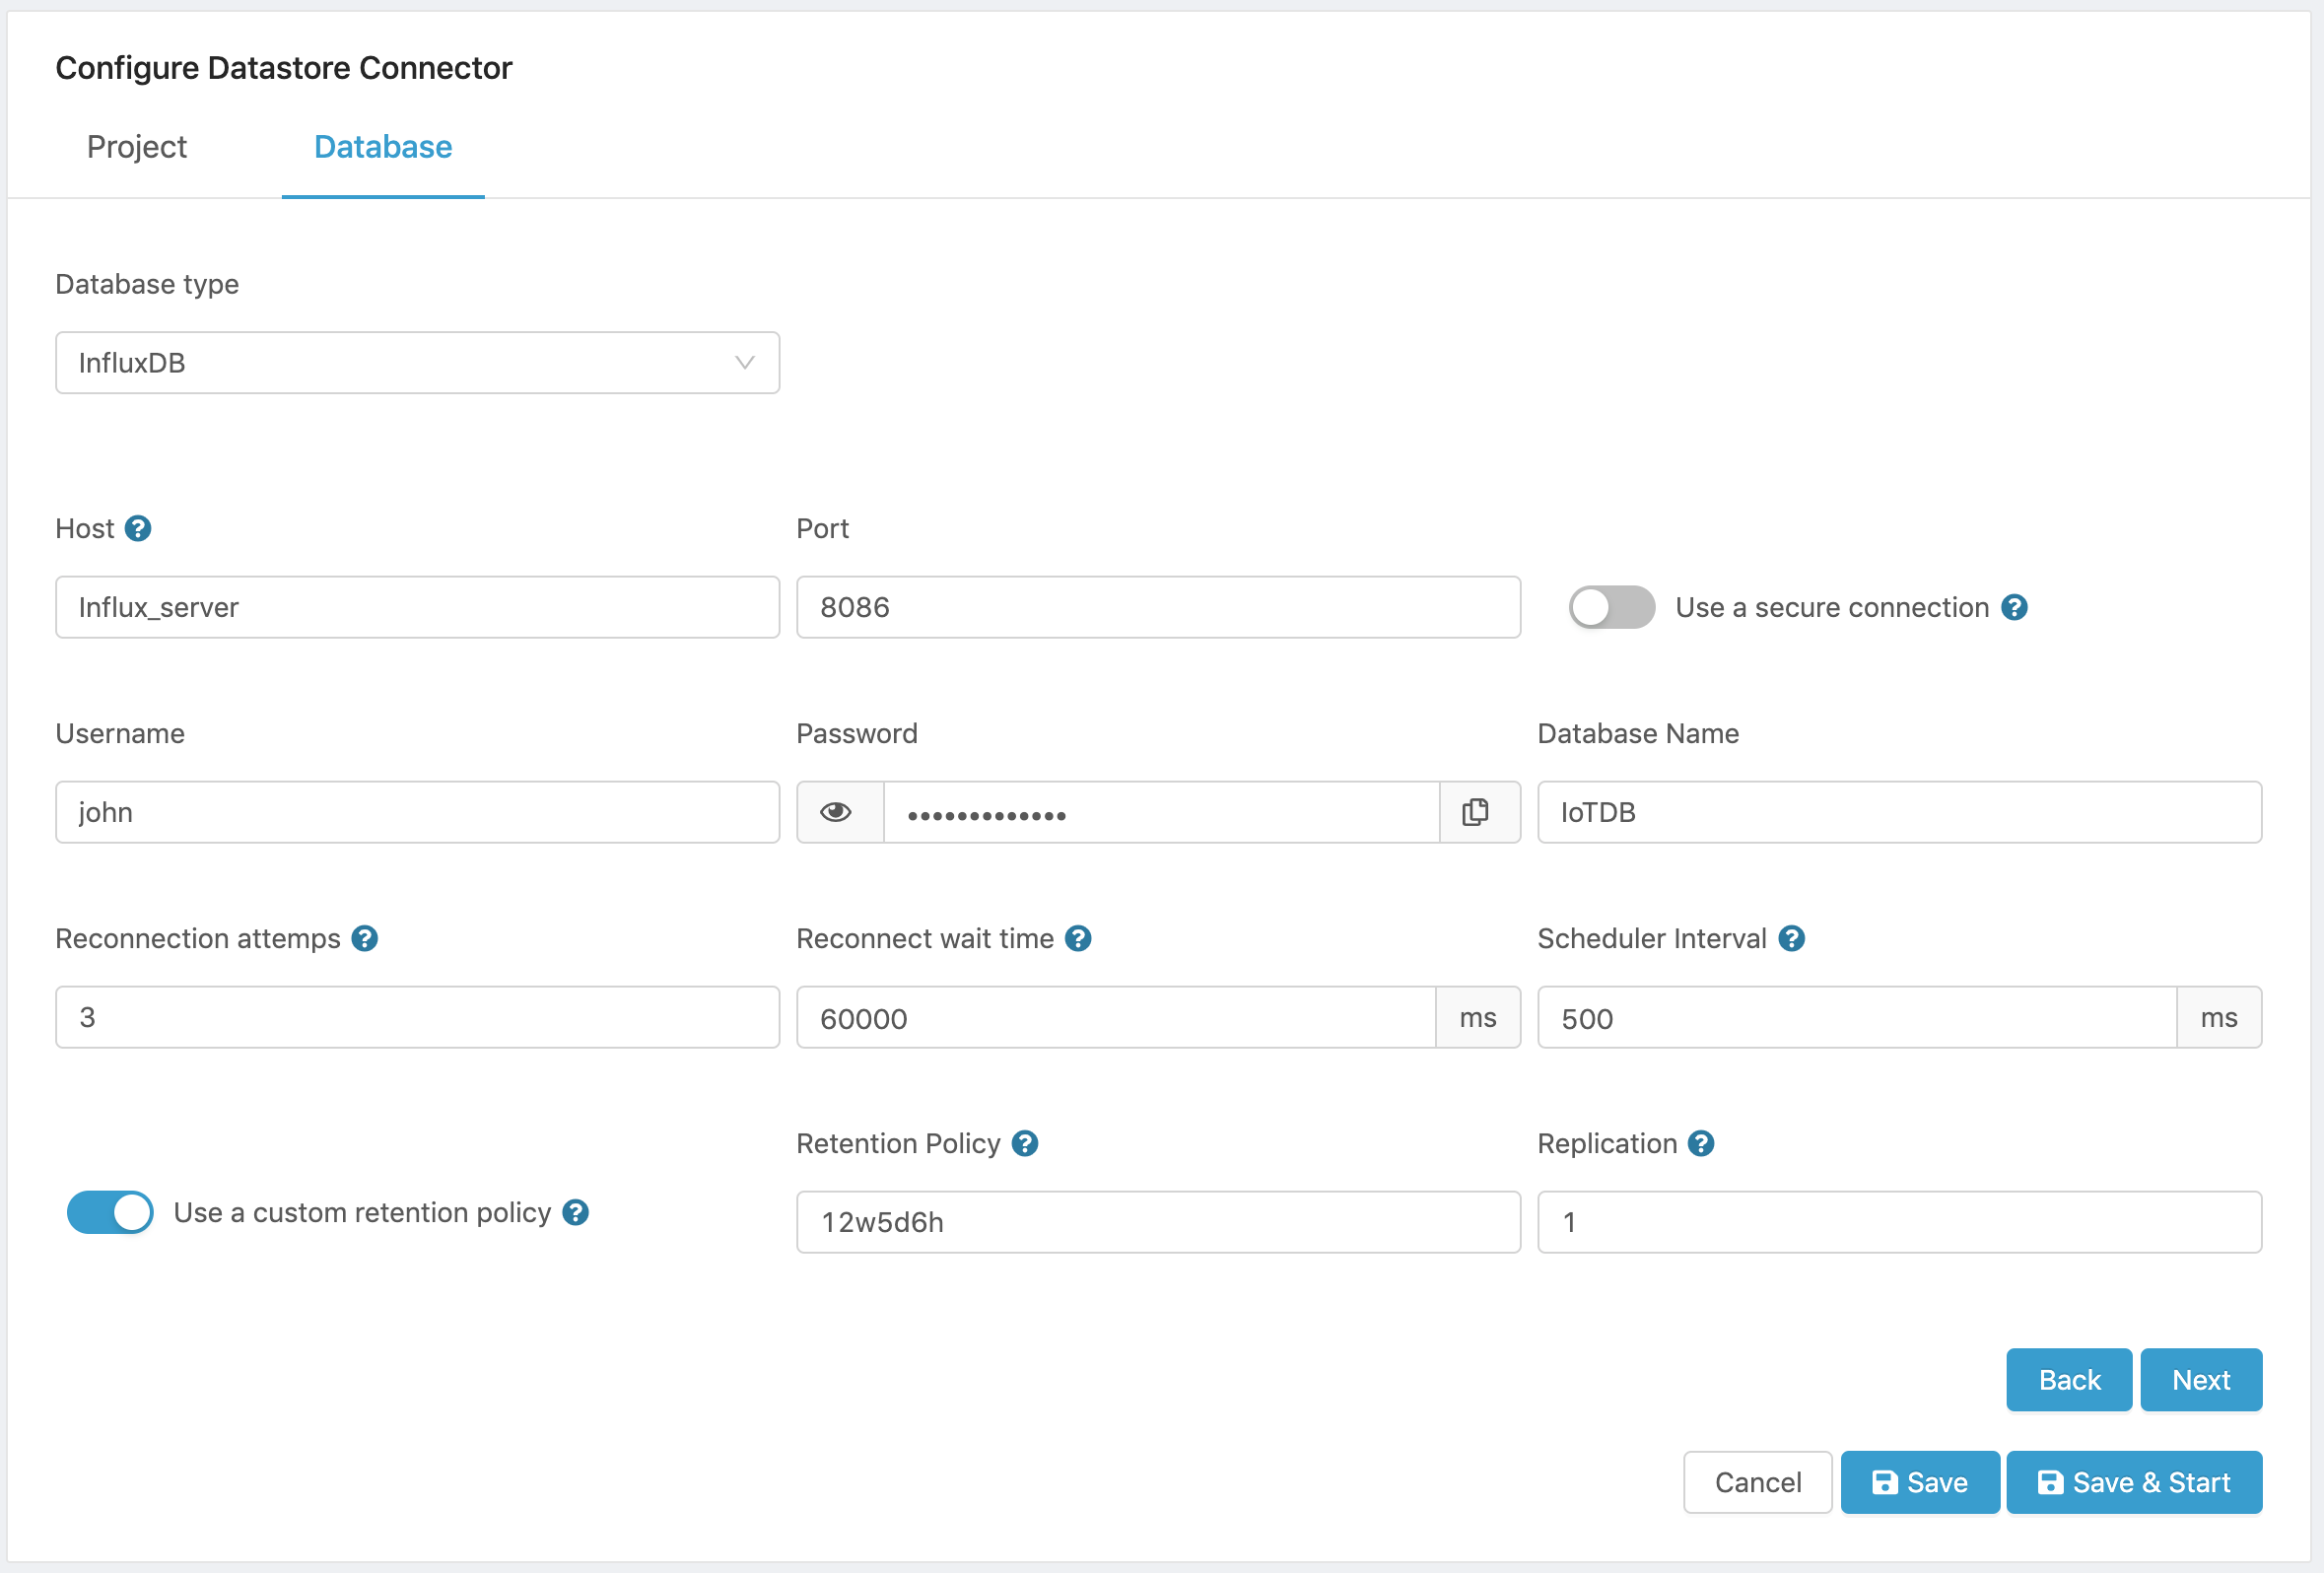
Figure 5. InfluxDB Configuration.
- Click on Next to select a data source that will be used to feed the database.
MongoDB Configuration
The Datastore connector also allows the storage of project data into a MongoDB database. MongoDB is a general purpose, document-based, distributed database built for modern application developers and for the cloud era.
Here are some of the characteristics of MongoDB.
- Rich JSON Documents
- The most natural and productive way to work with data.
- Supports arrays and nested objects as values.
- Allows for flexible and dynamic schemas.
- Powerful query language
- Rich and expressive query language that allows you to filter and sort by any field, no matter how nested it may be within a document.
- Support for aggregations and other modern use-cases such as geo-based search, graph search, and text search.
- Queries are themselves JSON, and thus easily composable. No more concatenating strings to dynamically generate SQL queries.
- All the power of a relational database, and more…
- Full ACID transactions.
- Support for joins in queries.
- Two types of relationships instead of one: reference and embedded.
To store data in a MongoDB database, follow these steps:
- Configure the database parameters:
- Host name. The MongoDB host name.
- Port. The TCP port used for the connection to the database.
- Connection security. Turn on the Use a secure connection switch to enable TLS/SSL connection to the database.
- Self-Signed certificates. Turn on the Accept self-signed certificates switch if the database accepts self-signed certificates.
- Username is the username used to access the database.
- Password. is the password used to authenticate the access to the database.
- Database Name. is the name of the database that the connector will connect to.
- Reconnection Attempts. Determines the number of attempts at reconnecting to the database when a connection is lost. During the loss of connection, data is buffered in the connector and stored in the database once the connection is re-established.
- Reconnect wait time. Determines the interval to wait before an attempt is made to re-connect to the database if the connection is lost.
- Scheduler Interval. Determines how often the connector will store data in the database. If Edge One™ reads data from a project every X ms, this setting should be equal or greater to X. The default is 500 milliseconds.
Here is a sample configuration

Figure 6. MongoDB Configuration.
- Click on Next to select a data source that will be used to feed the database.
MySQL Configuration
The Datastore connector also allows the storage of project data into a MySQL database. MySQL is a popular open source database that enables high performance scalable database applications.
Here are some of the characteristics of MySQL Standard Edition.
MySQL Standard Edition enables you to deliver high-performance and scalable Online Transaction Processing (OLTP) applications. It provides the ease of use that has made MySQL famous along with industrial strength performance and reliability.
MySQL Standard Edition includes InnoDB, making it a fully integrated transaction-safe, ACID compliant database. In addition, MySQL Replication allows you to deliver high performance and scalable applications.
- Lower TCO - MySQL enables you to minimize your database TCO.
- Reliability, Performance & Ease of Use - MySQL is proven as the world’s most popular open source database.
- Database Development, Design and Administration - MySQL Workbench provides an integrated development, design and administration environment to make developers and DBAs more productive.
When you need additional capabilities it is easy to upgrade to MySQL Enterprise Edition or MySQL Cluster Carrier Grade Edition.
To store data in a MySQL database, follow these steps:
- Configure the database parameters:
- Host name. The MySQL host name or IP address.
- Port. The TCP port used for the connection to the database.
- Connection security. Turn on the Use a secure connection switch to enable TLS/SSL connection to the database.
- Self-Signed certificates. Turn on the Accept self-signed certificates switch if the database accepts self-signed certificates.
- Username is the username used to access the database.
- Password. is the password used to authenticate the access to the database.
- Database Name. is the name of the database that the connector will connect to.
- Reconnection Attempts. Determines the number of attempts at reconnecting to the database when a connection is lost. During the loss of connection, data is buffered in the connector and stored in the database once the connection is re-established.
- Reconnect wait time. Determines the interval to wait before an attempt is made to re-connect to the database if the connection is lost.
- Scheduler Interval. Determines how often the connector will store data in the database. If Edge One™ reads data from a project every X ms, this setting should be equal or greater to X. The default is 500 milliseconds.
Here is a sample configuration
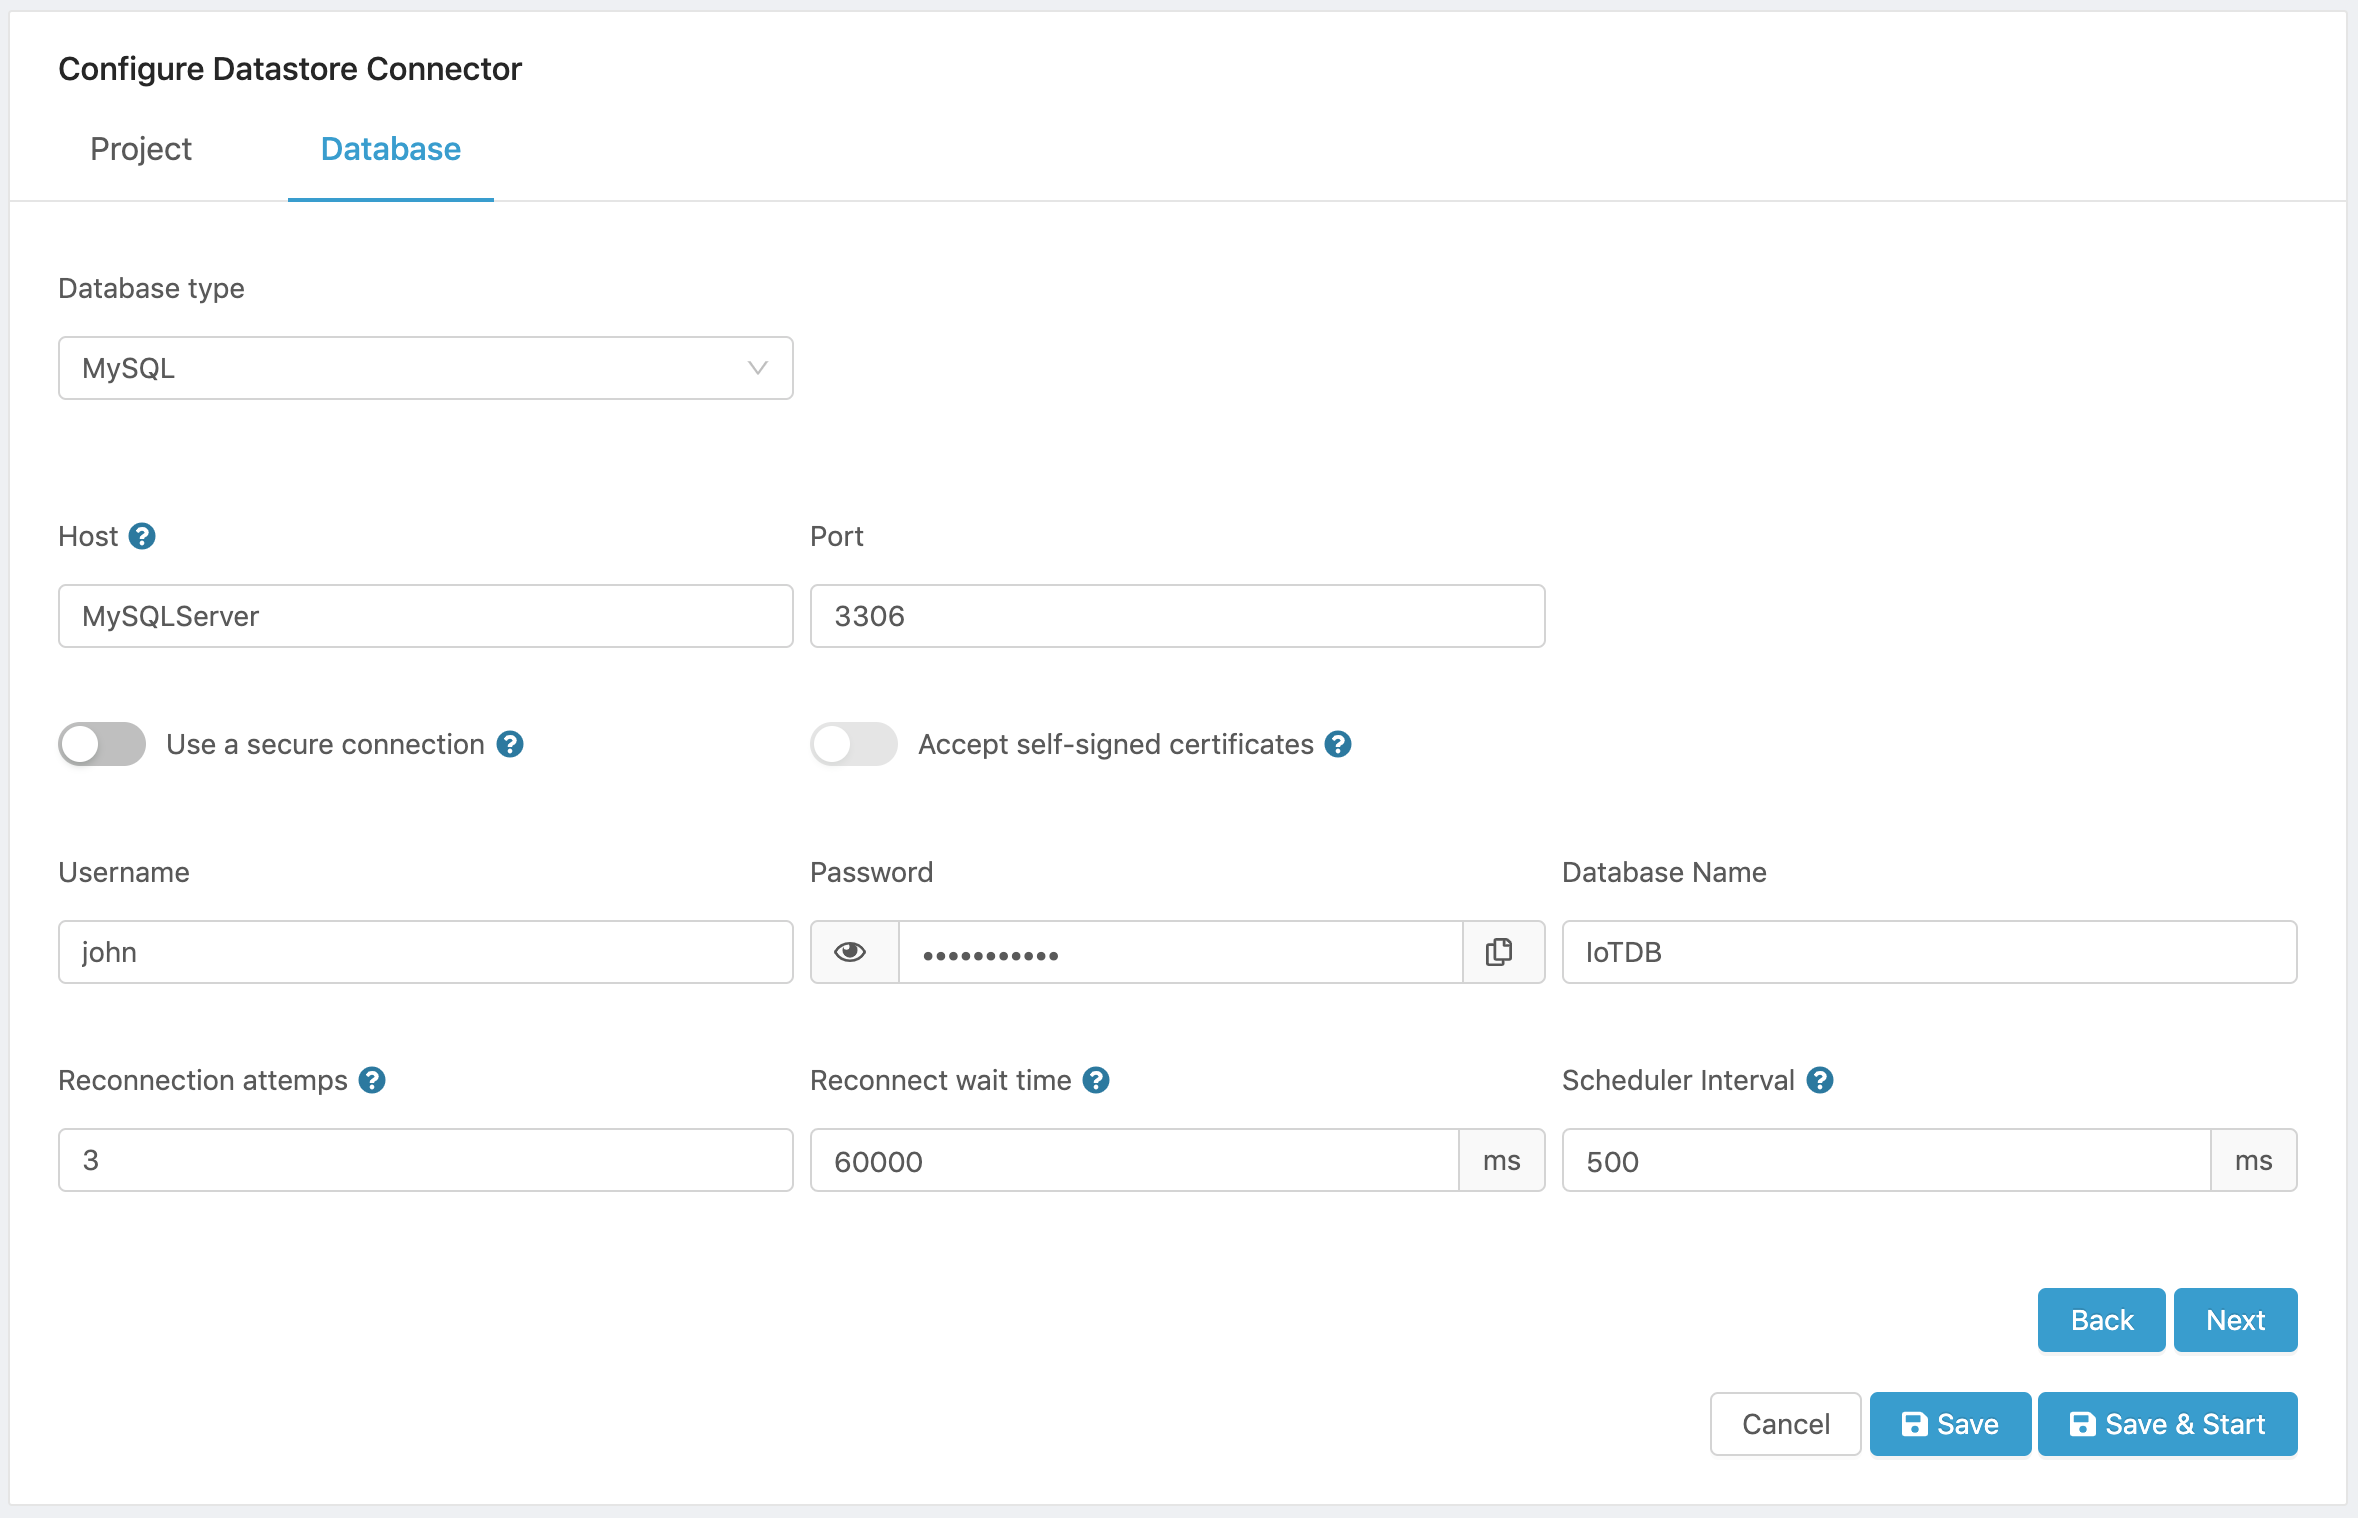
Figure 7. MySQL Configuration.
- Click on Next to select a data source that will be used to feed the database.
Oracle Configuration
The Datastore connector also allows the storage of project data into an Oracle database.
Oracle Database is the first database designed for enterprise grid computing, the most flexible and cost effective way to manage information and applications. Enterprise grid computing creates large pools of industry-standard, modular storage and servers. With this architecture, each new system can be rapidly provisioned from the pool of components. There is no need for peak workloads, because capacity can be easily added or reallocated from the resource pools as needed.
The database has logical structures and physical structures. Because the physical and logical structures are separate, the physical storage of data can be managed without affecting the access to logical storage structures. Here are some of the characteristics of MySQL Standard Edition.
To store data in an Oracle database, follow these steps:
- Configure the database parameters:
- Username is the username used to access the database.
- Password. is the password used to authenticate the access to the database.
- Connection String. is the connection string for the database that the connector will connect to.
- Reconnection Attempts. Determines the number of attempts at reconnecting to the database when a connection is lost. During the loss of connection, data is buffered in the connector and stored in the database once the connection is re-established.
- Reconnect wait time. Determines the interval to wait before an attempt is made to re-connect to the database if the connection is lost.
- Scheduler Interval. Determines how often the connector will store data in the database. If Edge One™ reads data from a project every X ms, this setting should be equal or greater to X. The default is 500 milliseconds.
Here is a sample configuration
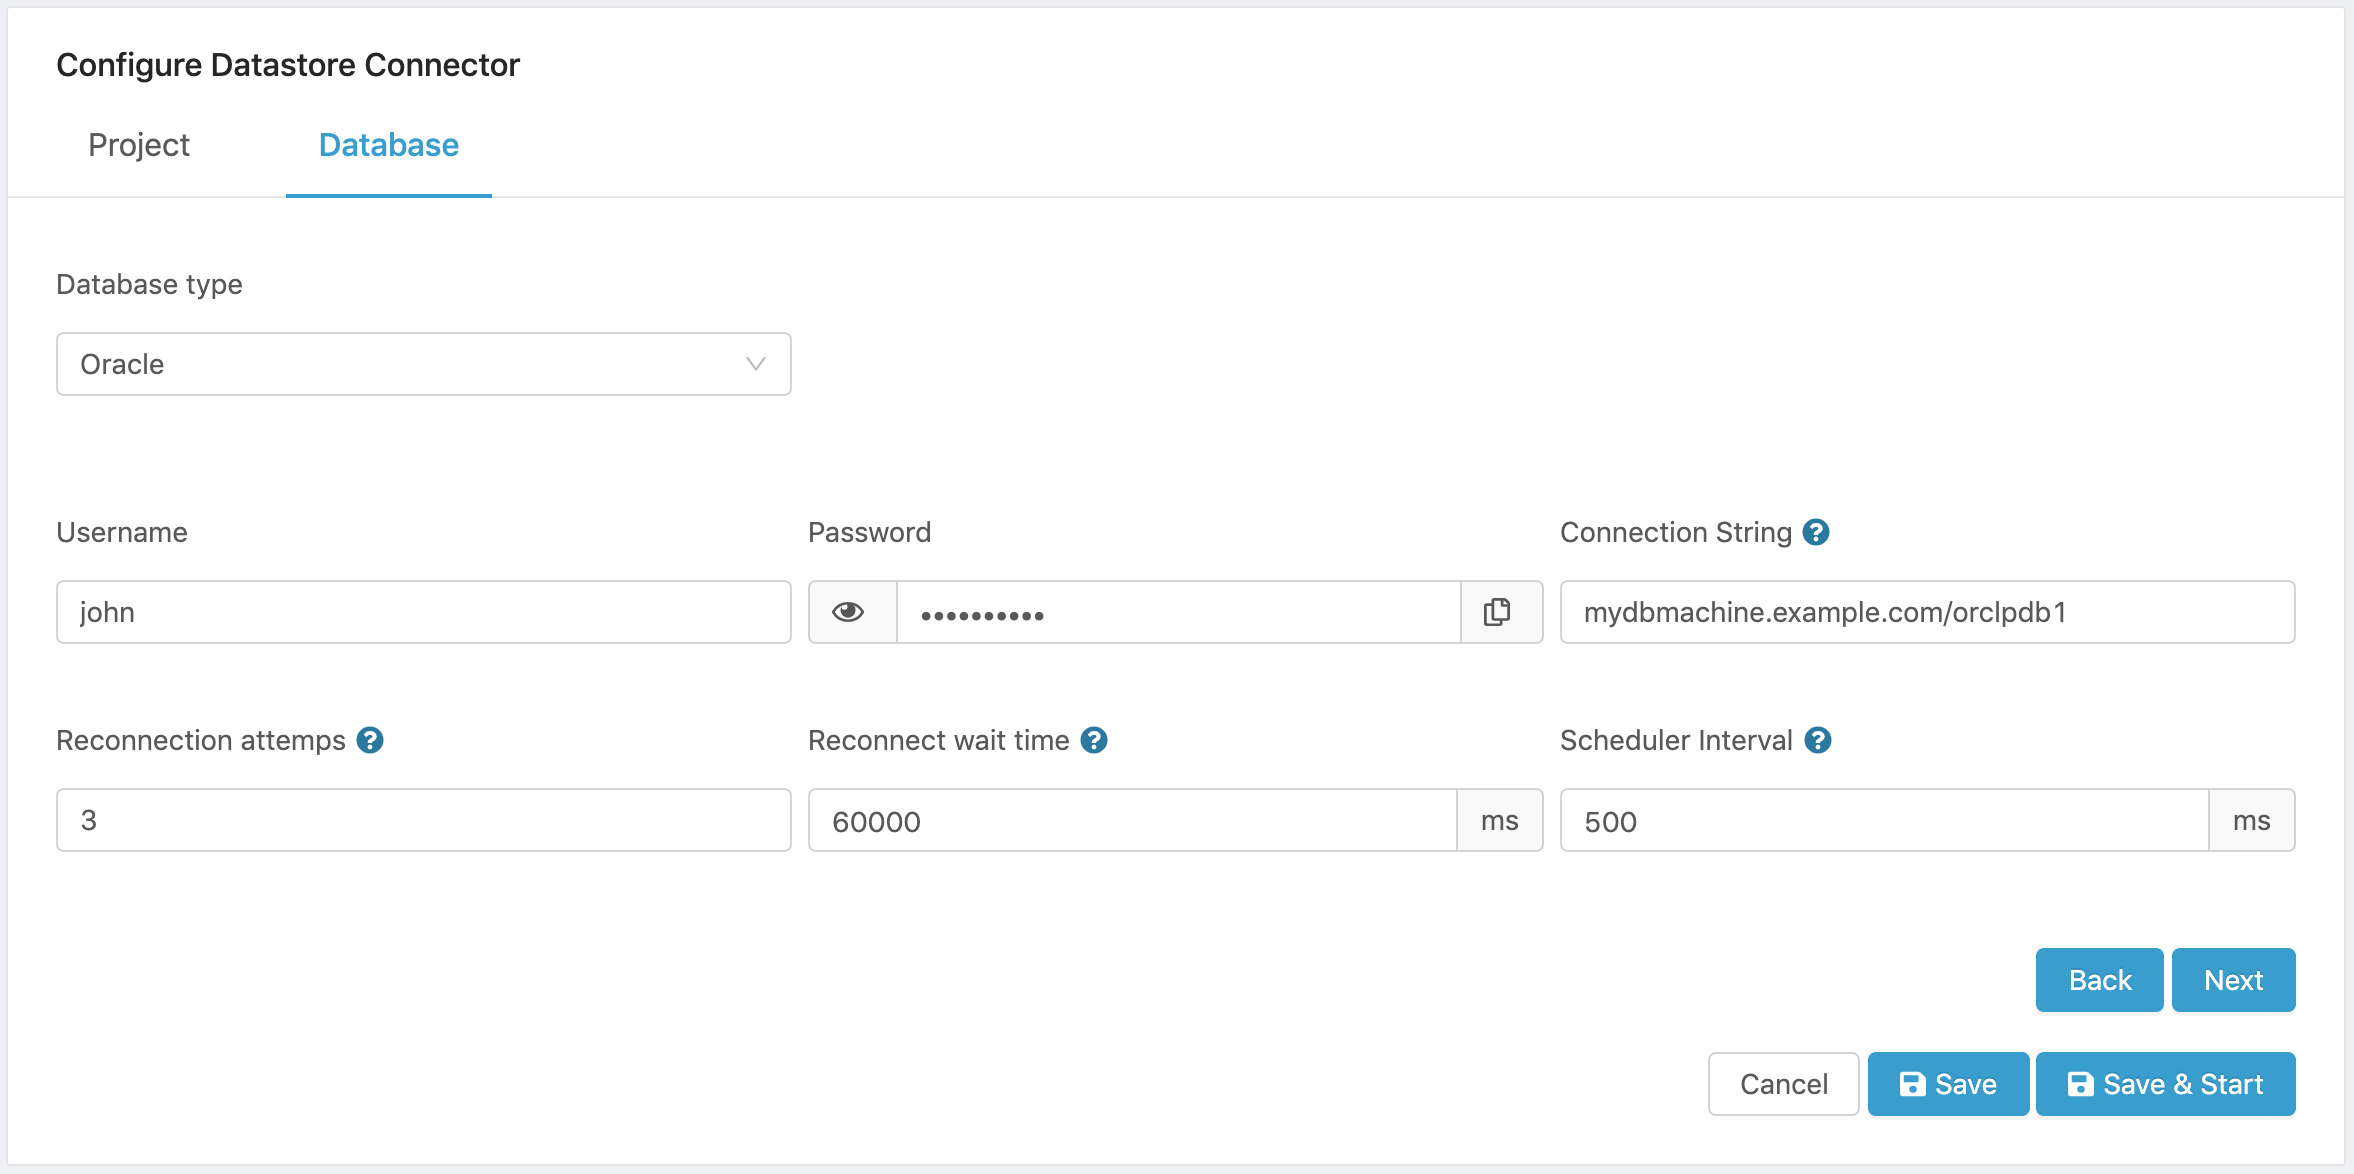
Figure 8. Oracle Configuration.
- Click on Next to select a data source that will be used to feed the database.
PostgreSQL Configuration
The Datastore connector also allows the storage of project data into an PostgreSQL database.
PostgreSQL is a powerful, open source object-relational database system with over 30 years of active development that has earned it a strong reputation for reliability, feature robustness, and performance.
Here are some of the most important features of PostgreSQL.
- Data Types
- Primitives: Integer, Numeric, String, Boolean
- Structured: Date/Time, Array, Range, UUID
- Document: JSON/JSONB, XML, Key-value (Hstore)
- Geometry: Point, Line, Circle, Polygon
- Customizations: Composite, Custom Types
- Data Integrity
- UNIQUE, NOT NULL
- Primary Keys
- Foreign Keys
- Exclusion Constraints
- Explicit Locks, Advisory Locks
- Concurrency, Performance
- Indexing: B-tree, Multicolumn, Expressions, Partial
- Advanced Indexing: GiST, SP-Gist, KNN Gist, GIN, BRIN, Covering indexes, Bloom filters
- Sophisticated query planner / optimizer, index-only scans, multicolumn statistics
- Transactions, Nested Transactions (via savepoints)
- Multi-Version concurrency Control (MVCC)
- Parallelization of read queries and building B-tree indexes
- Table partitioning
- All transaction isolation levels defined in the SQL standard, including Serializable
- Just-in-time (JIT) compilation of expressions
- Reliability, Disaster Recovery
- Write-ahead Logging (WAL)
- Replication: Asynchronous, Synchronous, Logical
- Point-in-time-recovery (PITR), active standbys
- Tablespaces
- Security
- Authentication: GSSAPI, SSPI, LDAP, SCRAM-SHA-256, Certificate, and more
- Robust access-control system
- Column and row-level security
- Multi-factor authentication with certificates and an additional method
- Extensibility
- Stored functions and procedures
- Procedural Languages: PL/PGSQL, Perl, Python (and many more)
- SQL/JSON path expressions
- Foreign data wrappers: connect to other databases or streams with a standard SQL interface
- Customizable storage interface for tables
- Many extensions that provide additional functionality, including PostGIS
- Internationalization, Text Search
- Support for international character sets, e.g. through ICU collations
- Case-insensitive and accent-insensitive collations
- Full-text search
To store data in an PostgreSQL database, follow these steps:
- Configure the database parameters:
- Host name. The PostgreSQL host name or IP address.
- Port. The TCP port used for the connection to the database.
- Connection security. Turn on the Use a secure connection switch to enable TLS/SSL connection to the database.
- Self-Signed certificates. Turn on the Accept self-signed certificates switch if the database accepts self-signed certificates.
- Username is the username used to access the database.
- Password. is the password used to authenticate the access to the database.
- Database Name. is the name of the database that the connector will connect to.
- Reconnection Attempts. Determines the number of attempts at reconnecting to the database when a connection is lost. During the loss of connection, data is buffered in the connector and stored in the database once the connection is re-established.
- Reconnect wait time. Determines the interval to wait before an attempt is made to re-connect to the database if the connection is lost.
- Scheduler Interval. Determines how often the connector will store data in the database. If Edge One™ reads data from a project every X ms, this setting should be equal or greater to X. The default is 500 milliseconds.
Here is a sample configuration
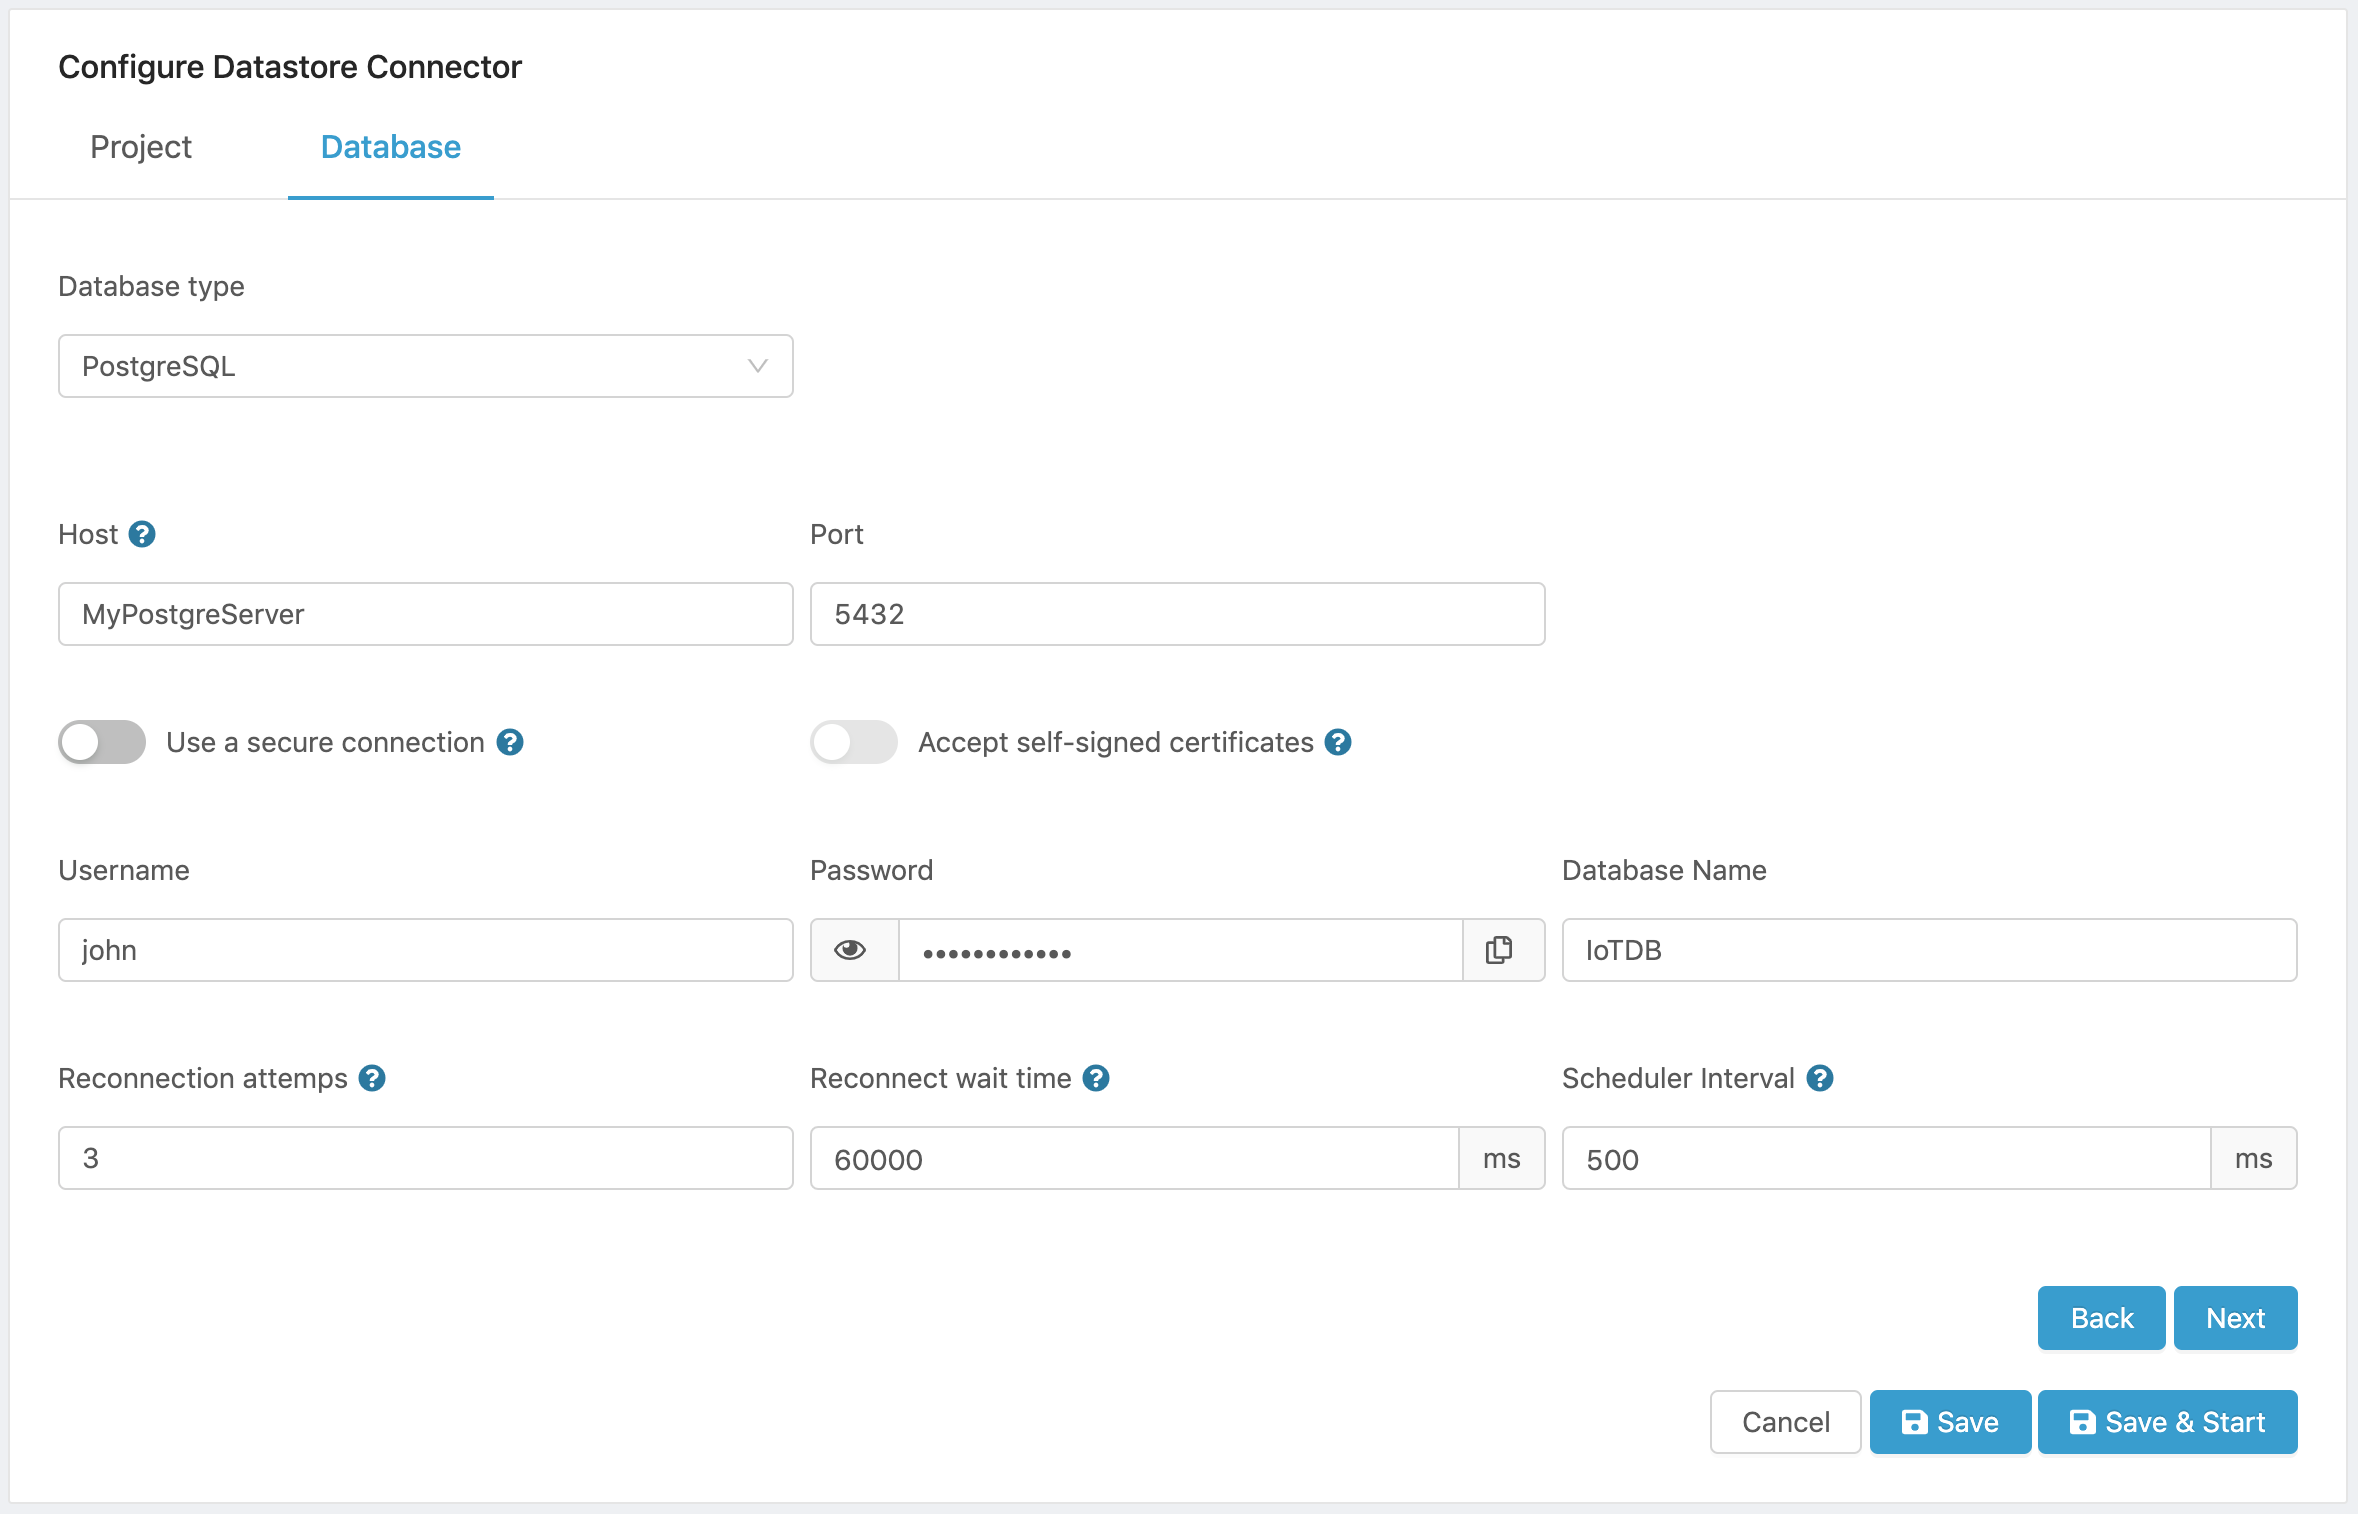
Figure 9. PostgreSQL Configuration.
- Click on Next to select a data source that will be used to feed the database.
SQLite3 Configuration
The Datastore connector also allows the storage of project data into an SQLite 3 database.
SQLite is an open-source C-language library that implements a small, fast, self-contained, high-reliability, full-featured, SQL database engine. SQLite is the most used database engine in the world. SQLite is built into all mobile phones and most computers and comes bundled inside countless other applications that people use every day.
The SQLite file format is stable, cross-platform, and backwards compatible and the developers pledge to keep it that way through at least the year 2050. SQLite database files are commonly used as containers to transfer rich content between systems and as a long-term archival format for data. There are over 1 trillion SQLite databases in active use.
To store data in an SQLite 3 database, follow these steps:
- Configure the database parameters:
- Database Name. is the name of the database that the connector will connect to.
- Scheduler Interval. Determines how often the connector will store data in the database. If Edge One™ reads data from a project every X ms, this setting should be equal or greater to X. The default is 500 milliseconds.
Here is a sample configuration

Figure 10. SQLite 3 Configuration.
- Click on Next to select a data source that will be used to feed the database.
Microsoft SQL Server Configuration
The Datastore connector also allows the storage of project data into an SQL Server database.
Microsoft SQL Server is a relational database management system developed by Microsoft. As a database server, it is a software product with the primary function of storing and retrieving data as requested by other software applications—which may run either on the same computer or on another computer across a network (including the Internet).
Microsoft markets at least a dozen different editions of Microsoft SQL Server, aimed at different audiences and for workloads ranging from small single-machine applications to large Internet-facing applications with many concurrent users.
To store data in a Microsoft SQL Server database, follow these steps:
- Configure the database parameters:
- Host name. The PostgreSQL host name or IP address.
- Port. The TCP port used for the connection to the database.
- Connection security. Turn on the Use a secure connection switch to enable TLS/SSL connection to the database.
- Username is the username used to access the database.
- Password. is the password used to authenticate the access to the database.
- Database Name. is the name of the database that the connector will connect to.
- Reconnection Attempts. Determines the number of attempts at reconnecting to the database when a connection is lost. During the loss of connection, data is buffered in the connector and stored in the database once the connection is re-established.
- Reconnect wait time. Determines the interval to wait before an attempt is made to re-connect to the database if the connection is lost.
- Scheduler Interval. Determines how often the connector will store data in the database. If Edge One™ reads data from a project every X ms, this setting should be equal or greater to X. The default is 500 milliseconds.
Here is a sample configuration
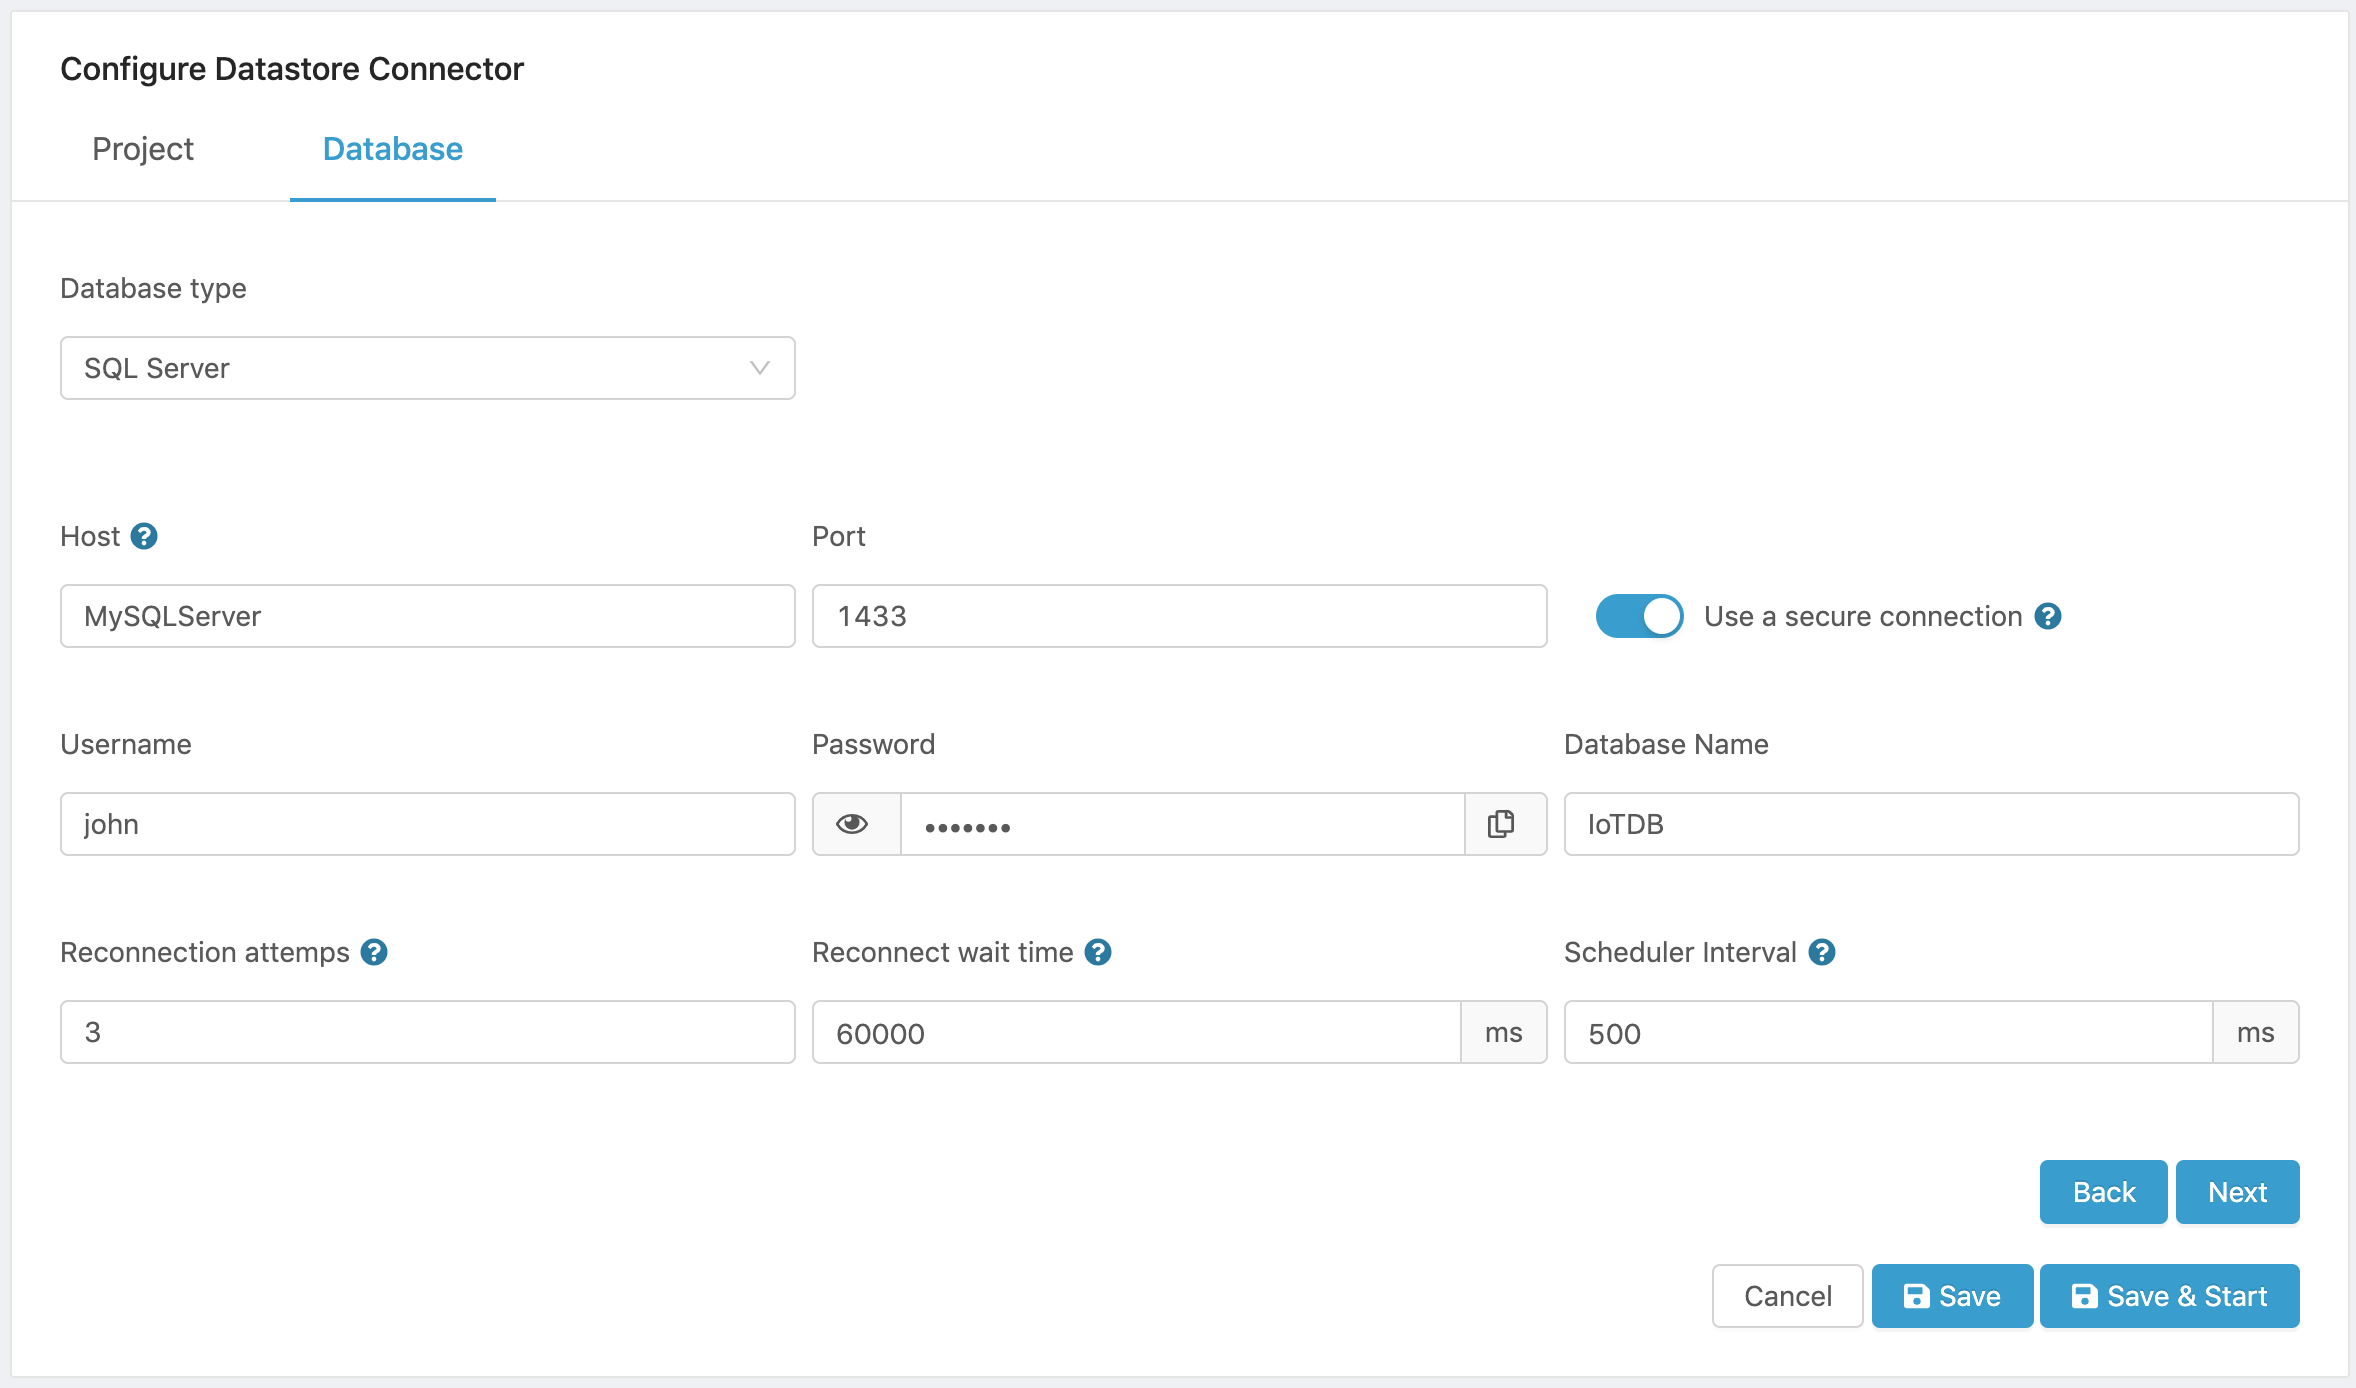
Figure 11. SQL Server Configuration.
- Click on Next to select a data source that will be used to feed the database.
Selecting a Data Source
Once a database has been configured, you must select a data source.
- Click on Data source.
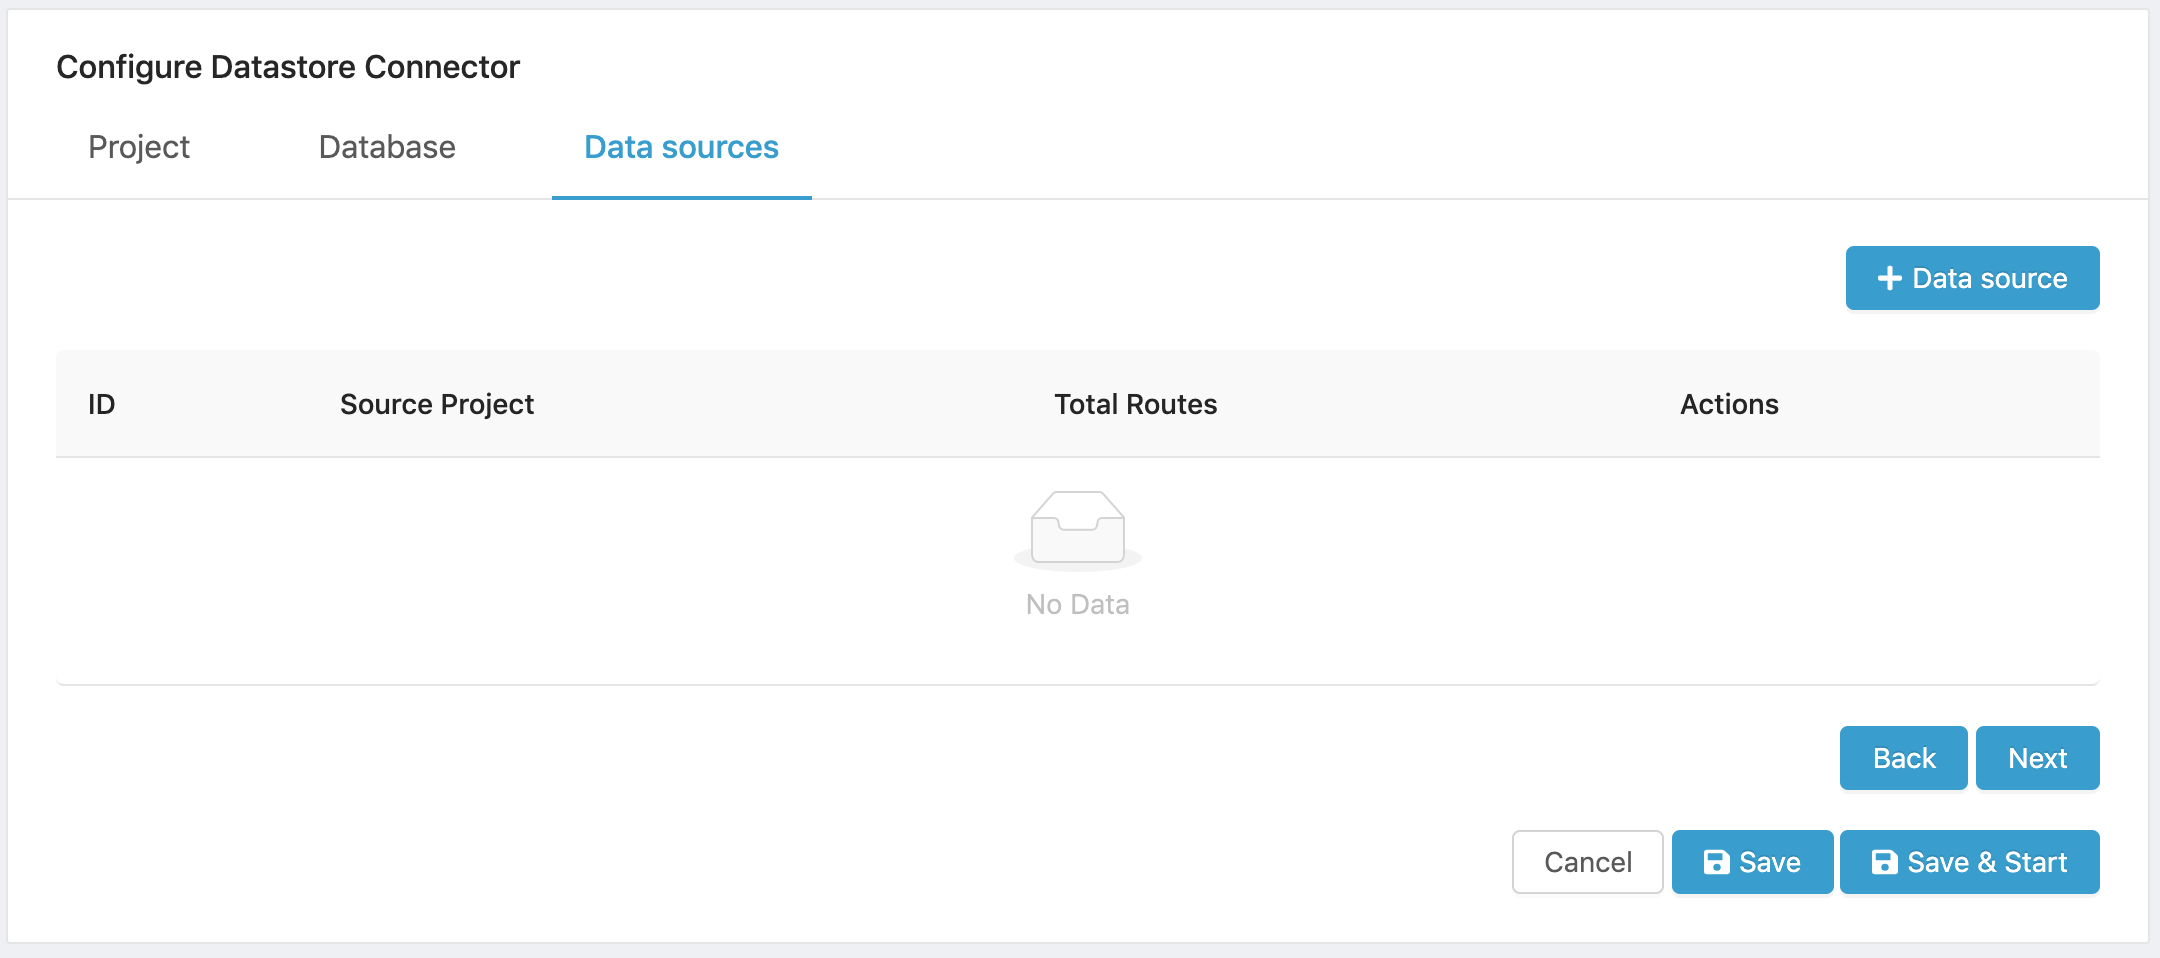
Figure 12. Adding a Data Source.
- Select a project from the project dropdown menu. All your existing projects are listed to allow you to choose the one that will feed the database.
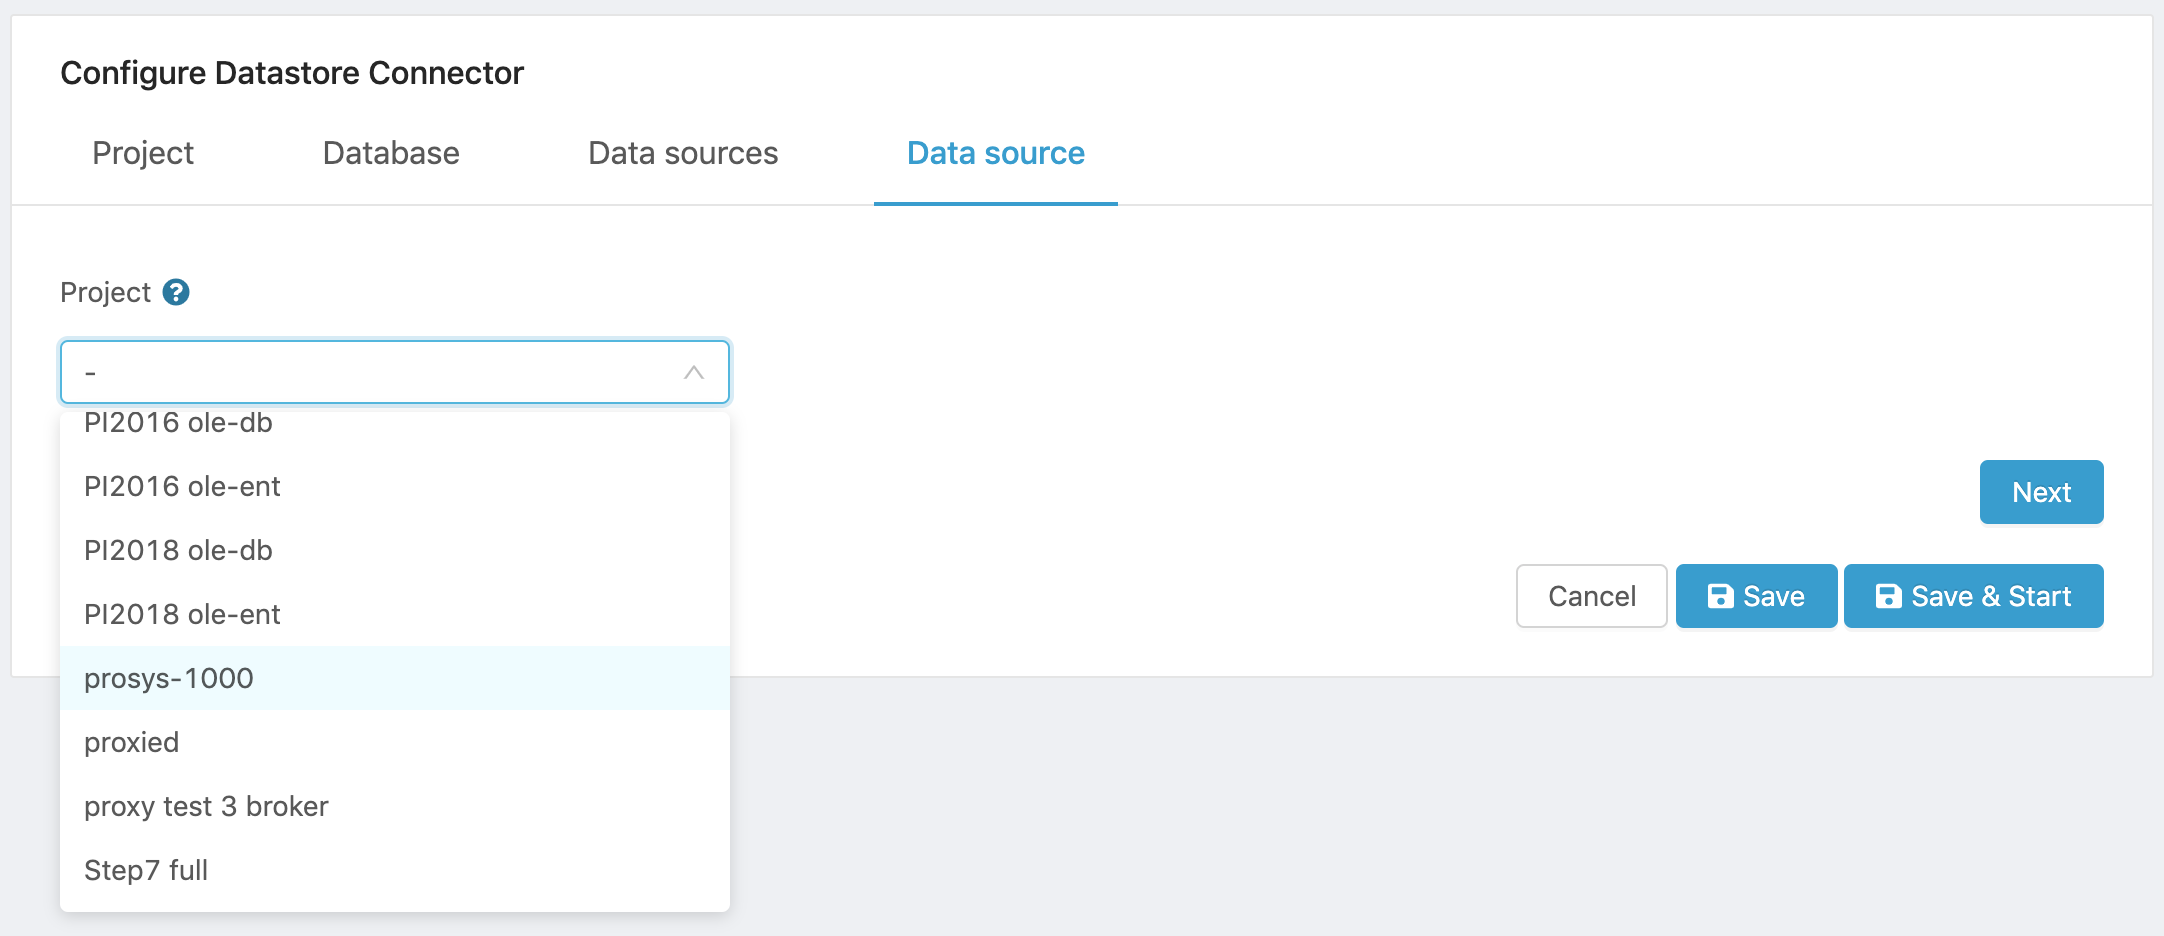
Figure 13. Select Data Source Project.
- Click on Next to display the data source list.
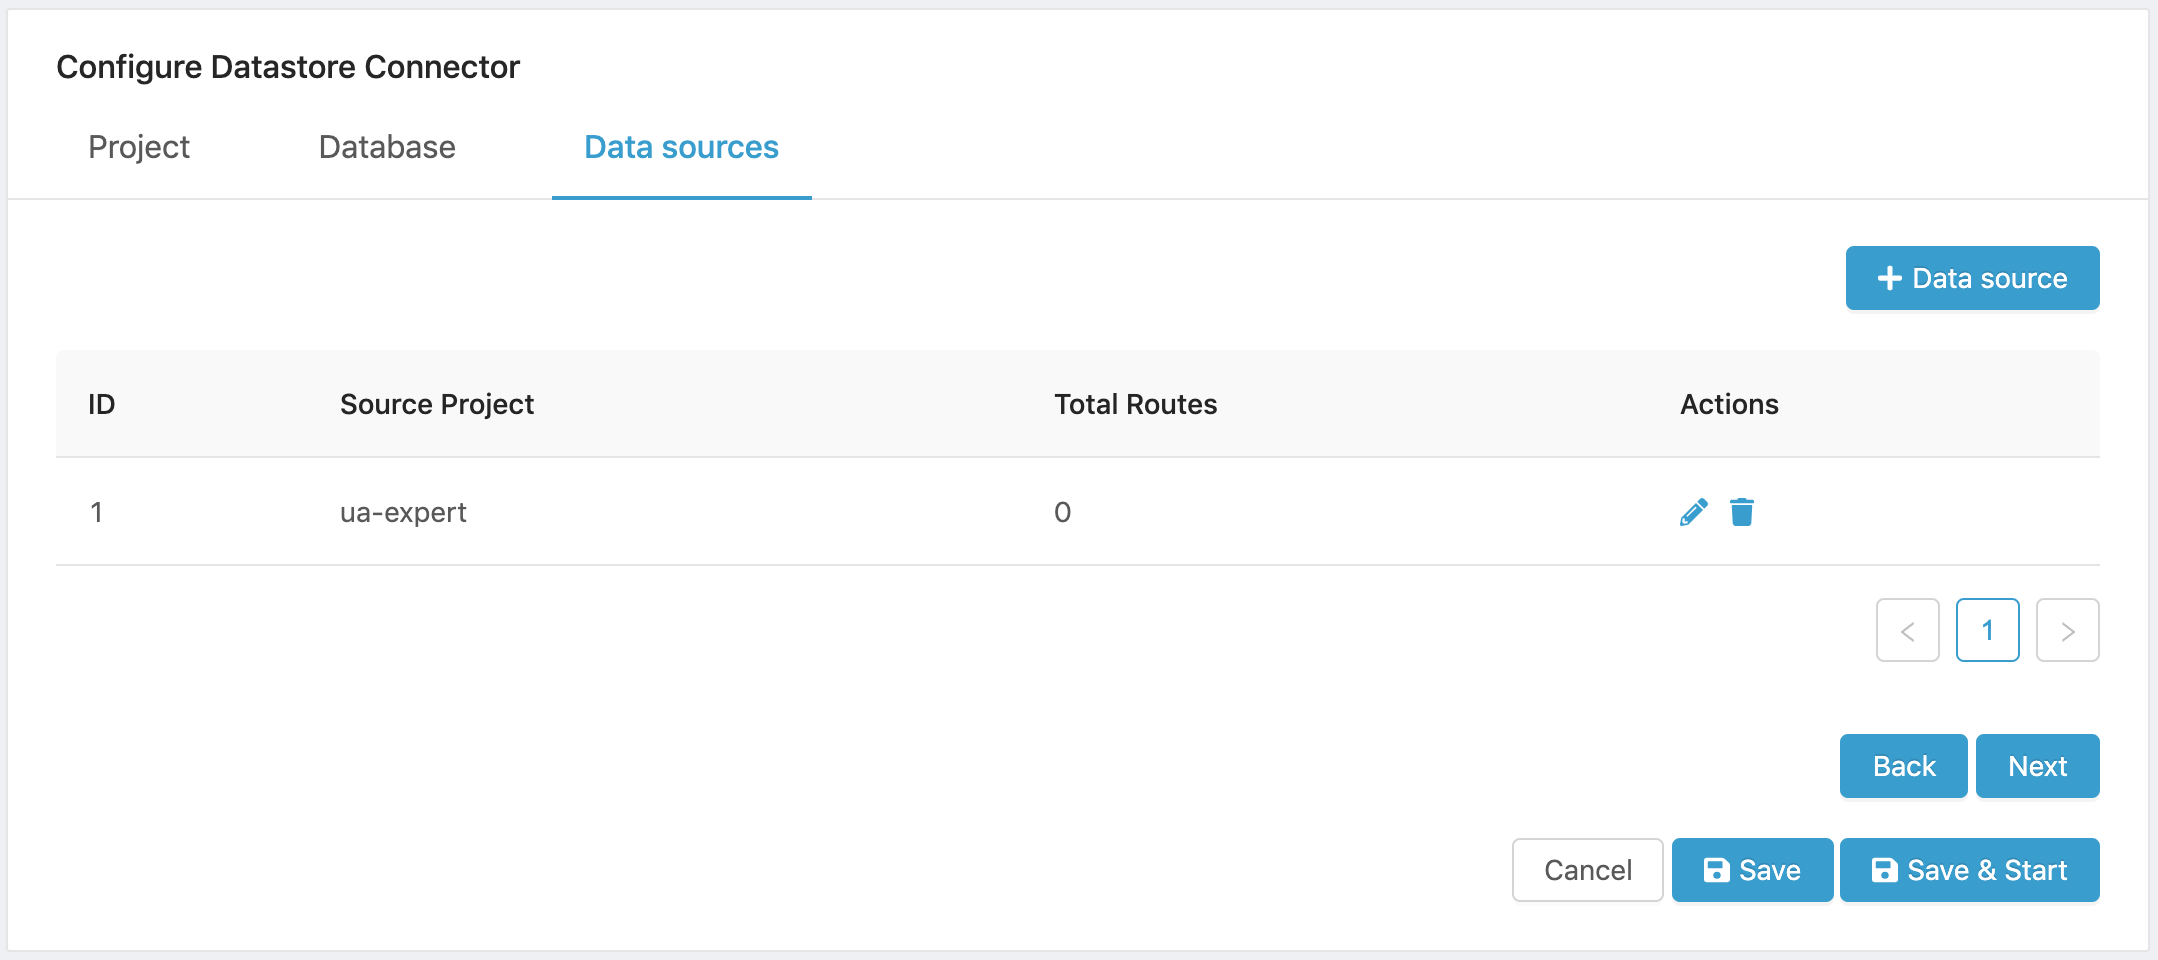
Figure 14. Data Source list.
Note that Total Routes displays “0” until you add a data route to a data source.
-
Repeat the process if you want to add more data sources.
-
Click on Next to configure the routes or destination for the storage of data. The routes are basically the tables that will store the source project’s data.
Creating a Data Route
You must now configure where the data from the source project will be stored.
After clicking Next on the Data sources tab, the Routes tab opens.
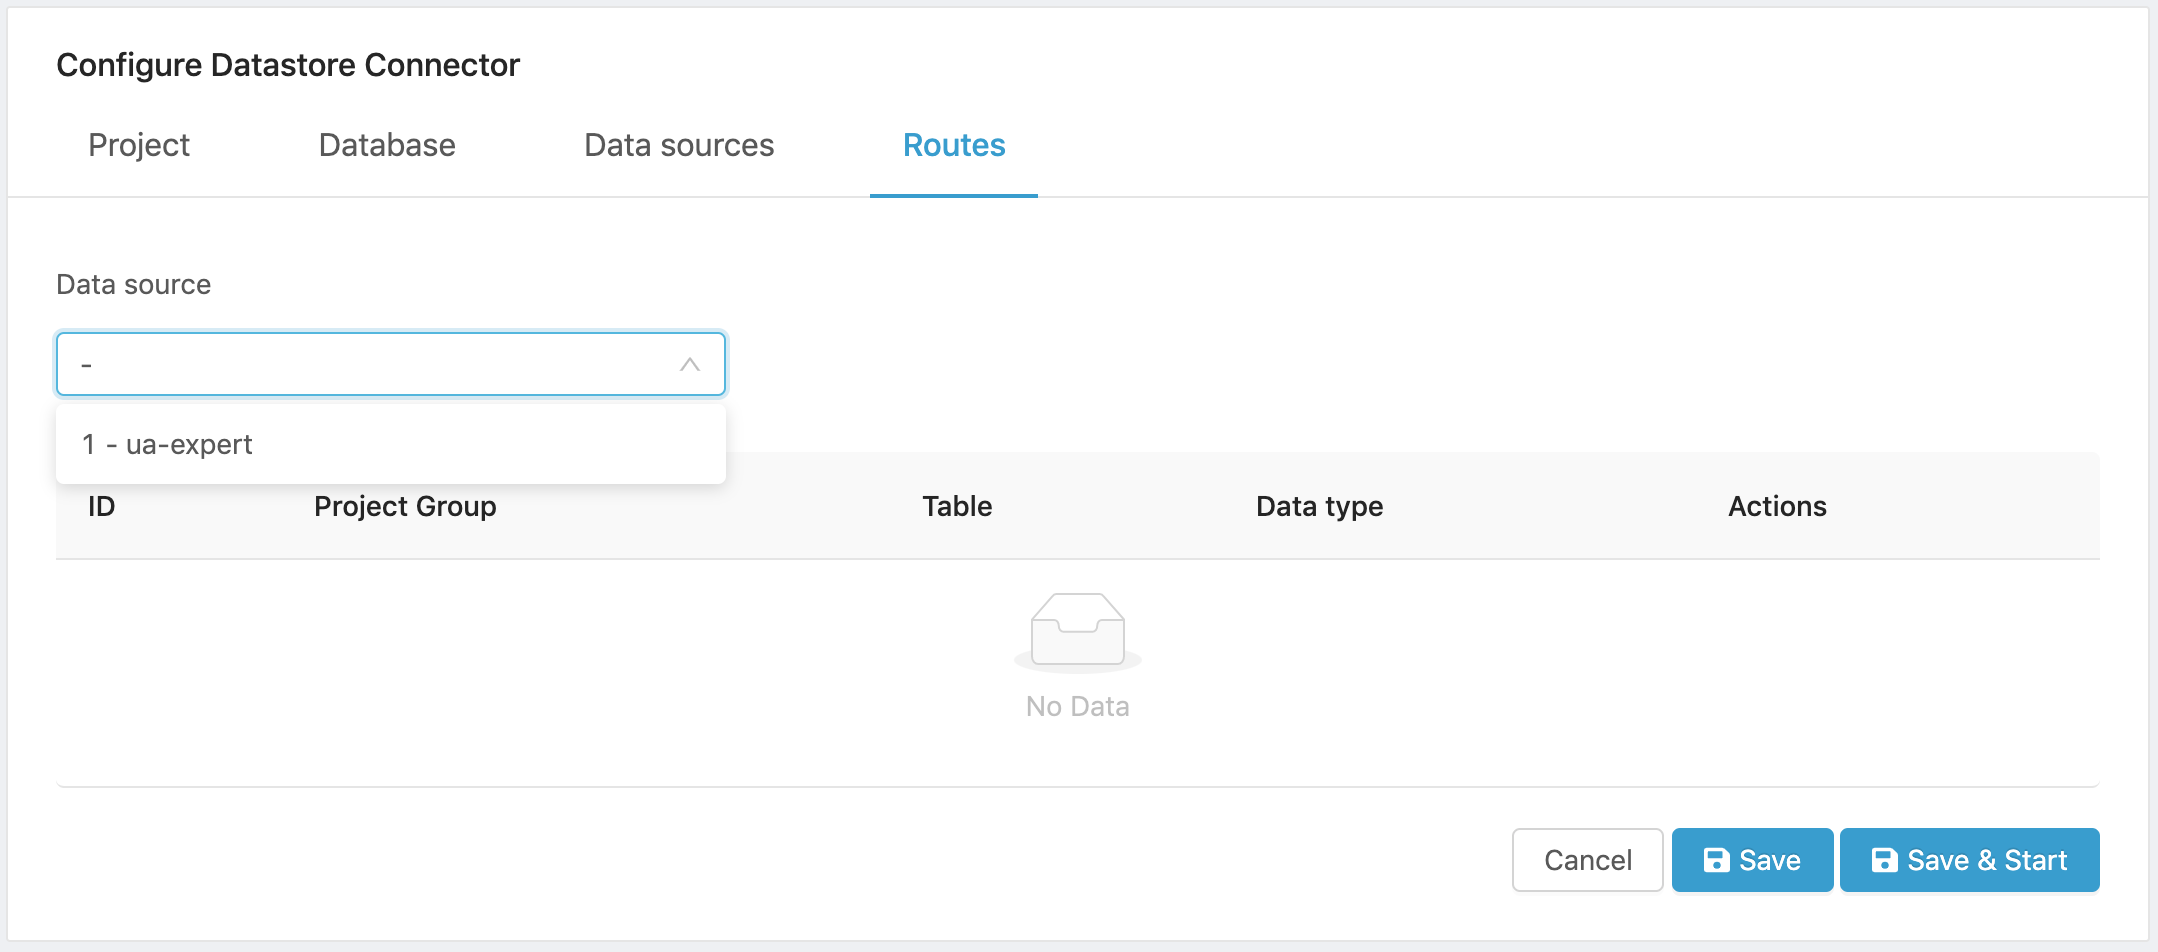
Figure 15. Routes tab.
- Select a Data source from the dropdown menu. It lists all the data sources that you have created.
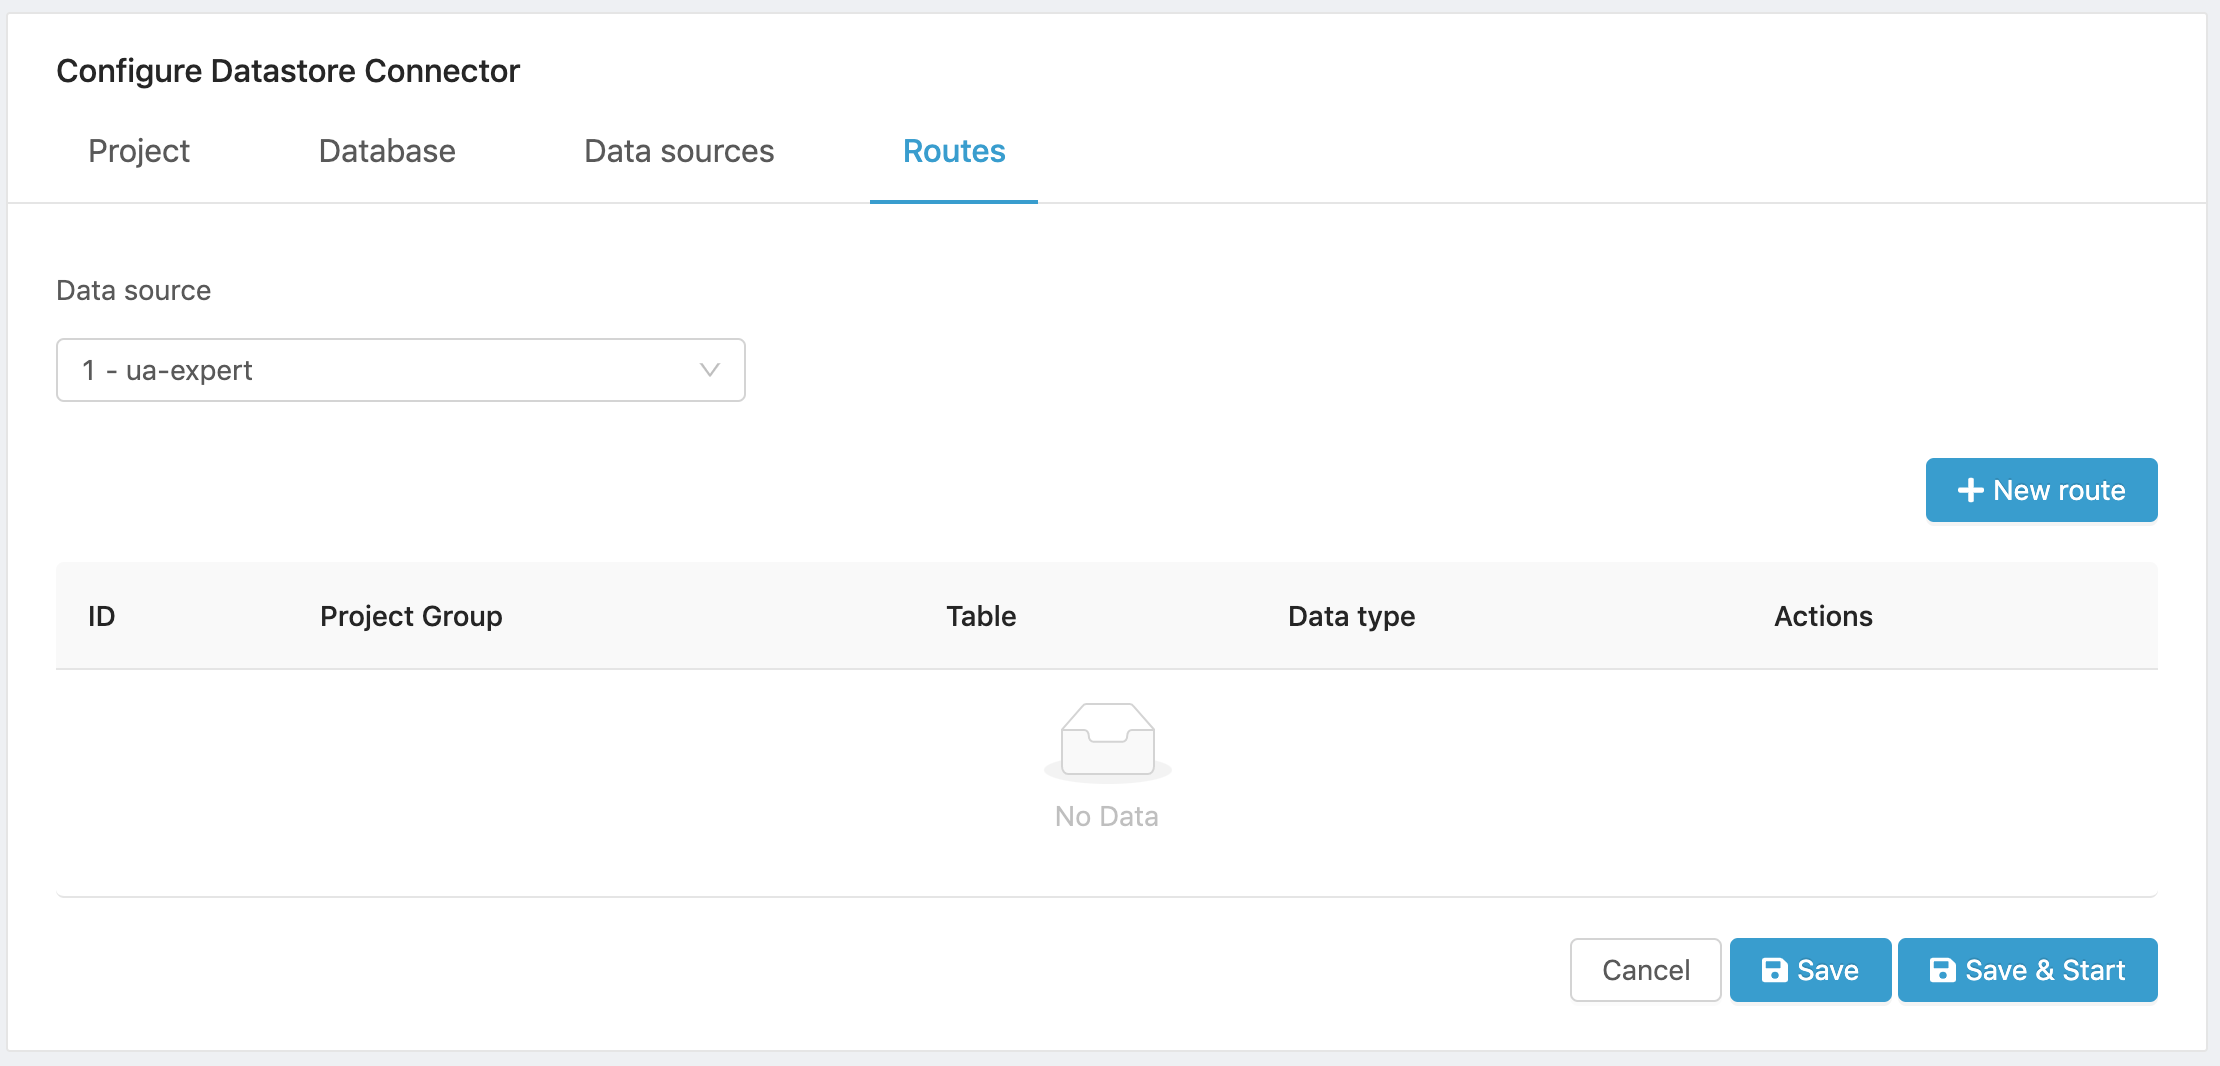
Figure 16. Select data source.
- Click on New route to open the Route configuration tab.
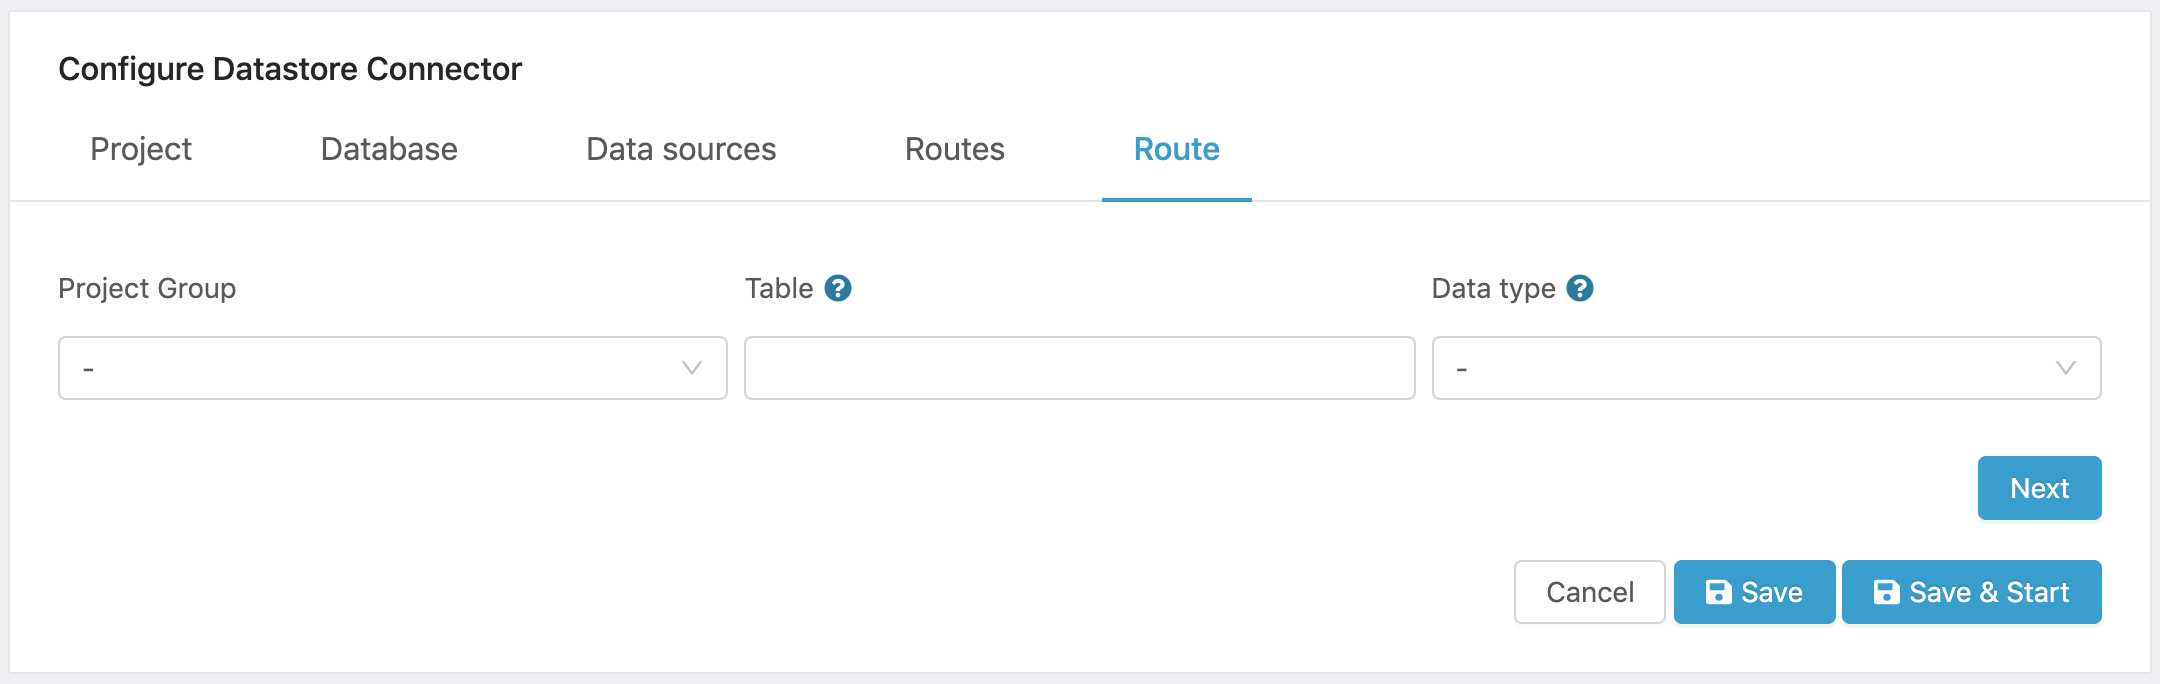
Figure 17. Add a new route for project data.
- Select a Group from the project you previously selected to act as data source.
- Enter the name of the database table that will store the data.
- Select the Data type for the data to be stored in the table. Text, Integer, Double and Boolean data types are supported.
A sample configuration is shown below
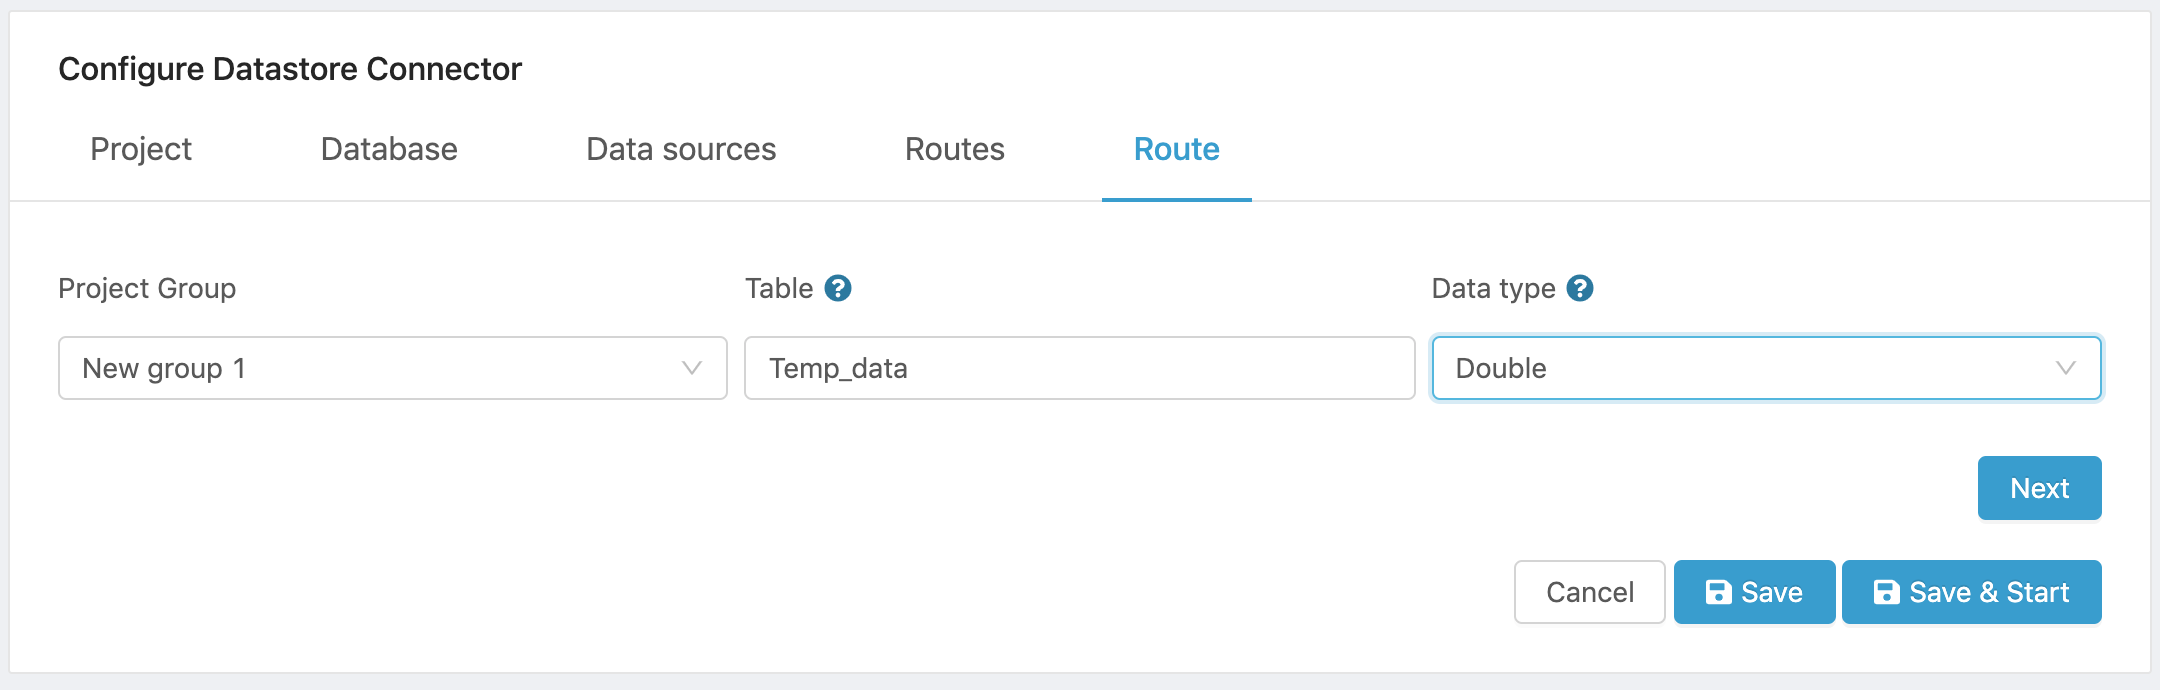
Figure 18. Sample route configuration.
- Click on Next to complete the route configuration and open the Routes panel. The new route will be displayed.
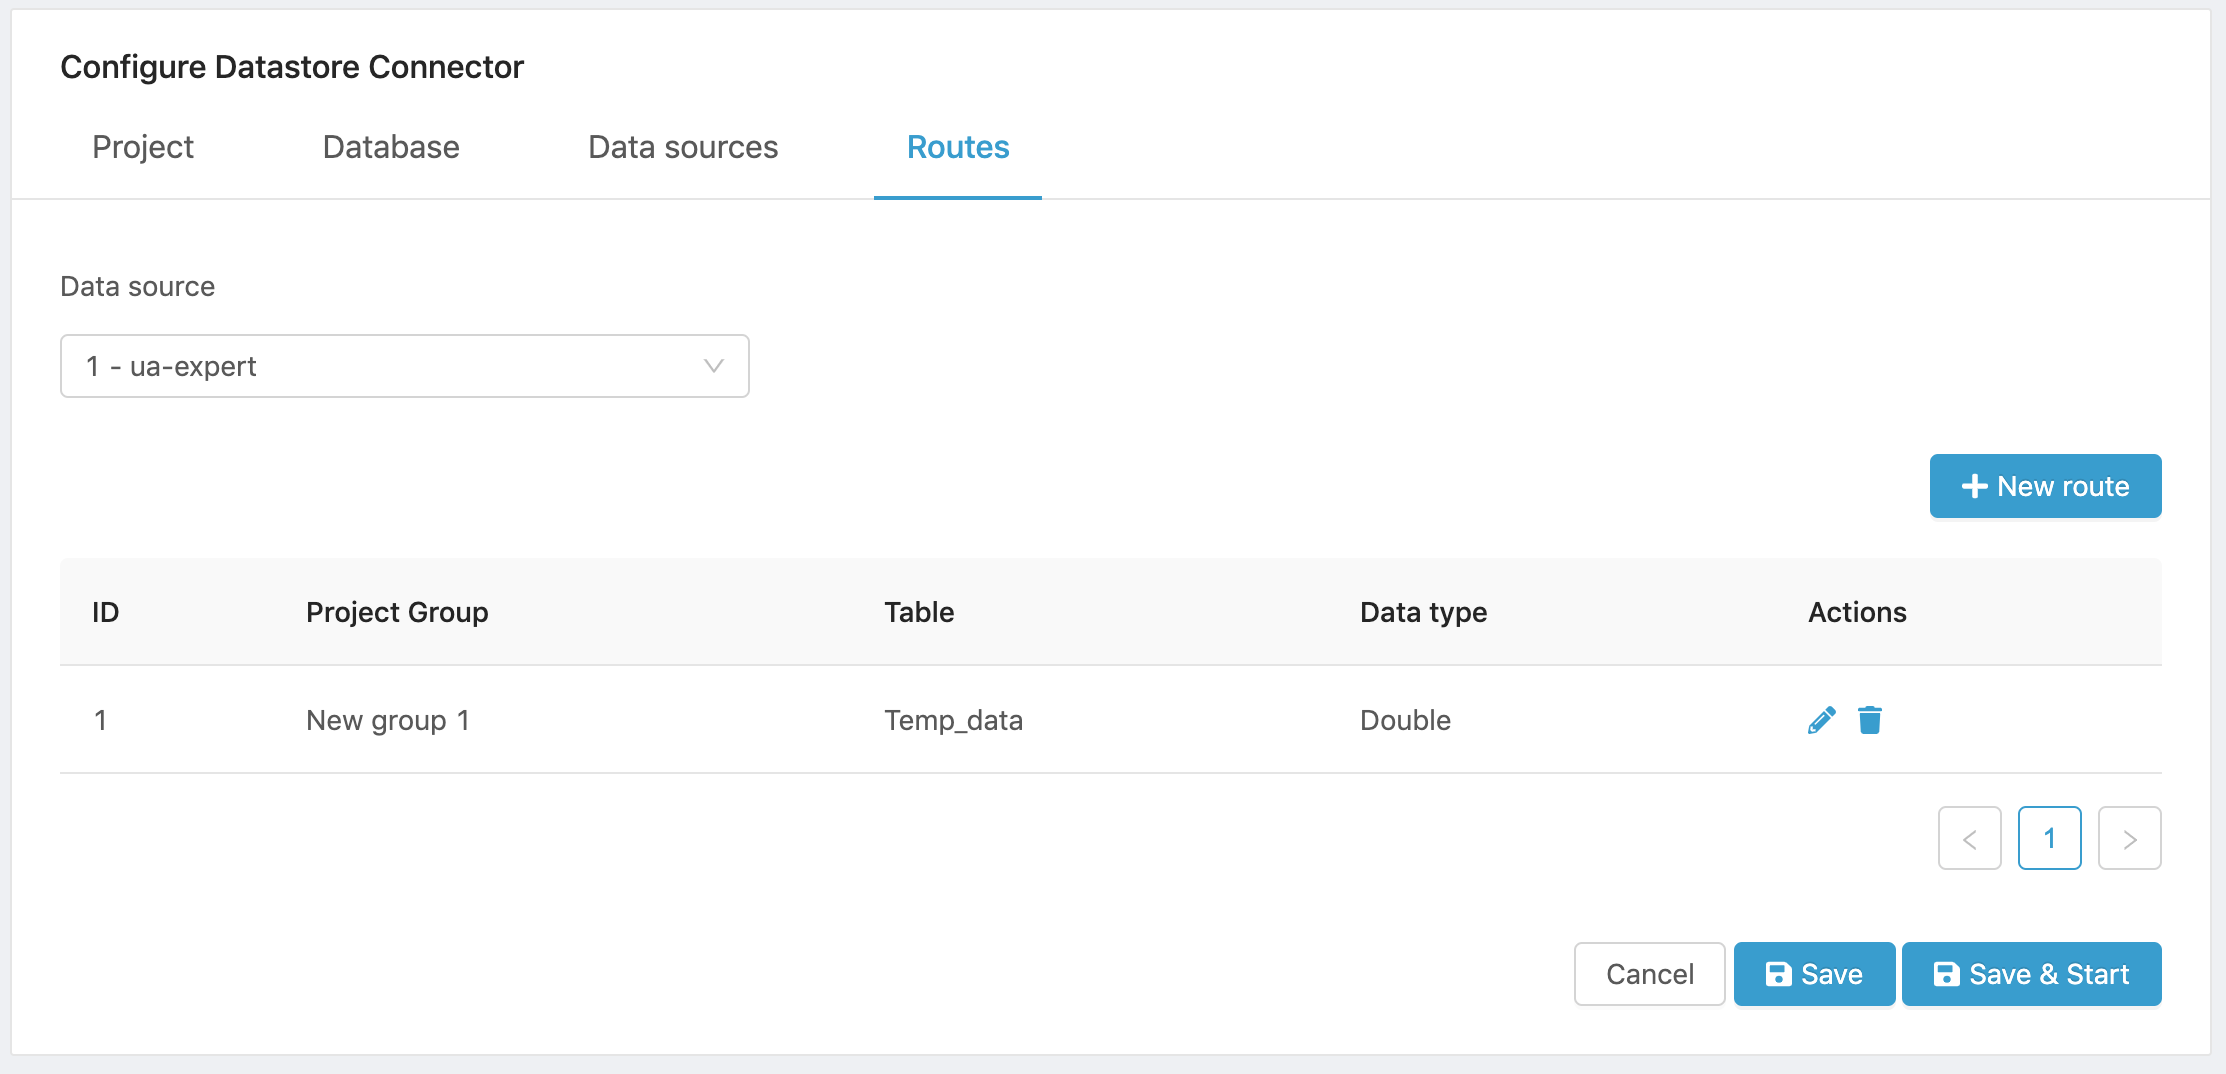
Figure 19. Configured Routes list.
-
Add more routes if required by your application.
-
Click on Save to save the project or on Save & Start to save and run your project.
Once your project starts, data from the selected group of the source project will be stored in the database table selected.