Container Configuration
![]() Docker containers are orchestrated by SmartPlug™ agents such as those inside the Edge One™
platform. They are provisioned into Production Templates or Production Things which deploy the containers into the device running a SmartPlug™. Once deployed, the
SmartPlug™ will pull, run, stop, update or remove the container from the local Docker engine.
Docker containers are orchestrated by SmartPlug™ agents such as those inside the Edge One™
platform. They are provisioned into Production Templates or Production Things which deploy the containers into the device running a SmartPlug™. Once deployed, the
SmartPlug™ will pull, run, stop, update or remove the container from the local Docker engine.
Before configuring any containers in CloudPlugs IoT, you must be familiar with the Docker Get Started Guide.
The following steps are required to configure and deploy a Docker container on a device.
- Configure the container in CloudPlugs IoT.
- Push and publish the container into the CloudPlugs IoT registry.
- Provision & deploy the container into Production Templates and/or Production Things.
Configure the Container
In order for a container to be pushed to the CloudPlugs IoT container registry, the platform must be configured as follows:
- Create a Namespace.
- Configure the Container parameters.
Create a Namespace
Containers allows users to create Namespaces to provide a repository for one or more containers. Every container must have a namespace.
Namespaces are unique in the CloudPlugs IoT container registry. Two different companies in CloudPlugs IoT cannot give the same name to their Namespaces. If a namespace is already in use, you must select a different name for your namespace.
Users can see other company Namespaces if the containers in the company’s Namespace(s) are configured as Public. However, users cannot push containers into Namespaces that do not belong to them.
Namespace name rules
- Only lowercase alphanumeric characters, “-” (minus/dash) and “_” (underscore) with no spaces are accepted.
- Namespaces can only be edited or deleted if there are no containers associated with them.
Create a new container Namespace
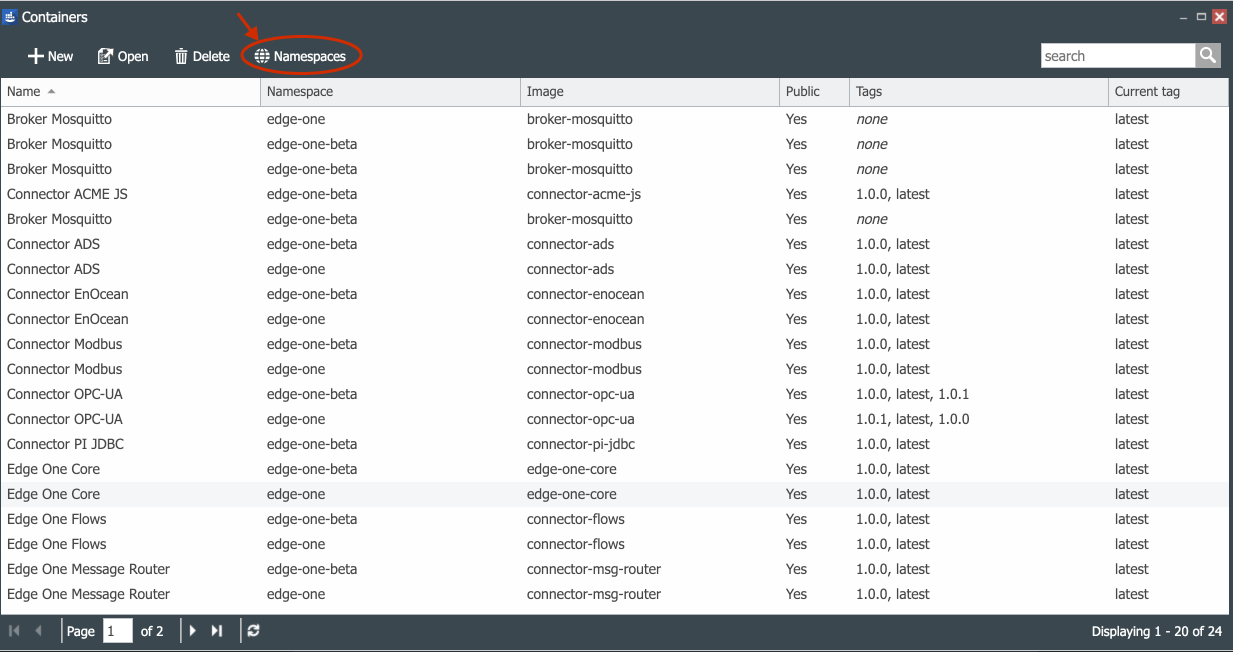
- Open the Containers application in the CloudPlugs IoT web desktop.
- Click the Namespaces button to open the Namespaces management window.
-
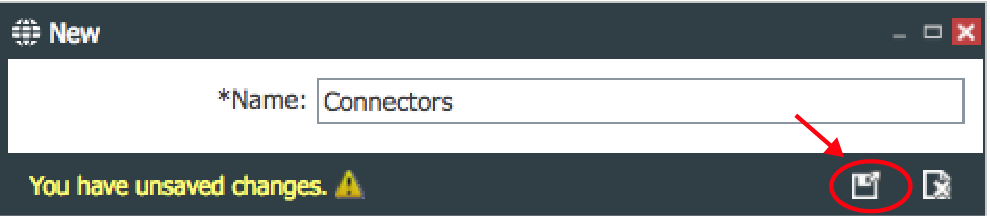
Click on ( ) New to add a new Namespace.
-
Enter a Name and click on Save and Close (
 ).
).
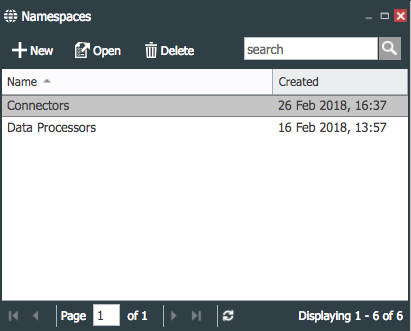
- Verify that the Namespace has been created.
You can edit and delete a Namespace as follows:
Edit a Namespace
Namespace names can only be edited if there are no containers associated with the Namespace.
To edit a Namespace:
- Open the Containers application in the CloudPlugs IoT web desktop.
- Click the Namespaces button to open the Namespaces management window.
- Select the Namespace. to be edited.
- Double-click or click on (
 ) Open.
 - Enter the new Name and click on Save and Close ( ).
- Verify that the Namespace has been edited.
Delete a Namespace
Namespace names can only be deleted if there are no containers associated with the Namespace.
To delete a Namespace:
- Open the Containers application in the CloudPlugs IoT web desktop.
- Click the Namespaces button to open the Namespaces management window.
- Select the Namespace. to be edited.
- Double-click or click on ( ) Open.
- Enter the new Name and click on Save and Close ( ).
- Verify that the Namespace has been edited.
Configure the Container
Once the Namespace is created, we must create and configure the container’s properties in the registry so the actual container can be pushed.
To configure the container:
-
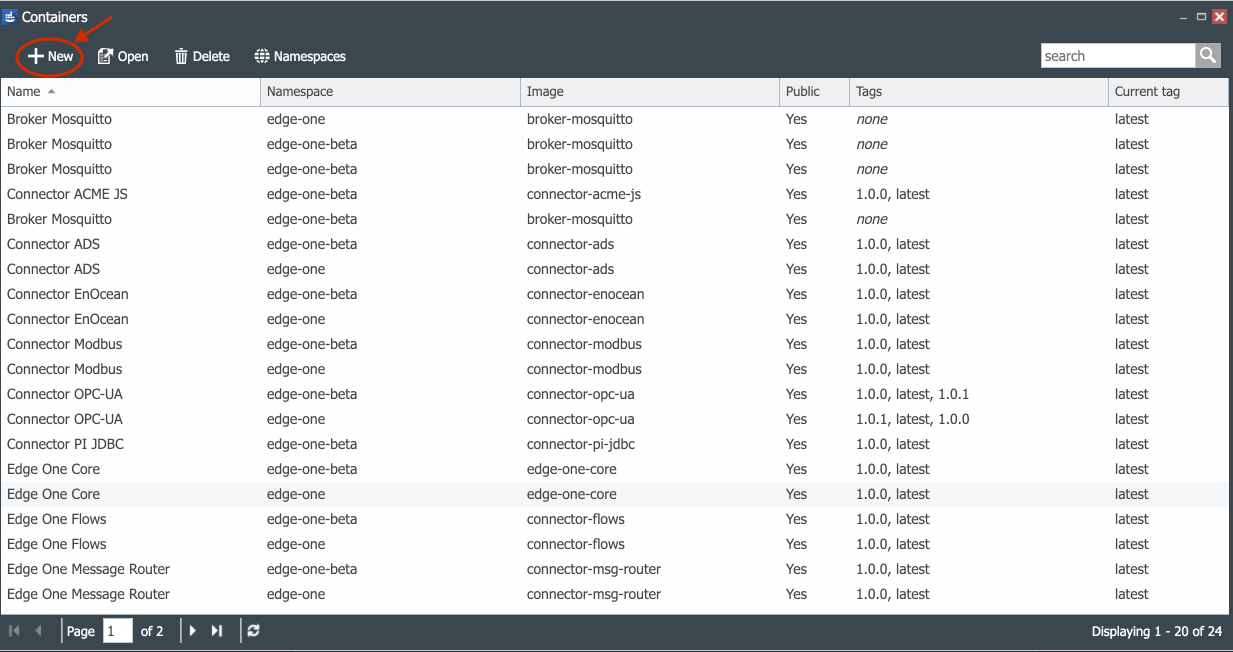
Open the Containers application in the CloudPlugs IoT web desktop.
-
Click on ( ) New to add a new container.
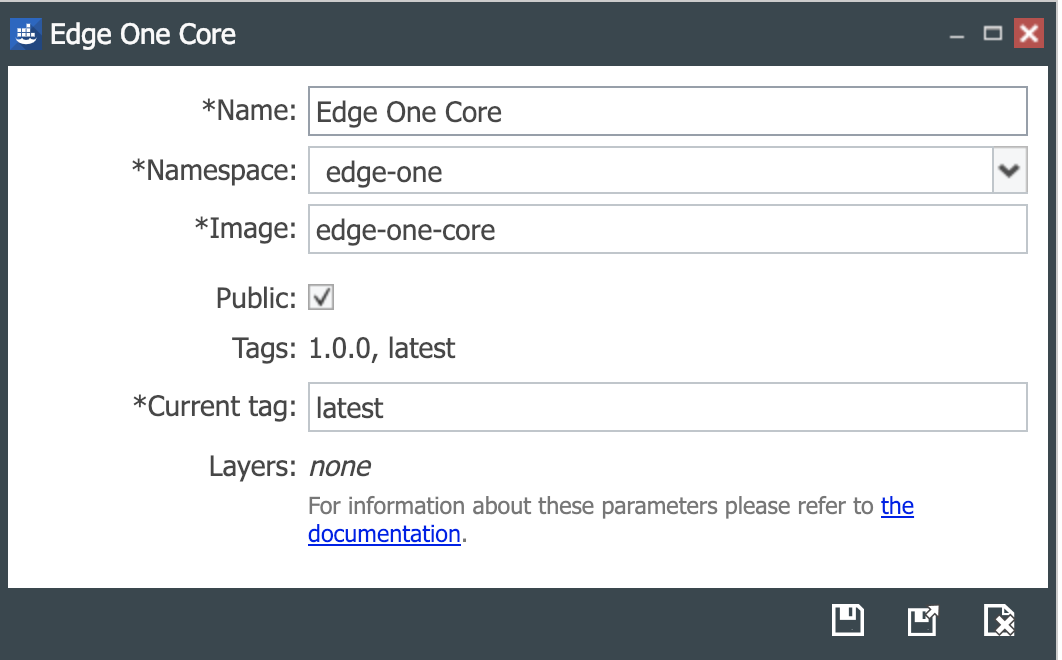
Name
Enter a Name for the container.
Select Namespace
Select a Namespace from the dropdown menu. If no Namespaces are available, you must create one as described above.
Image
Enter the name of the Image. The image is the executable package that includes everything needed to run an application - the code, a runtime, libraries, environment variables, and configuration files.
Image names may contain lowercase letters, digits and separators. A separator is defined as one or two underscores, or one or more dashes. Periods are not allowed. An image name may not start or end with a separator.
Configure optional parameters
The following optional parameters are available:
Public - if checked, the container will be visible to all companies in the instance of the CloudPlugs IoT platform. This provides an easy way to share containers with other
users and companies. Users will be eventually able to bill other companies and users for the use of their shared containers.
Enter the current tag
Enter the tag to be used for this container. A tag refers to an image or group of images. Tags provide a simple way to give names to different versions of an image. Tag names must be valid ASCII and may contain lowercase and uppercase letters, digits, underscores, periods and dashes. A tag name may not start with a period or a dash and may contain a maximum of 128 characters.
Push the container to the CloudPlugs IoT registry
Once the Namespace and container are configured in the CloudPugs IoT container management system, it can be pushed the registry as follows:
   $ docker tag IMAGE_NAME registry.cloudplugs.com/MY_NAMESPACE/IMAGE_NAME:TAG
   $ docker login registry.cloudplugs.com
   $ docker push registry.cloudplugs.com/MY_NAMESPACE/IMAGE_NAME:TAG
Where,
- IMAGE_NAME is the name assigned to the image in the container configuration.
- NAMESPACE is the namespace assigned to the container.
- TAG is the current tag assigned to the container. If tag is omitted, latest is automatically chosen.
A sample container configuration is shown below.
Deploying containers into Production Things.
Containers available in CloudPlugs IoT can be configured for deployment on your edge devices using Production Templates and Production Things. Once the containers are configured for deployment, saving the Production Template or Thing will instruct the SmartPlug™ running on the remote system to download the containers and orchestrate them in the local Docker instance.
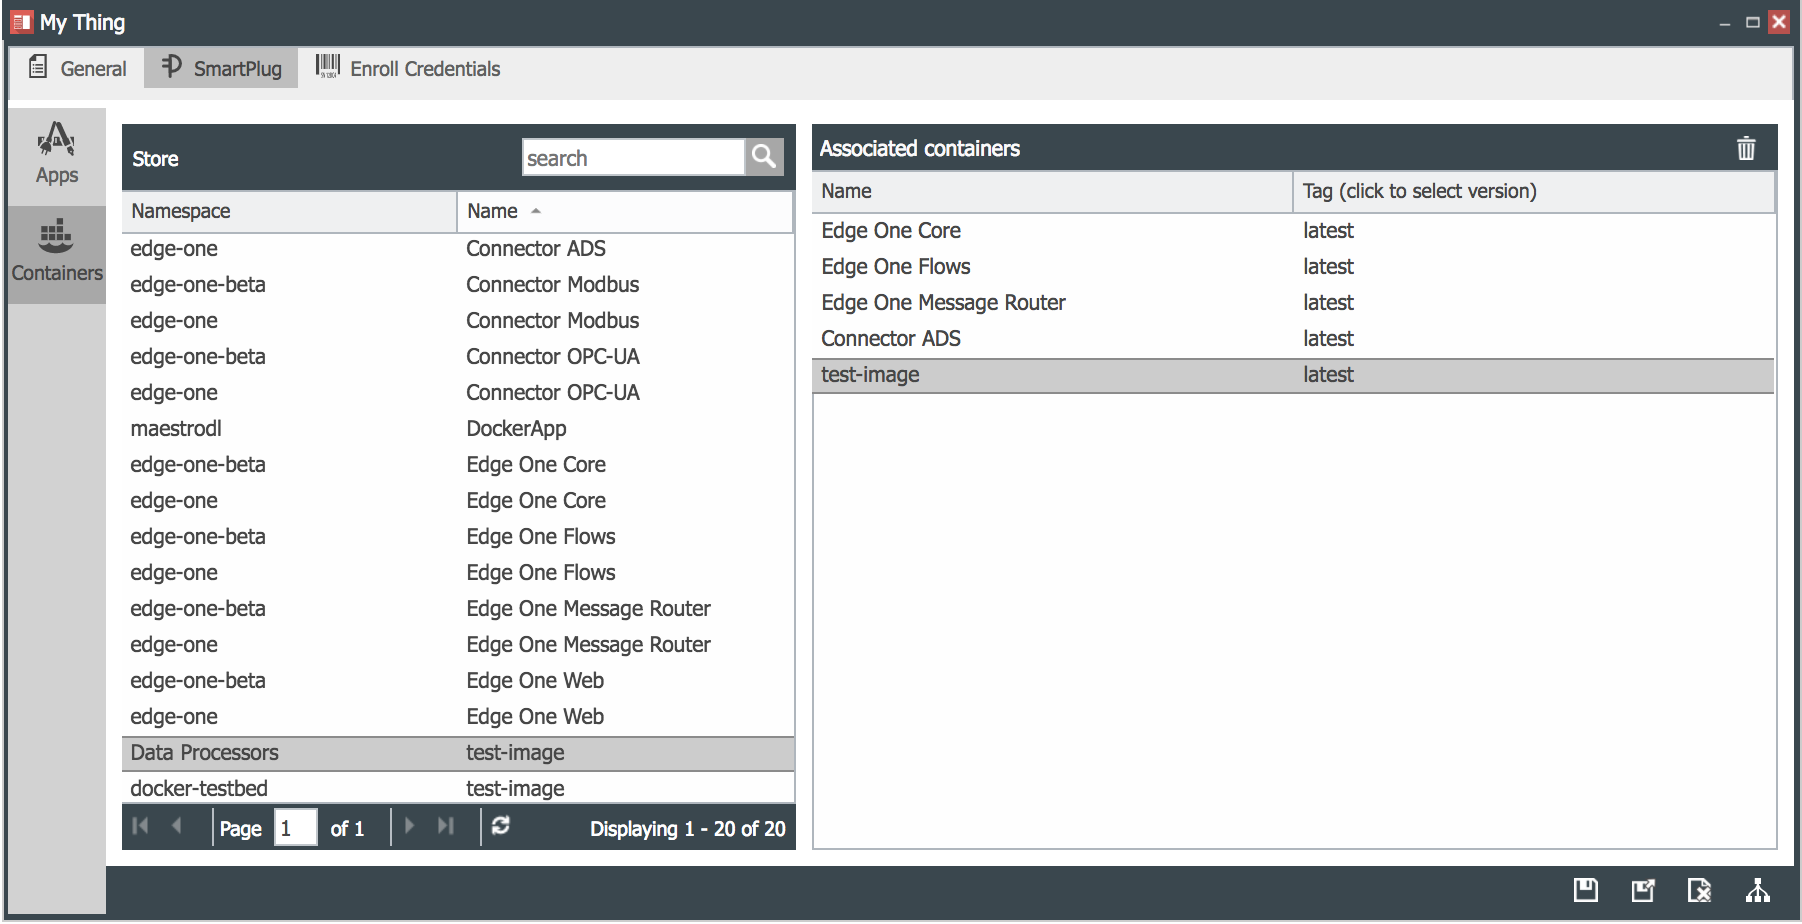
Assigning containers to devices of a Production Template.
It is possible to deploy containers to a group of devices belonging to a Production Template and that run the SmartPlug™. To configure the Template:
- Open the Production Template Management console in the CloudPlugs IoT web desktop.
- Select the target Production Template.
- Open the Production Template by double-clicking on it or using the ( ) Open button.
- Click on the SmartPlug tab on the toolbar to open the Production Template’s SmartPlug™ panel.
- Select Containers from the vertical navigation bar to open the Containers panels.
- The left panel displays the Container Store which lists all the containers available to the Thing.
- The right panel displays any containers that are associated with the Production Template. The panel will be empty is there aren’t any.
- Select one or more Containers from the Store and drag-and-drop it/them in the Associated containers panel.
- Click on Save (
 ) or Save and Close ( ).
The result of adding one container called test-image to a Production Template called My Thing which already had inherited the Edge One and Connector ADS containers is shown below.
Assigning containers to a Production Thing
Containers may be provisioned and deployed in individual Production Things, as follows:
-
Open the Thing Management console by clicking on the Things tile (
 )in the CloudPlugs IoT web desktop.
 -
Select the target Thing.
-
Open the Thing by double-clicking on it or using the (
) Open button. -
Click on the SmartPlug tab (
 ) on the toolbar to open the Thing’s SmartPlug™ panel and vertical menu bar.
 -
Select Containers (
 ) from the vertical navigation bar to open the Containers panels.
- The left panel displays the Container Store which lists all the containers available to the Thing.
- The top right panel displays any containers that are associated with the Thing. The panel will be empty is there aren’t any.
- The bottom right panel displays any containers inherited from the Production Template.
The image below displays a Thing’s Containers panel with the containers inherited from its Production Template.
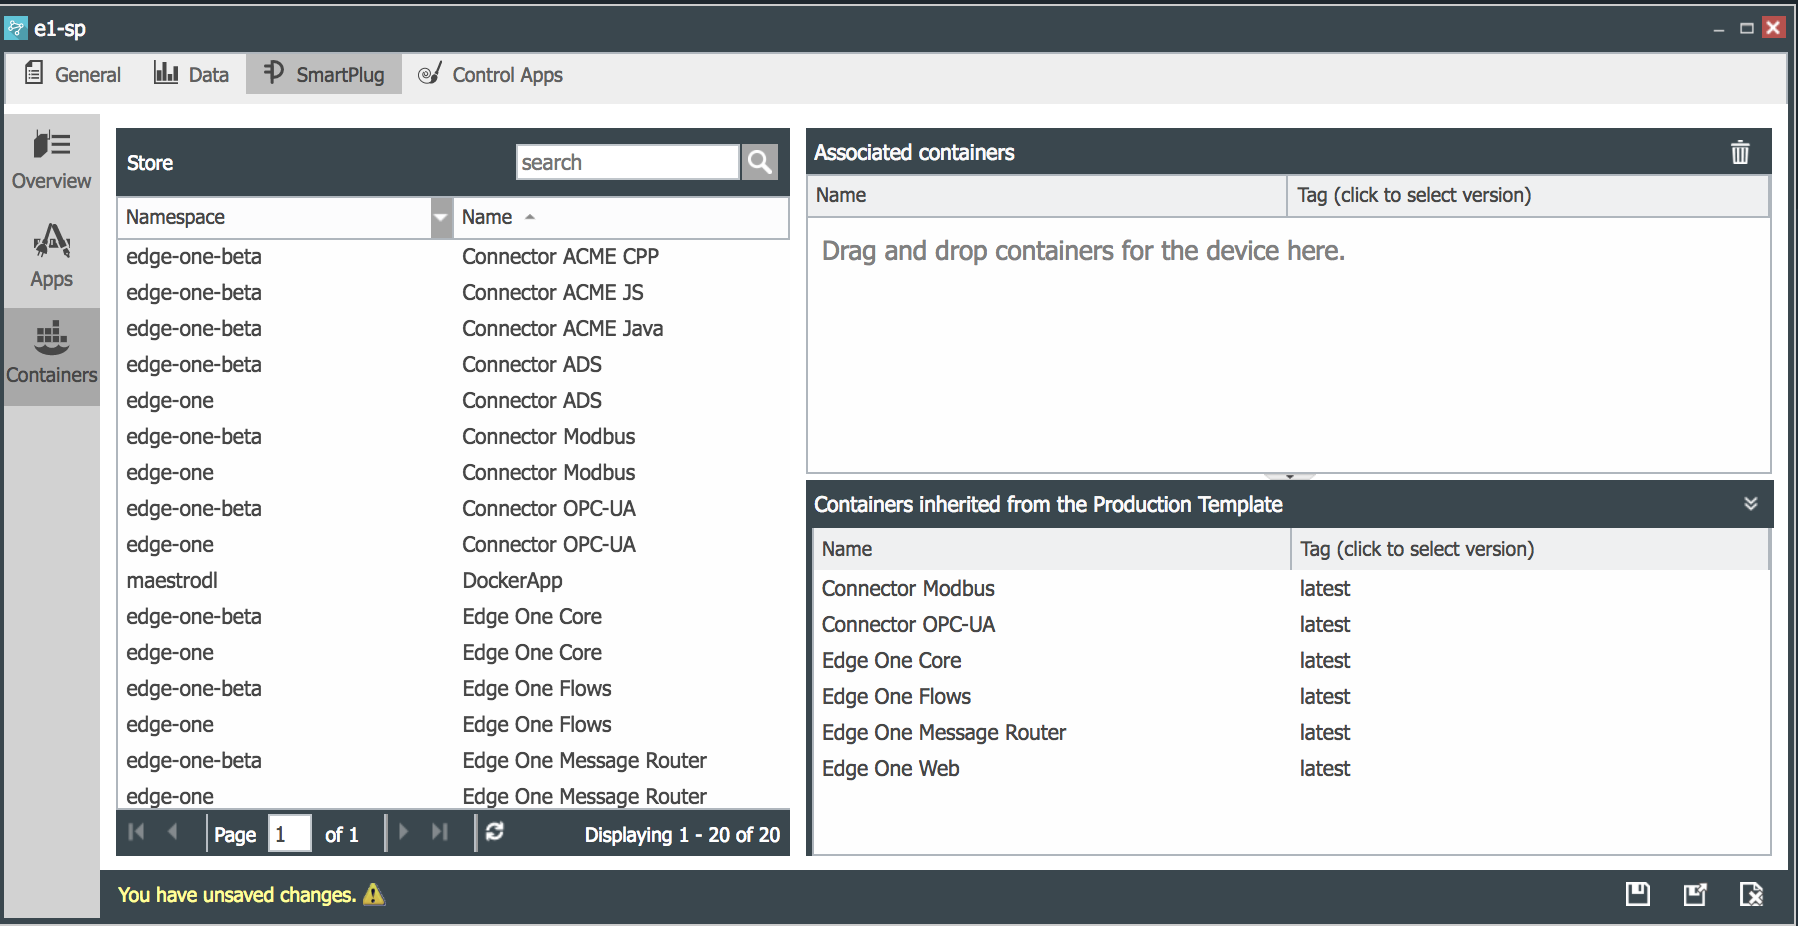
-
Select one or more Containers from the Store and drag-and-drop them in the Associated containers panel.
-
Click on Save (
) or Save and Close ( ).
The example below displays the result of adding a container to a Production Thing before a Save operation.
