Arduino Tutorial
Connecting a Temperature Sensor
Introduction
This tutorial introduces the basics of how to quickly deploy an Internet of Things project with a working example of a Connected Product.
The example illustrates how to connect a temperature sensor to the CloudPlugs service through a Arduino board using the internal Ethernet controller.
You will need to open an account at CloudPlugs so you can create an Arduino Production Thing in your account. The example shows how to configure the Arduino with a connectivity library to connect to CloudPlugs IoT. Once all the software is configured and the sensor is connected, the Arduino will upload and publish data every minute.
Requirements
You will need to set up your Arduino and sensor hardware, your CloudPlugs account and your Arduino software so you can monitor published data from the CloudPlugs IoT web desktop.
Hardware
You can use any of the Arduino boards with Ethernet controller listed below to build the project. In addition, you will need a temperature sensor like the TMP35/36/37.
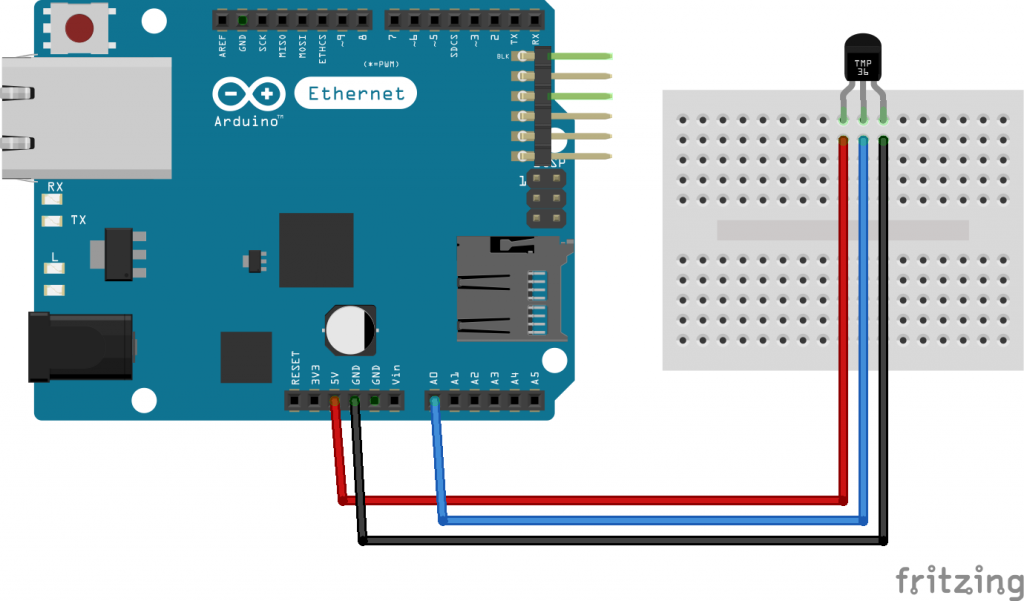
Here is an image of the circuit that needs to be wired.
Boards
- Arduino Mega + Ethernet Shield;
- Arduino Mega ADK + Ethernet Shield;
Components
- TMP36 sensor (Datasheet)
Software
- Use the CloudPlugs IoT Arduino library.
- Use the CloudPlugs IoT Web Desktop to configure your device in the cloud.
Connecting the the Arduino and the sensor using the Python Library
Here are a few simple steps you need to follow to connect the sensor and to start publishing data as a device Prototype:
- Become familiar with the process for installing Arduino libraries and follow any guide to learn how to connect the Ethernet Shield to the compatible Arduino board.
- Create an account at www.cloudplugs.com.
- Login to the CloudPlugs platform either through the website or through http://platform.cloudplugs.com.
- Create a Production Template.
- Create a Serial Number and Enter its enroll password.
- Retrieve the Plug-ID and activation/connection password using the manual method.
- Download the CloudPlugs Arduino Library and use an example that matches your device. In your Arduino software go to Files > Examples and choose CloudPlugs.ino from the CloudPlugs library folder.
- Add the source code shown below to your Arduino sketch.
- Change AUTH_PLUGID to the Plug-ID retrieved manually.
- Enter the retrieved connection authentication password in AUTH_PASS. Leave AUTH_MASTER as false.
- Connect your hardware.
- Connect the TMP36 to the Arduino ports (optionally wiring it with a breadboard).
- Power to the 5V port and ground to GND.
- Analog input to analog port A0.
- Connect the Arduino board to your network using an ethernet cable. You can power it using a micro USB cable connected to your computer or using the board’s external power adapter.
- Temperature data will be published every minute in the Published Data panel under Prototype->Publish data. To change temperature values easily, lightly press the sensor between your fingers.
- Congratulations! you have successfully connected a Thing (temp sensor) through your Arduino to the cloud.
Source Code
Use the following source code.
#include "SPI.h"
#include "Ethernet.h"
#include "CloudPlugs.h"

CloudPlugs client;
char* AUTH_PLUGID = "dev-00112233445566778899AABB"; // Enter your Plug-ID here
char* AUTH_PASS = "password";  // Enter your authentication password for the device here
boolean AUTH_MASTER = false;   // change to true, if you want to authenticate the device using your login password.

void setup() {
    Serial.begin(9600);
    // setup your Ethernet connection via DHCP
    byte mac[] = { 0xDE, 0xAD, 0xBE, 0xEF, 0xFE, 0xED };

    while (Ethernet.begin(mac) != 1) {
        Serial.println("Error getting IP address via DHCP, trying again...");
        delay(500);
    }
    client.setAuth(AUTH_PLUGID, AUTH_PASS, AUTH_MASTER); // CloudPlugs Authentication
}

String response;
boolean res = false;

void loop() {
    int sensorValue;
    float celsius;
    float voltage;
    char msgBody[256];
    char float_buffer[20];

    sensorValue = analogRead(0);               // Reading data from TMP36 sensor
    voltage = (sensorValue * 5) / 1,024;       // millivolts from Analog port
    celsius = (voltage - 500)/10;              // Celsius Degrees;
    dtostrf(celsius, 2, 2, float_buffer);

    sprintf(msgBody, "{\"data\":{\"temperature\":\"%s\"}}", float_buffer); // composing JSON obj
    res = client.publishData("weather", msgBody, response); // publishing data
    Serial.println(res);
    delay(60000); // once per minute
}