Production Templates
| Production Templates are a critical component in the lifecycle of connected products. They are required to create and provision the digital-twins of your devices or Production Things. |
|---|
This guide will teach you to create, configure, manage and provision Production Templates and it has the following content:
- Overview of Production Templates.
- Creating Production Templates.
- Production Templates Management and Properties Consoles.
- Configuring Things Properties, Security, Triggers and Applications.
- Configuring the Production Things Enroll Credentials.
- Provisioning Production Things.
- Deleting Production Templates.
- Creating Tokens for Programmable Generation of Serial Numbers and enroll credentials.
Overview
![]() Production Templates are used to create and provision Production Things. A Production
Template defines a class or model of a product. Based on that class, multiple similar Production Things can be provisioned and connected to CloudPlugs IoT.
Production Templates are used to create and provision Production Things. A Production
Template defines a class or model of a product. Based on that class, multiple similar Production Things can be provisioned and connected to CloudPlugs IoT.
A simple example would be that we want to create connected refrigerators. We create a Production Template for a class or model of refrigerators and we call it White. We will then produce 1,000 White refrigerators each of which will be a Production Thing. We could make a second Templat and call it Silver to produce and connect 2,000 Silver refrigerators.
Production Templates set the credentials (serial number or hardware ID, enroll password and an optional control password) required by Production Things to enroll in the platform.
Optionally, Production Templates can set properties, control permissions, triggers, control applications, SmartPlug Apps and Containers that will be automatically configured in the Template’s Production Things once they enroll into the platform. These can later be customized for individual Things if required.
Production Templates provide a simple way to provision configuration, triggers and applications to their Production Things before or after they have enrolled into CloudPlugs IoT. For example, if you develop a new control application, SmartPlug App or Container and you want to deploy them to all the Things belonging to a Template, you simply add them to the respective provisioning panel(s) of the Template and when you Save the Template, they will be automatically deployed to its Production Things.
Creating Production Templates
The Templates are created as follows:
- Open the Production Templates console (
 ) in the web-desktop and click on the New Template button (
 ).
). - In the Production Template, open the serial number panel (
 ).
). - Add a new Serial Number (also called Hardware ID, HWID), Enroll password and an optional Control password for your device. The Control password is required if you want to grant access to control applications such as dashboards to your device.
- Return to the General->Profile panel (
 ), and Save (
 ) or Save and
Close (
) or Save and
Close ( ) the Production Template.
 - Provision your serial number(s) with the (
 ) button.
 - Take note of the Production Template’s Plug-ID since it also needs to be input as part of the enrollment credentials.
When the Templates are created, the platform assigns to them a unique Plug-ID that always start with “mod-”. The Template’s Plug-ID, along side a device’s serial number and enroll password constitute a Thing’s enrollment credentials.
You can set and edit the following Production Template features:
- It’s Name.
- Additional Properties that will be applied to all its devices.
- Triggers that will be applied to all its devices.
- SmartPlug Applications that will be installed in all its devices.
- Containers that will de deployed in all its devices.
The Name, Properties, Triggers, SmartPlug Applications and Containers can be edited and modified as required on the Template. In addition to these elements, Production Templates contain the list of all applications built with the Control Designer that use the Template. All or part of these elements can then be associated with the Template’s Production Things and, every time they are modified and saved, all the Template’s Production Things will be automatically updated with the changes.
Production Templates are managed through the Production Templates Management Console, and they are configured and modified through their Properties Console.
The next section describes the consoles in detail.
Production Template Consoles
This section describes:
- The Production Templates Management Console, and
- The Production Template Properties Console.
Production Templates Management Console
The Production Template’s Management console is opened by clicking on the Production Templates tile ( ![]() ) in the platform’s web desktop.
) in the platform’s web desktop.
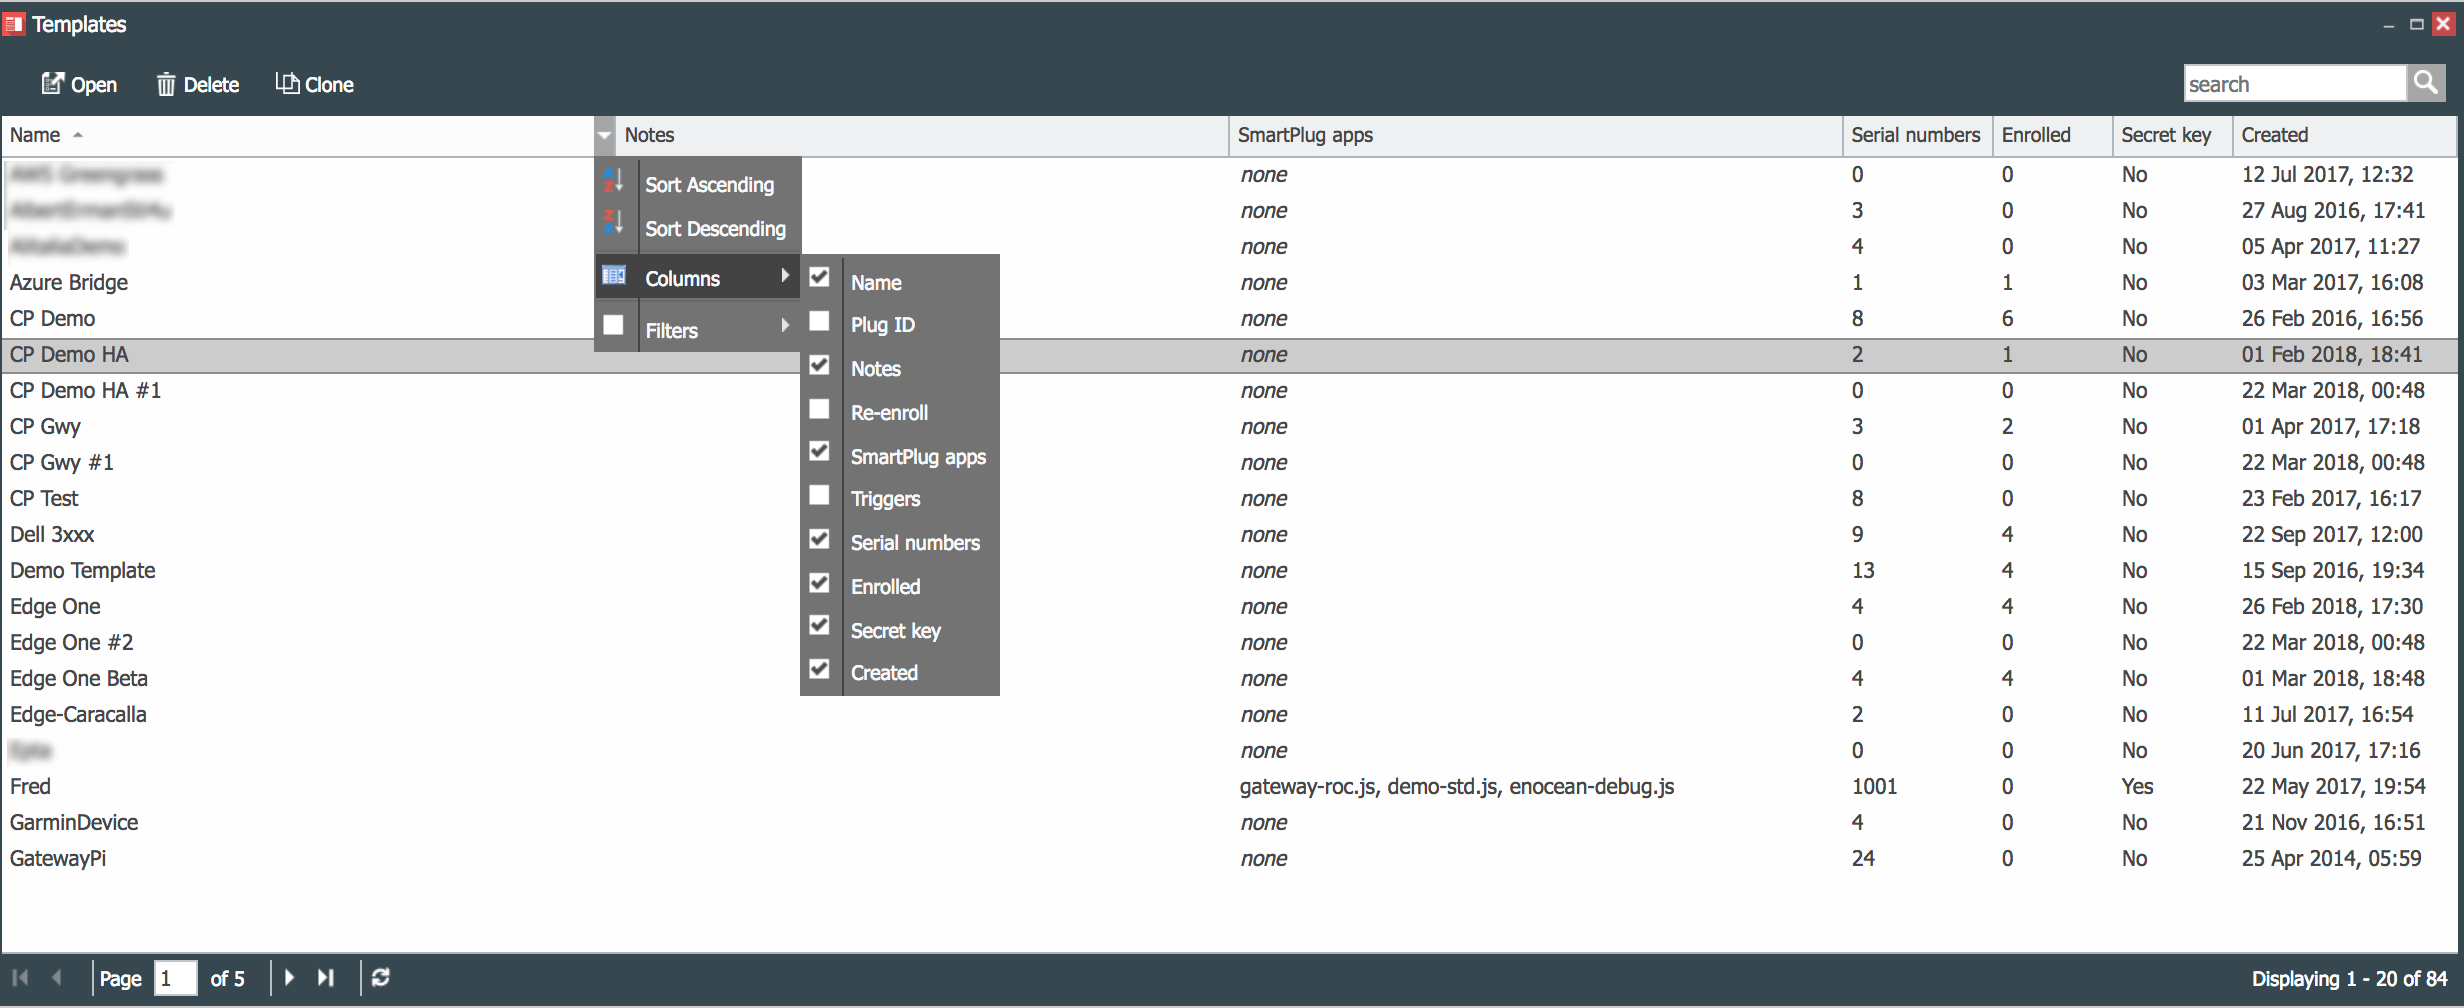
The console displays all Production Templates available and it allows operations to Open, Delete and Clone Templates as well as to
navigate across pages when the number of Templates exceeds a single page.
-
Open (
 ) opens the selected Template’s Properties Console.
 -
Delete (
 ) deletes the selected Template. Deleting a Template requires a few steps. For details on how to do this,
please refer to the delete a Production Template section of this guide.
) deletes the selected Template. Deleting a Template requires a few steps. For details on how to do this,
please refer to the delete a Production Template section of this guide. -
Clone (
 ) duplicates the selected Template and it appends a #1, #2, etc. number to the Template’s name.
The Production Template Management Console shows the:
- Template Name.
- The Plug-ID of the Production Template.
- Notes. Any notes that you have added to the template.
- Re-enroll, which indicates whether the Template’s Production Things will be allowed to re-enroll or not.
- SmartPlug Apps that will be, or have been deployed on the Template’s Production Things.
- Triggers indicates how many triggers are programmed in the Template.
- Serial Numbers indicates the number of serial numbers created and managed by the template.
- Enrolled displays the number of serial numbers enrolled in the platform.
- Secret Key indicates whether a Secret Key was used to generate the Production Thing’s Enroll and Control passwords.
- Created indicates the date that the template was created.
The columns displayed can be set using the column filter accessible from the column drop down menus. Columns such as Created also allow filters to select specific date ranges.
Production Template Properties Console
Just like Production Things and Controllers, the Production Templates have a console to view, edit and manage its features and parameters.
To view the Properties Console of a Template:
- Select a Template from the Management Console.
- Open the Template by Double-clicking on it, or with the Open () button.
The main elements of the Properties Console are:
- General (
 ) which includes:
- Device Profile (
- Triggers (
), which allows the programming of triggers to be deployed on all the Production Things of the Template.
- **Ctrl Apps which are HMI’s or Dashboards built with the Control Designer and associated with the Production Template.
- SmartPlug Apps (
 ), which allows
to provision SmartPlug and Container applications to be deployed on all the Production Things of the Template.
), which allows
to provision SmartPlug and Container applications to be deployed on all the Production Things of the Template. - Serial Numbers (), which allows to input the Production Things serial numbers or hardware ids, and Enroll and Control passwords for the Production Things of the Template.
For details on each section, click on the respective links.
Configuring Properties, Security, Triggers and Applications with the Properties Console
Production Template properties are set through the Template’s Properties Console. This section describes how to configure:
- Properties, through the Production Template Profile () panel.
- Security through the Permissions panel of the Profile panel.
- Triggers through the General -> Triggers () panel.
- Control Applications through the General -> Control Applications (
 ) panel.
 - SmartPlug Applications through the SmartPlug Apps () panel.
- Containers through the Containers (
 ) panel.
As Production Things enroll, they will be configured with the parameters and applications programmed in their Production Template. Parameters and applications for individual Things can be modified after they enroll either through the Things Properties Console or through Bulk Actions.
Production Template Profile
The Production Template Profile includes 3 sections as shown in the image below:
The following sections describe the Production Template General Properties, Additional Properties and Permissions.
General Properties
The Production Template’s General Properties include:
- The image (optional) for the Production Things General Properties Console. It allows to load an image of your production devices. The image can be changed or cleared with the Change and Clear buttons. This image is inherited by all the Production Things belonging to the Template.
- Name, set by you. It can be changed while there are no Production Things enrolled.
- Plug-ID. The Production Template’s unique identifier assigned to it by the platform. Template Plug-ID’s always start with “mod-” unlike Production Things and Controllers whose Plug-ID’s start with “dev-”.
- Pub.data TTL. Allows to set the policy for time-to-live (TTL) or retention of data published by the devices belonging to the Template. Two parameters can be set:
- Max TTL. When a published data message includes a TTL value, Max TTL defines the Maximum period that the data will be stored.
- If the message’s TTL is greater than Max TTL, it will be ignored and the data will be stored and deleted using the value of Max TTL.
- Max TTL can be set to inherit, which means that the Max TTL will the same as the Max TTL of the company’s account.
- Default TTL. When a published data message does not include a TTL value, Default TTL defines the period that the message data will be stored. Default TTL can be set to inherit, which means that the Default TTL of the Company’s account will be used,
- Notes. Any notes you want to add to your Production Template.
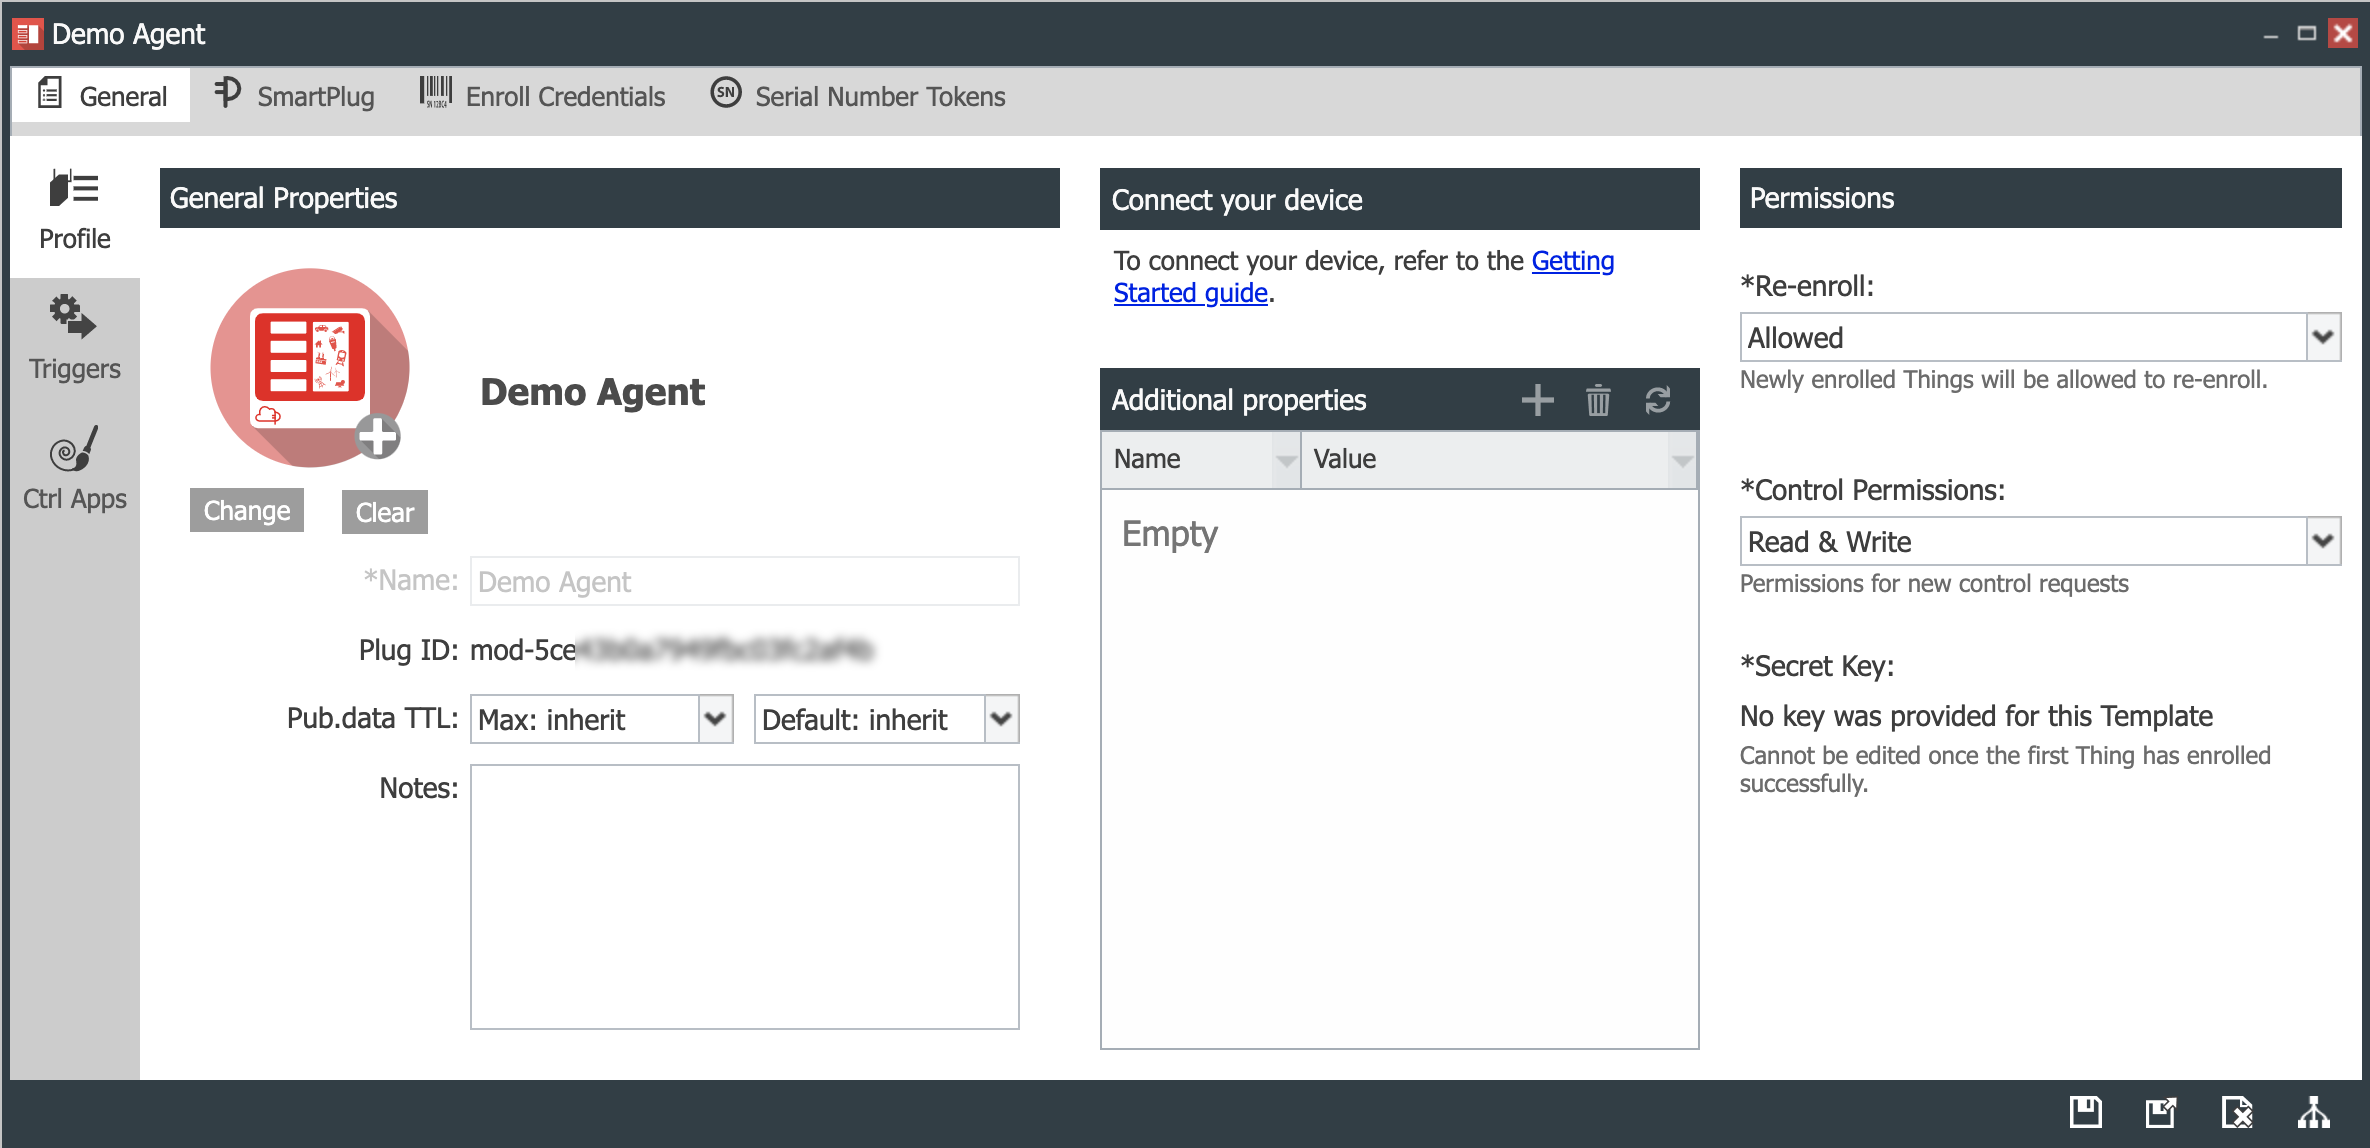
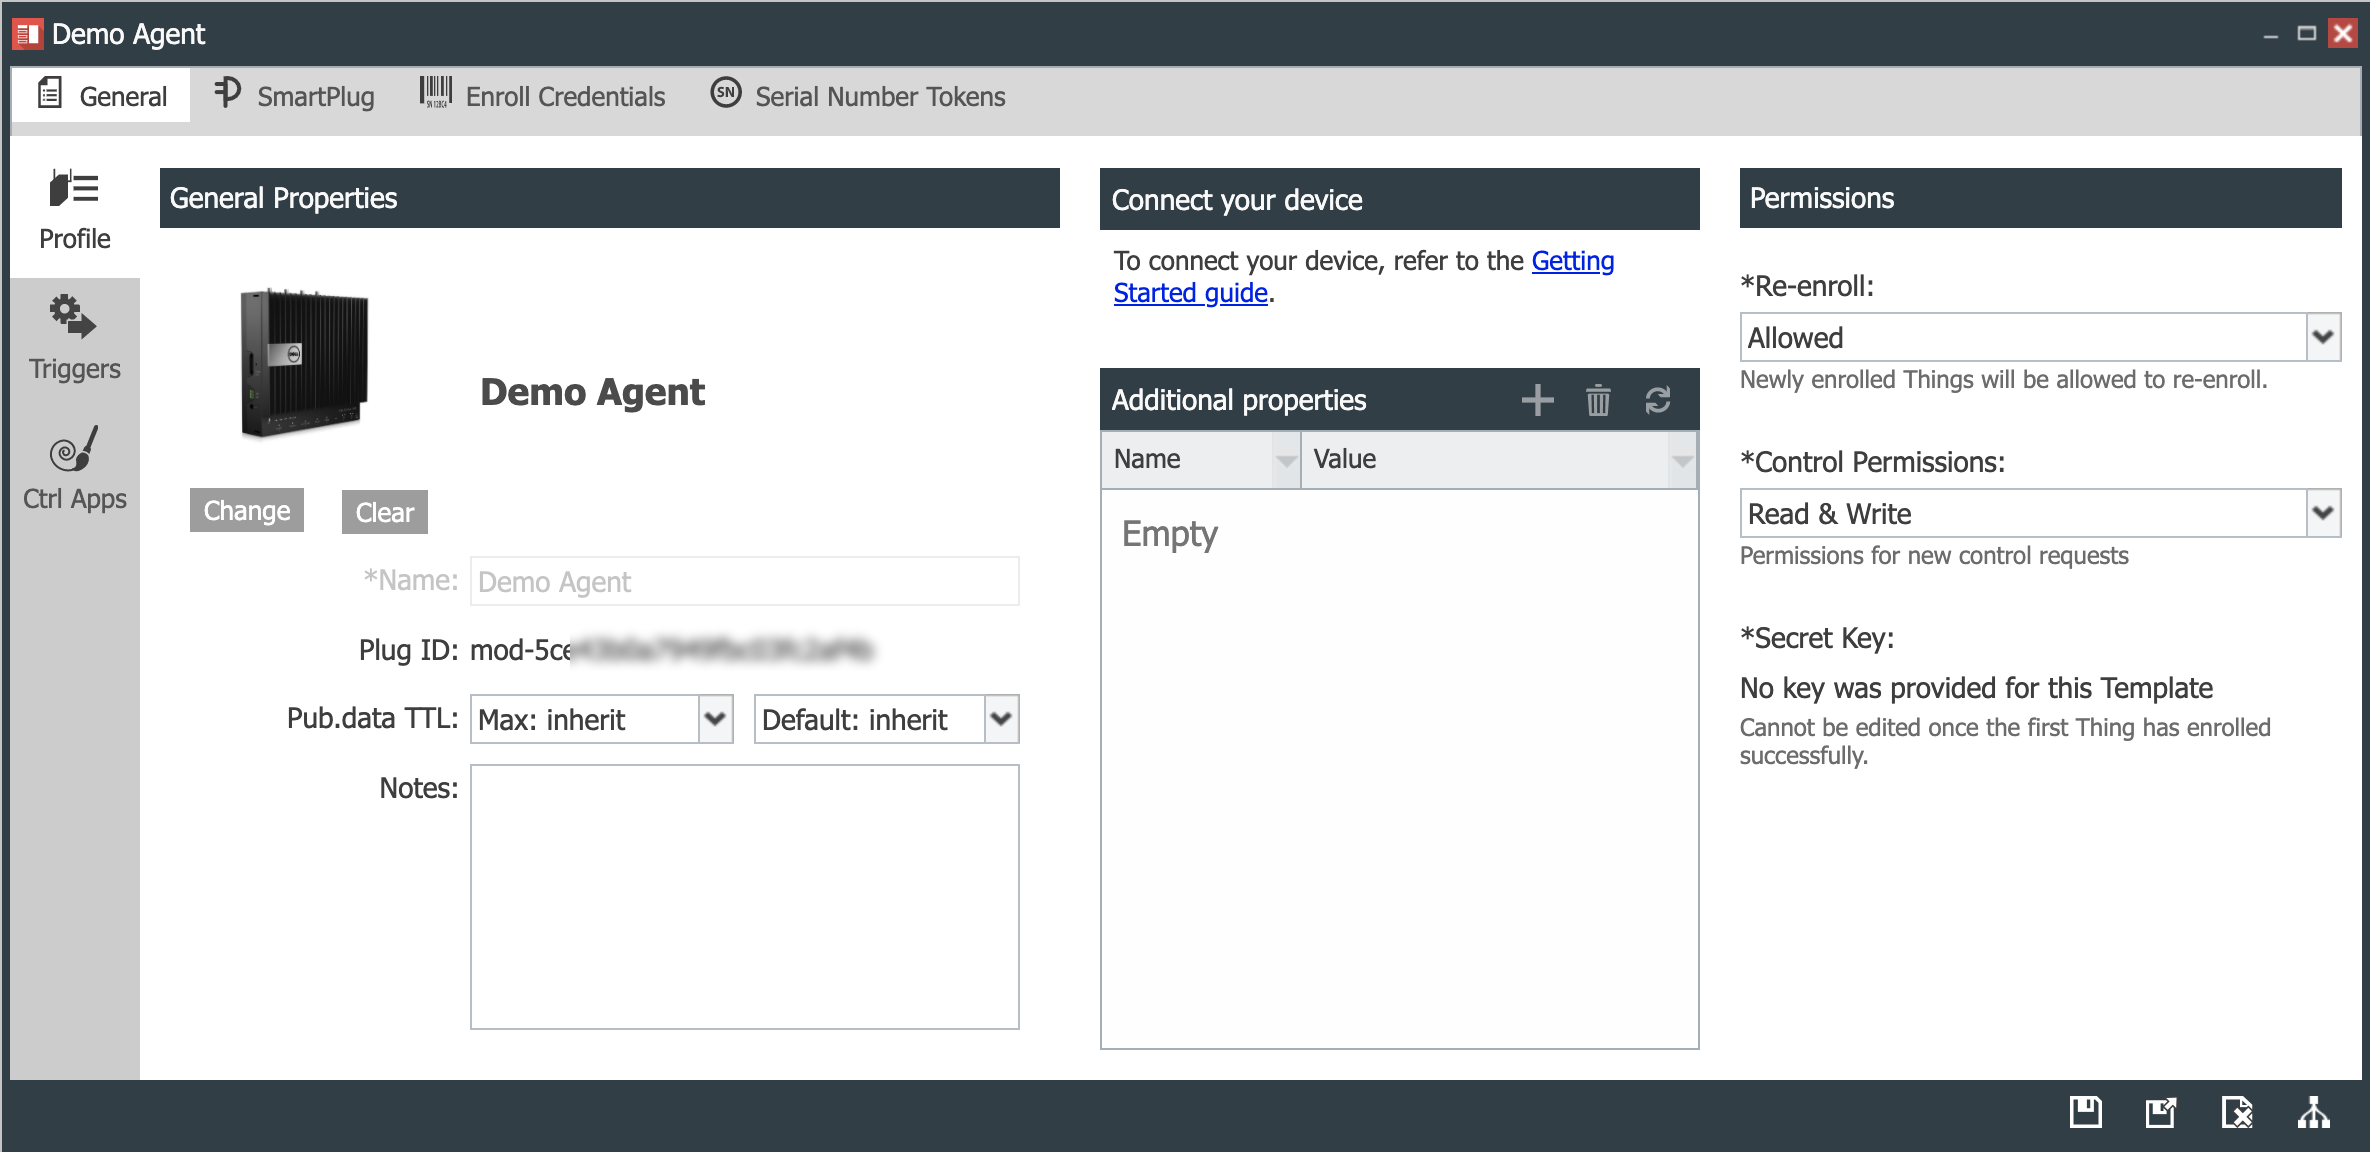
Here is an example of a Production Template before and after an image has been added.
| Initial CP-Demo Template | Template CP-Demo with an image for its Things |
|---|---|
|
 |
Additional Properties
Additional Properties are metadata that can be added to Production Thing and Controller devices. The Production Template’s Additional Properties can be set and edited through the Template’s console. All Additional Properties configured in a Template are inherited by all its Production Things.
Permissions
There are two types of permissions for Production Things that need to be set by the Production Templates:
- Re-enroll permissions, which indicate whether a Production Thing can be re-enrolled in case it ever loses its enrollment.
- Control Permissions which determine if Control applications will have:
- No permissions to access the device’s data and metadata.
- Read only permission which allows the controller to:
- Read data published by a Thing.
- Read the properties of a Thing.
- Enable a Thing to access the data published by the controller.
- Read/Write permission which allows the controller to:
- Overwrite the properties of a Thing.
- Modify data already published by a Thing.
- Publish data as if it was a Thing.
- Delete data published by a Thing.
The Permissions panel also allows to use Secret Keys to automatically generate Enroll and Control passwords as explained in the next section.
Secret Key
When there are lots of Things to be provisioned and, therefore, many enroll and control credentials to create and input, a Secret Key can be be used to have the platform generate enroll and control passwords for Production Things in a Production Template. Each Production Thing serial number entered will be automatically assigned enroll and control passwords.
Secret keys make the creation of large numbers of enroll and control passwords for Things easier. For example, if you have 10,000 Things to enroll, it would be time consuming and prone to mistakes to manually enter the passwords for each one. A Secret Key will instruct the platform to generate the passwords for you in milliseconds.
The enroll passwords produced are unique for each Production Thing and are generated as a combination of the Secret Key and the individual Things serial numbers. The Control passwords generated use a different algorithm than the one used for enroll passwords for security reasons. Therefore, each Secret Key produces a set of two different passwords for each serial number in a Production Template.
Secret Keys are not mandatory, but it is a best practice to use them to ensure secure enrollment of your Things. They need to be at least 8 characters long.
IMPORTANT!
Secret Keys can be changed as long as there are no serial numbers enrolled. If the Key is changed, you must Save the Production Template for the change to become effective. In addition, any devices that have already been programmed with Enroll and Control passwords generated by that Key will need to be updated. If a single serial number is enrolled using the previous Secret Key, the Key is no longer modifiable.
CloudPlugs provides the hash algorithm to customers that want to automate the programming of enroll credentials in their devices. For example, if you have a production line that is automatically installing the OS and applications or firmware and configurations into your devices, the hash algorithm with the Secret Key used in their Production Template can be used to program the enroll and control passwords in your devices.
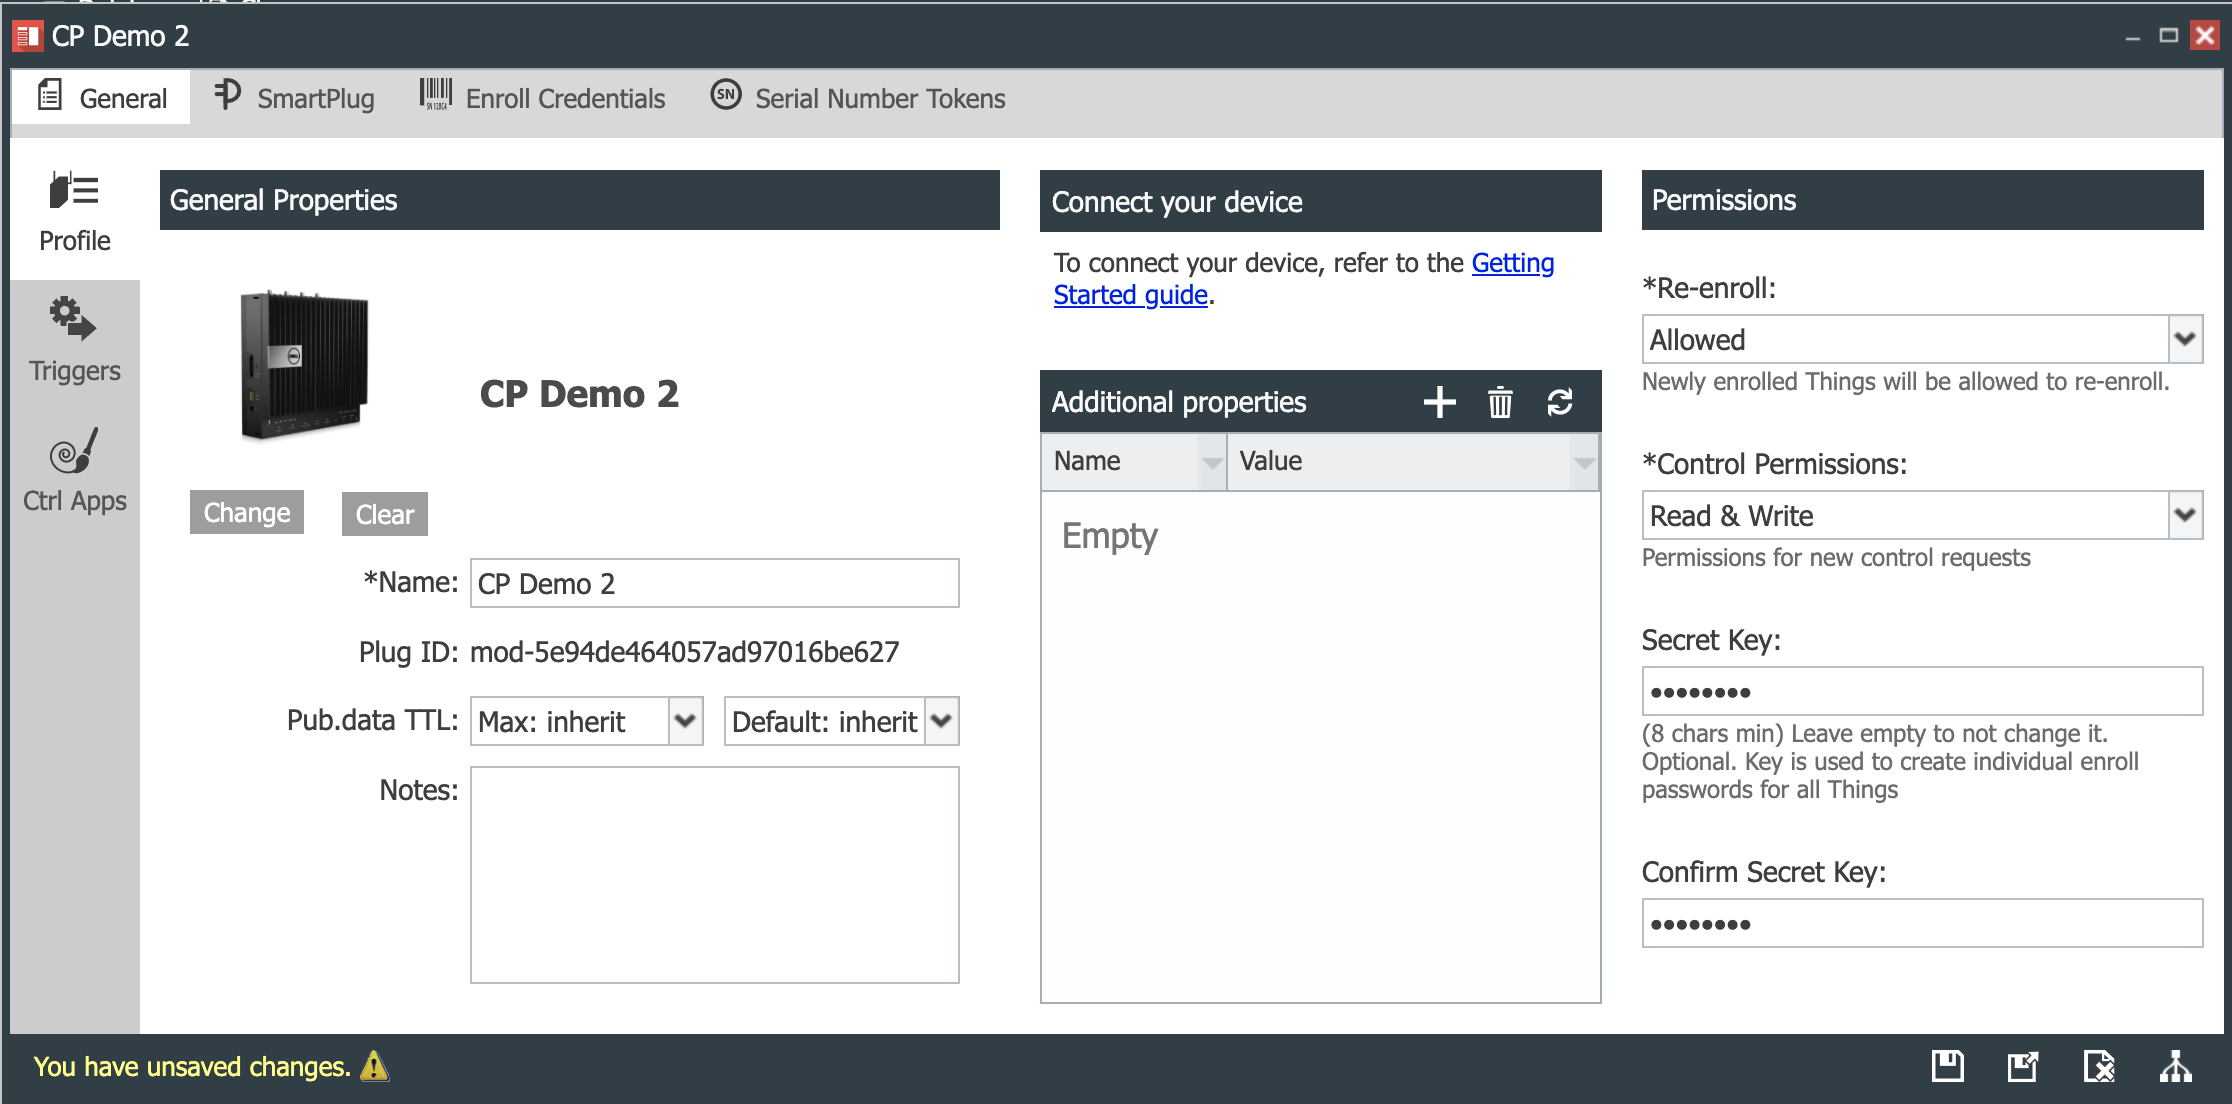
The following images show a Production Template’s Profile that uses a Secret Key, but has no Production Things enrolled yet, and one in which no Secret Key was used, but has enrolled serial numbers. Notice that in the one with enrolled Things, trying to Save the Template generates an error.
| Secret Key used and no serial numbers enrolled | No Secret Key used and at least one serial number enrolled |
|---|---|
 |
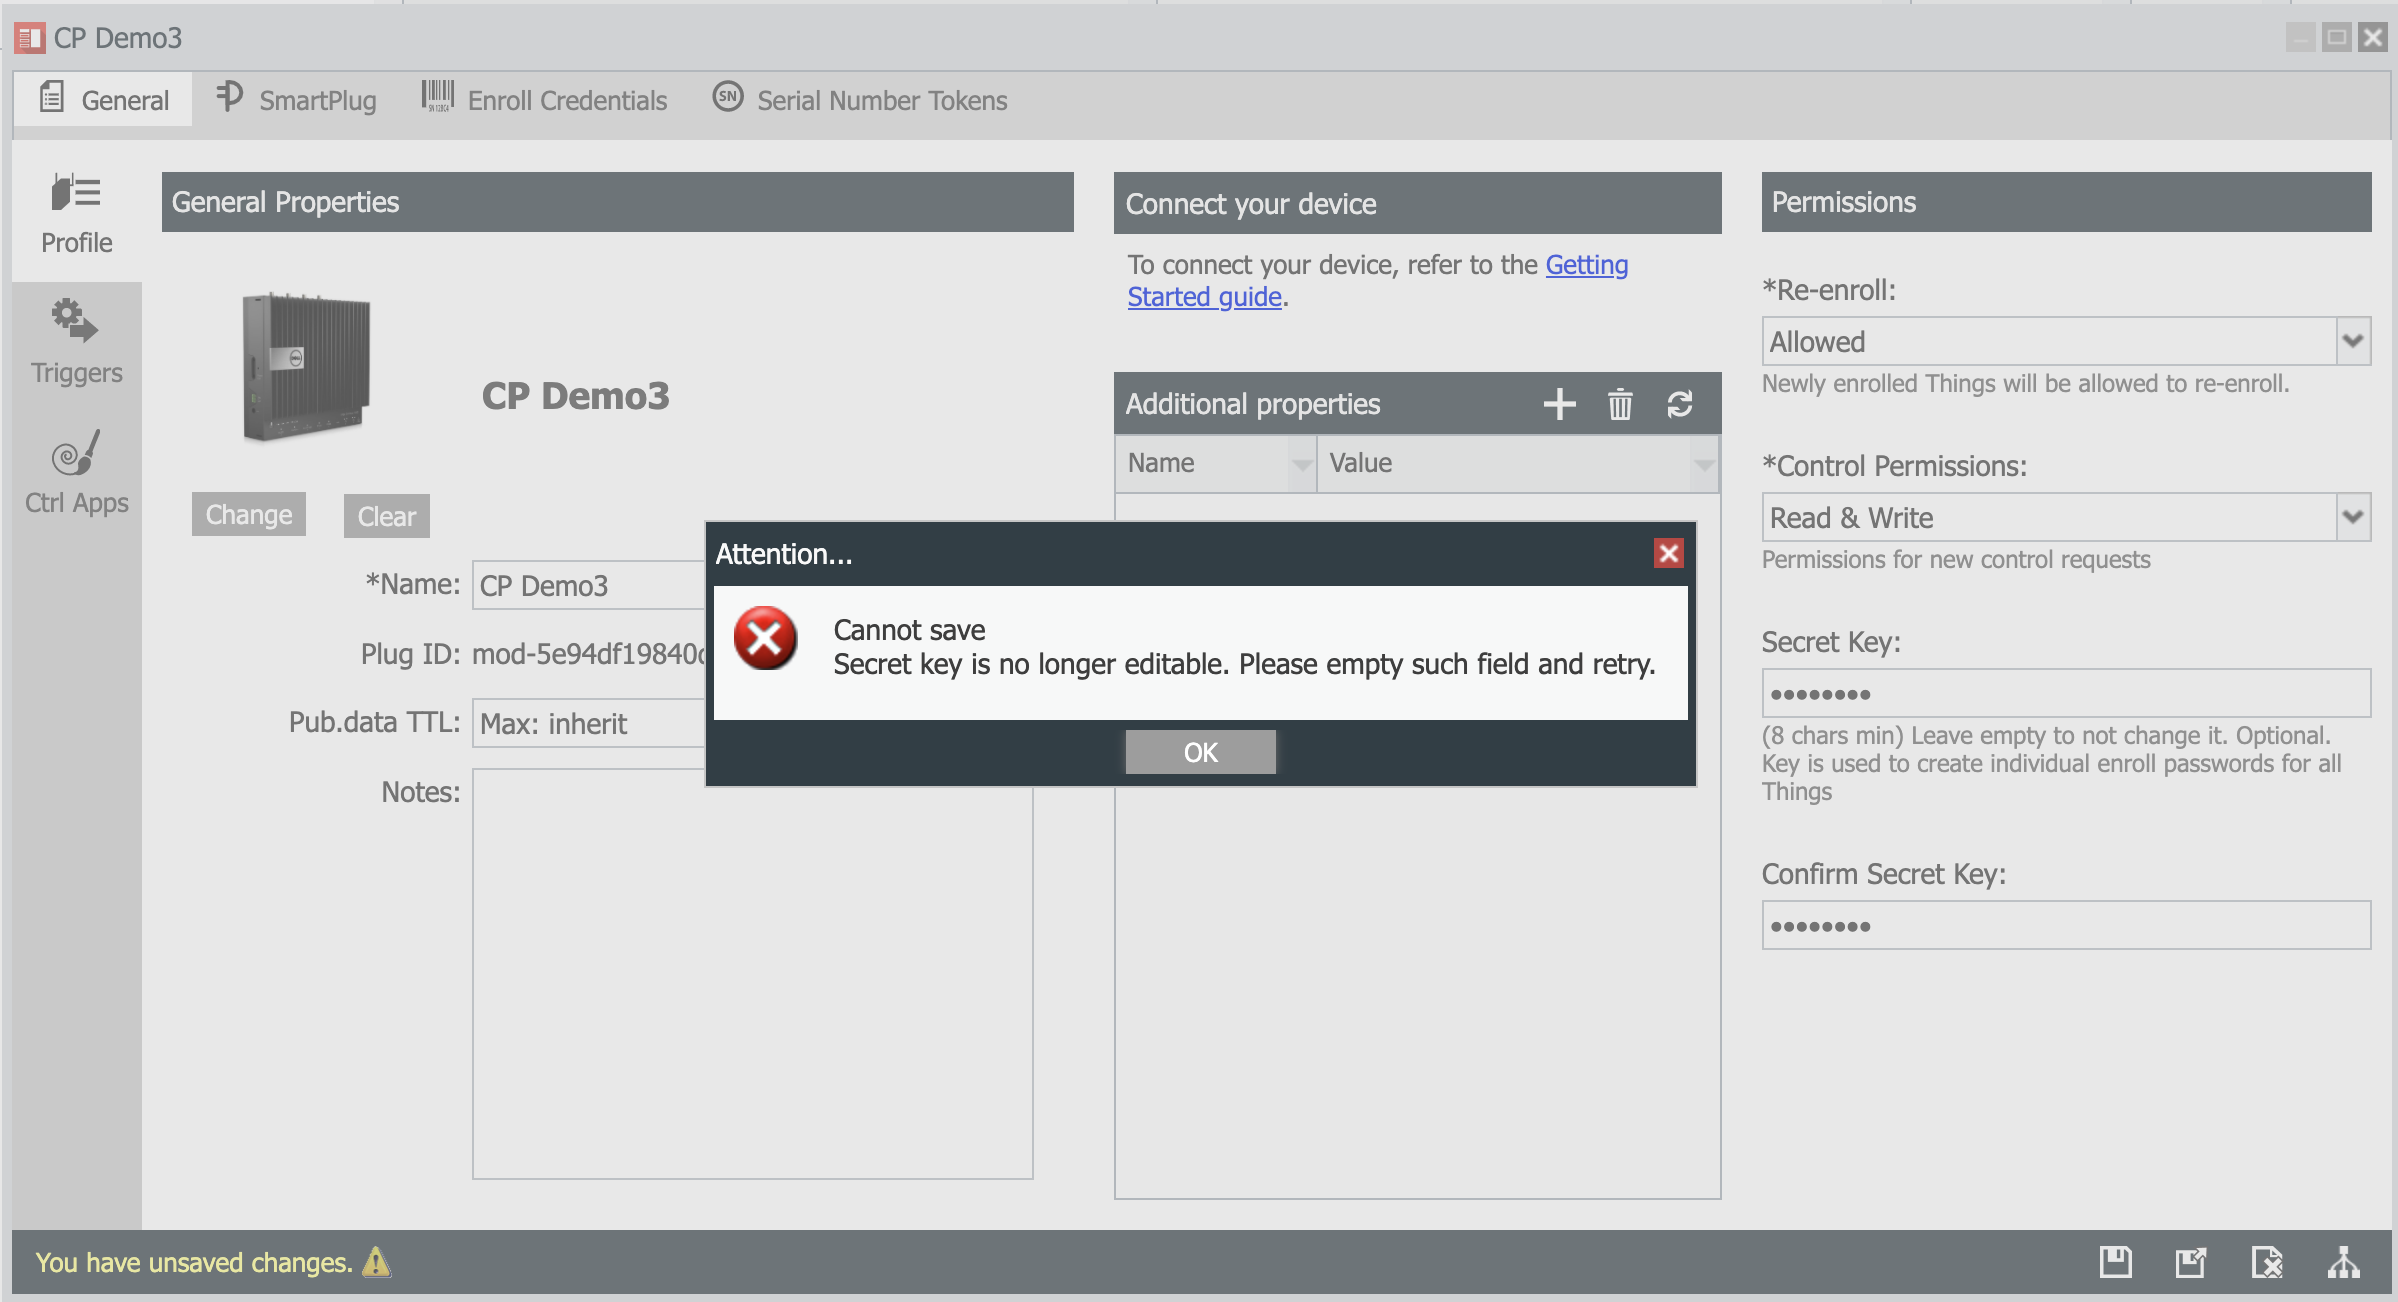 |
Production Template Triggers
Production Template triggers are configured in the exact same way as those for Production Things and Controllers. For details on how to configure triggers, refer to the Triggers Guide.
Production Template Control Applications
Production Templates allow to provision control applications built with the Control Designer to all their Production Things.
When an HMI or dashboard application is built with the Control Designer, it must have a Production Template associated with it. A Production Template will list as available Control Applications for deployment to its Things all the Control Designer applications that are associated with it. To provision Control Applications to the Things in a Production Template:
- Open the desired Production Template from the Production Template’s console.
- Select Ctrl Apps from the left panel menu under General.
- Select one or more control applications from the Control Apps for this Template list. To select more than one, simply Shift and Click the additional applications.
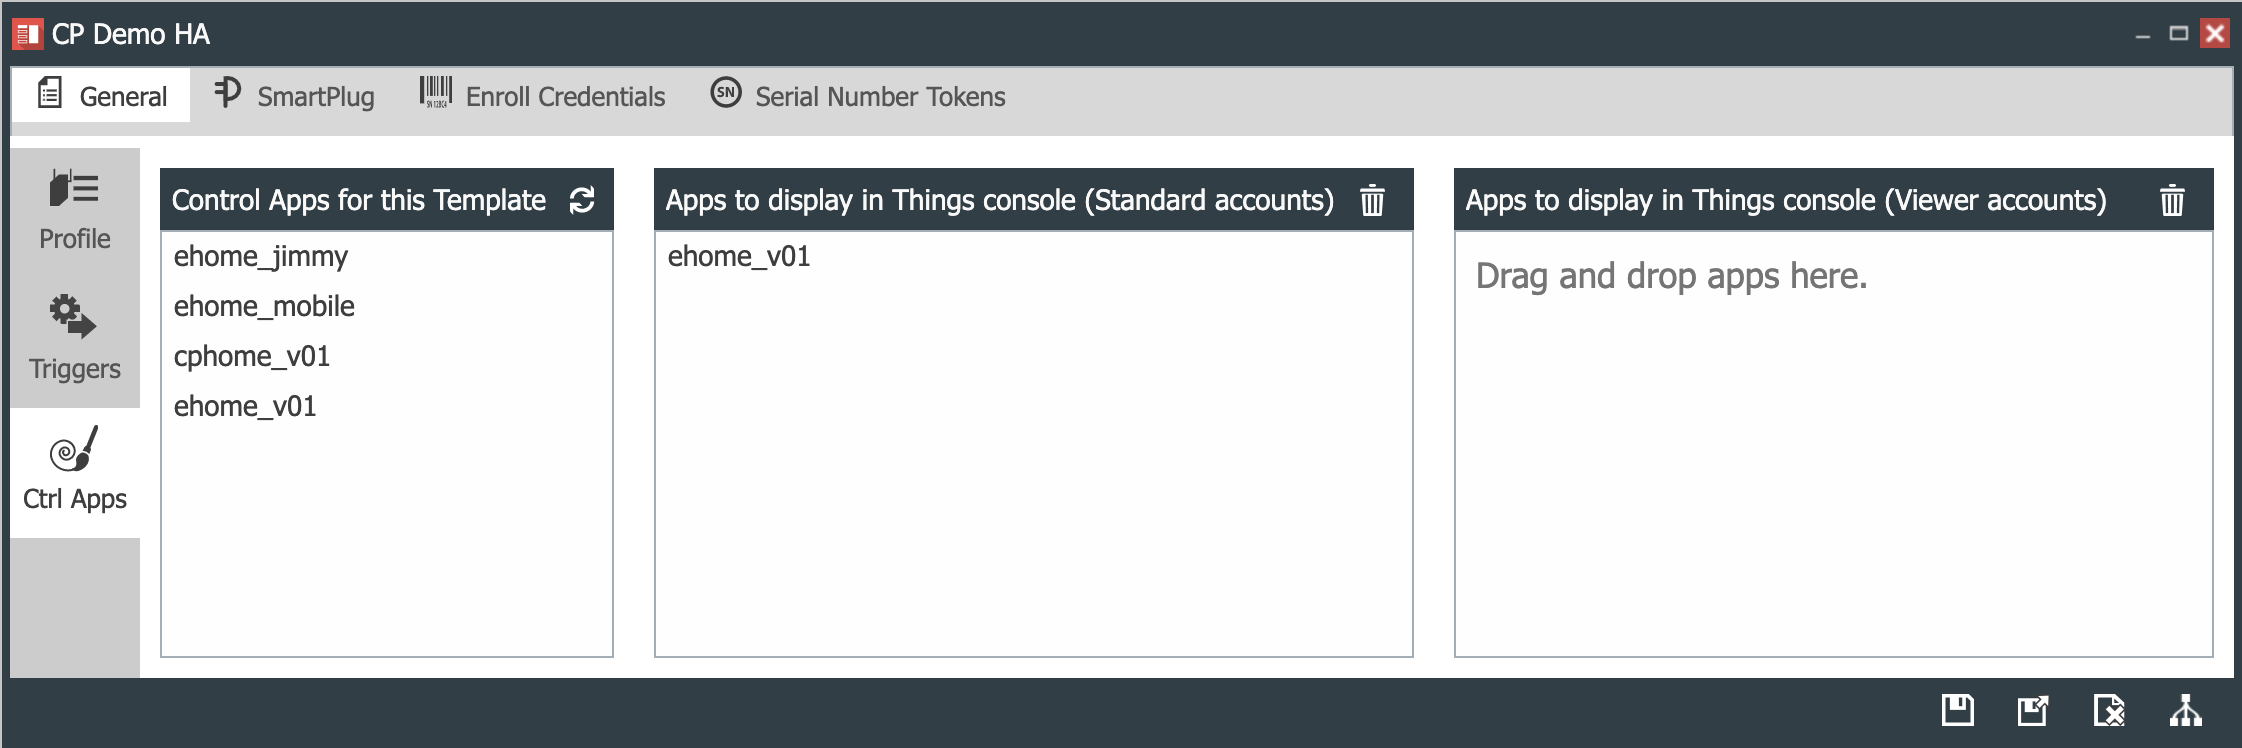
- Drag and Drop those applications into the Control Apps Provisioned to Things panel. If you want Viewer accounts to be able to see the control applications in the console of the Things that belong to the Template, also drag and drop them into the Allow “Viewer” Accounts to see these Control Apps panel.
- Save ( ) or Save and Close ( ) the Production Template to initiate the provisioning of the control apps to its Production Things.
The example below displays a number of Control Designer applications associated with the Template CP-Demo with 2 applications for its Production Things and one for Things in Viewer accounts.
Note that the only way to remove inherited control applications from Production Things is to remove them from the Control Apps Provisioned to Things panel in the Production Template. Control apps removed in this way will be removed from all the Things that belong to the Template.
Production Template SmartPlug Apps
Production Templates can have any number of SmartPlug™ applications associated with them if their
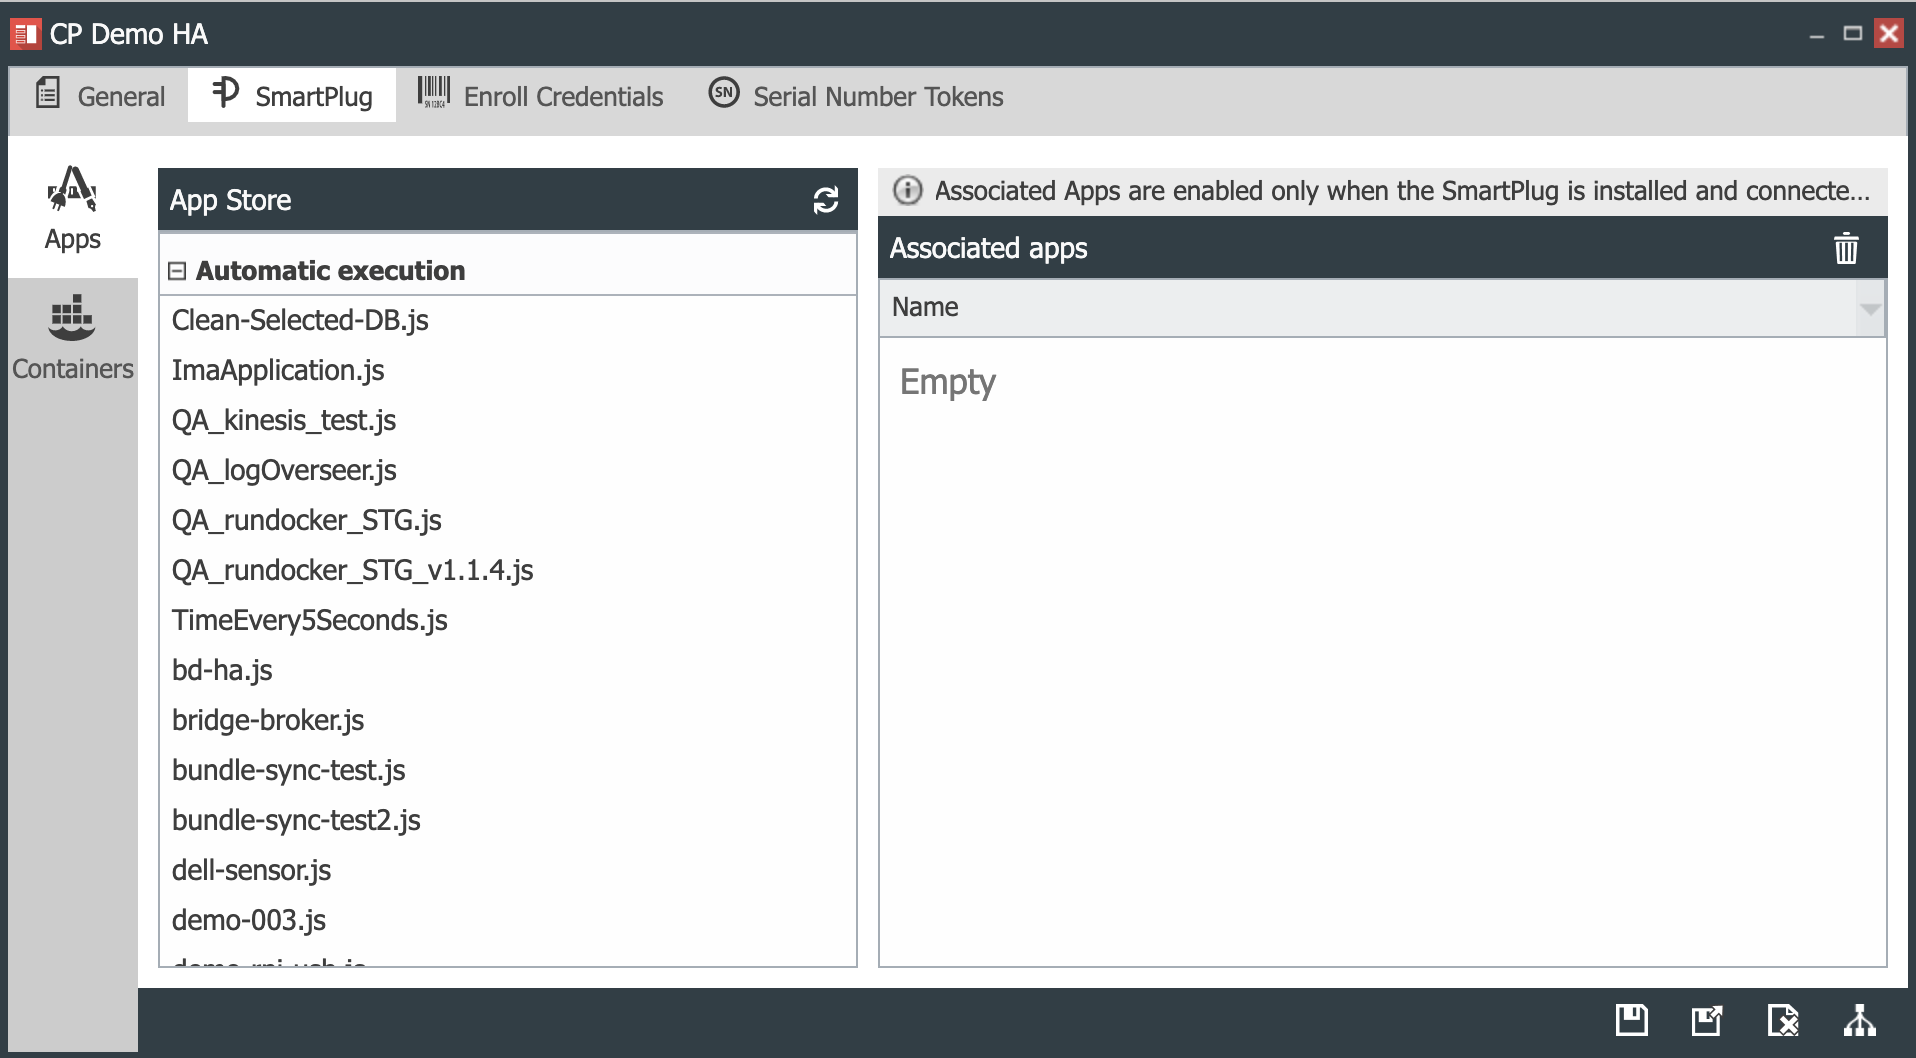
Production Things will be running a SmartPlug™ IoT agent. The SmartPlug Apps tab ( ![]() )
which enables to associate application scripts with the Production Template Things is accessible on the side menu bar when SmartPlug is selected on the top ribbon of the Production Template Properties Console as shown
below.
)
which enables to associate application scripts with the Production Template Things is accessible on the side menu bar when SmartPlug is selected on the top ribbon of the Production Template Properties Console as shown
below.
All the currently available applications in the SmartPlug App Store can be provisioned by the Production Templates. If the application list has been changed in the SmartPlug Apps store (![]() ),
the reload ( ) command will refresh the list.
),
the reload ( ) command will refresh the list.
For details on how to provision applications on Templates, refer to the Provisioning SmartPlug Apps through a Production Template Guide.
All Production Things associated with the Production Template will automatically inherit the SmartPlug Apps configured in the Production Template.
Note that the only way to remove inherited SmartPlug Apps from Production Things is to remove them from the Production Template. SmartPlug Apps that are removed from the Production Template panel will then be removed from all the Production Things associated with the Template.
Clicking on Save ( ![]() ) or Save and Close (
) or Save and Close ( ![]() ) will deploy the Apps on all the Production Things with SmartPlugs associated with the Template.
) will deploy the Apps on all the Production Things with SmartPlugs associated with the Template.
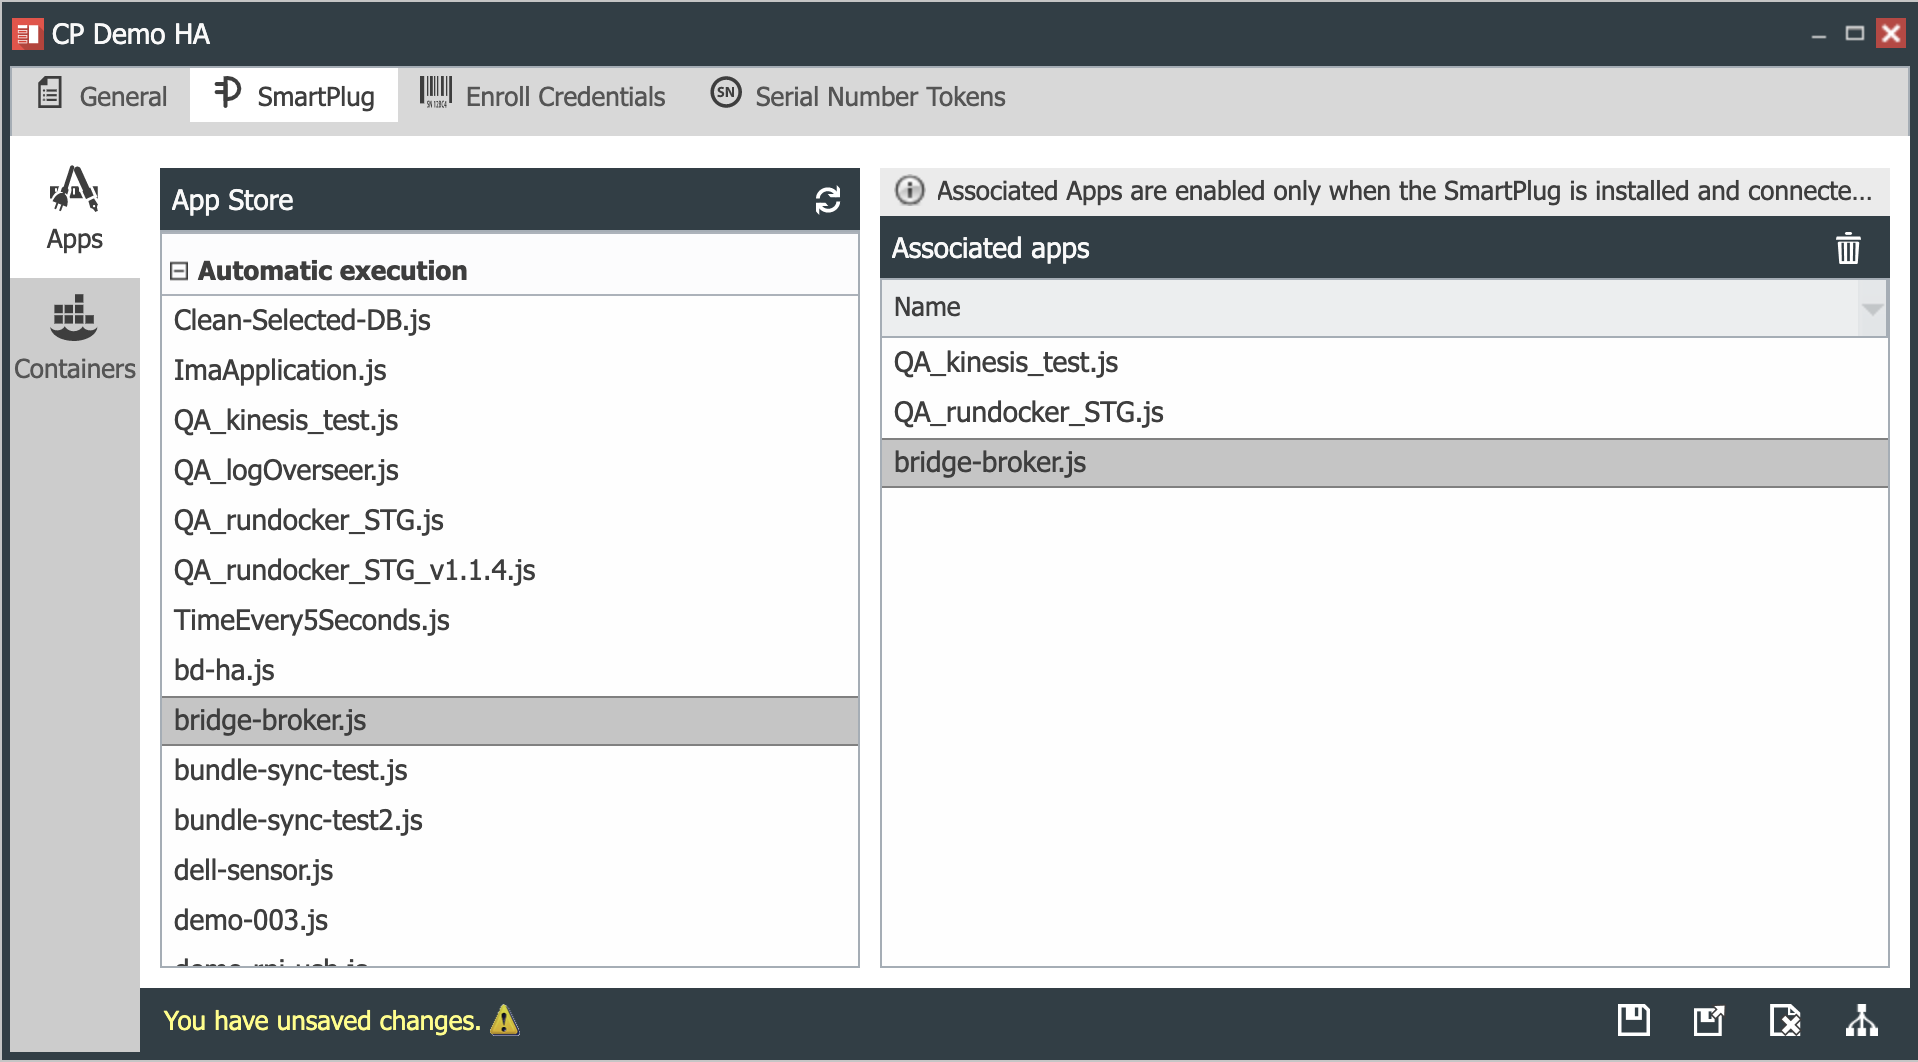
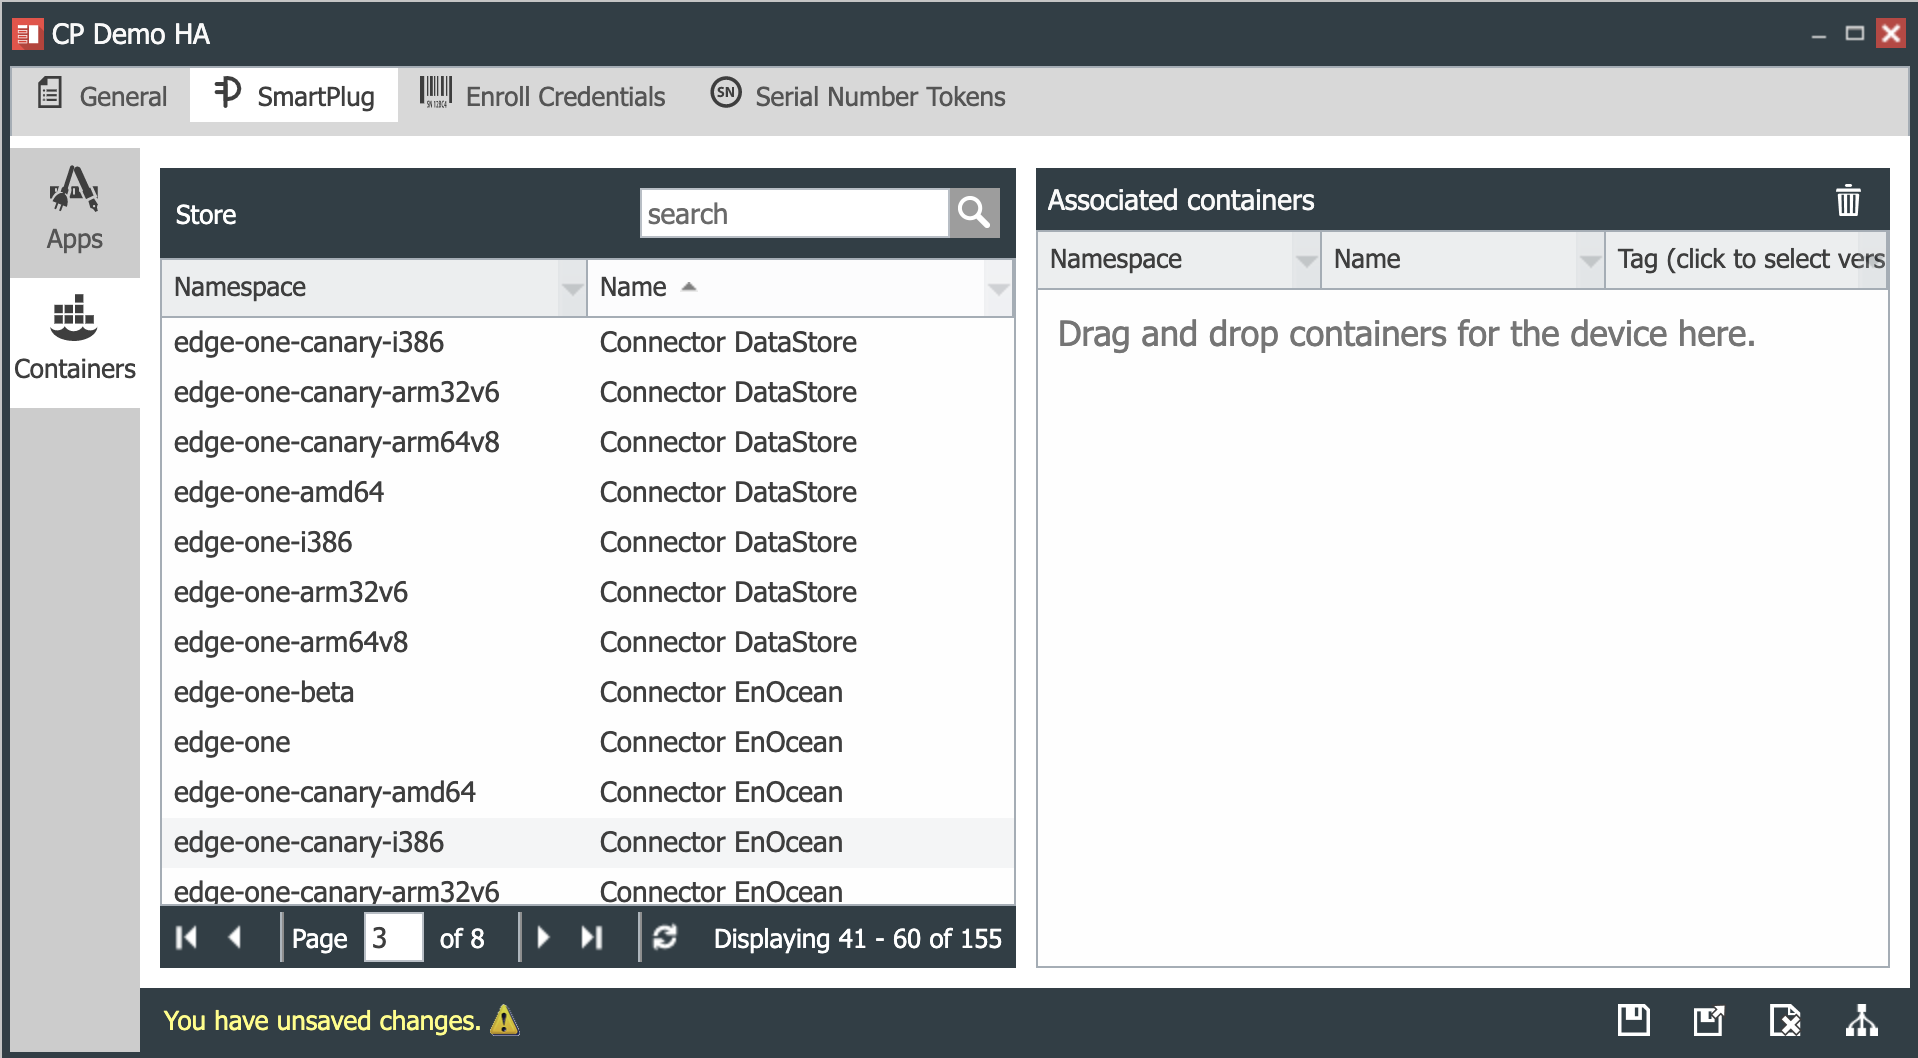
The image below shows the Template CP-Demo’s SmartPlug Apps panel with three apps and a library provisioned.
Production Template Containers
You can associate a number of Containers with a Production Template. Containers are only accessible by devices that run a SmartPlug™ IoT agent. The Containers tab ( ![]() )
is available on the side menu bar when SmartPlug is selected on the top ribbon of the Production Template Properties Console as shown below.
)
is available on the side menu bar when SmartPlug is selected on the top ribbon of the Production Template Properties Console as shown below.
All the Containers available in the CloudPlugs IoT registry of your account will be displayed on the list and can be provisioned to Things by the Production Templates. If while working on the Production Template more Containers have been added to the registry, the reload ( ) command will refresh the list.
All Production Things associated with the Production Template will automatically inherit the Containers configured in the Production Template.
Note that the only way to remove inherited Containers from Production Things is to remove them from the Production Template. Containers that are removed from the Production Template panel will then be removed from all the Production Things associated with the Template.
Clicking on Save ( ) or Save and Close ( ![]() ) will deploy the Apps on all the Production Things with SmartPlugs associated with the Template.
) will deploy the Apps on all the Production Things with SmartPlugs associated with the Template.
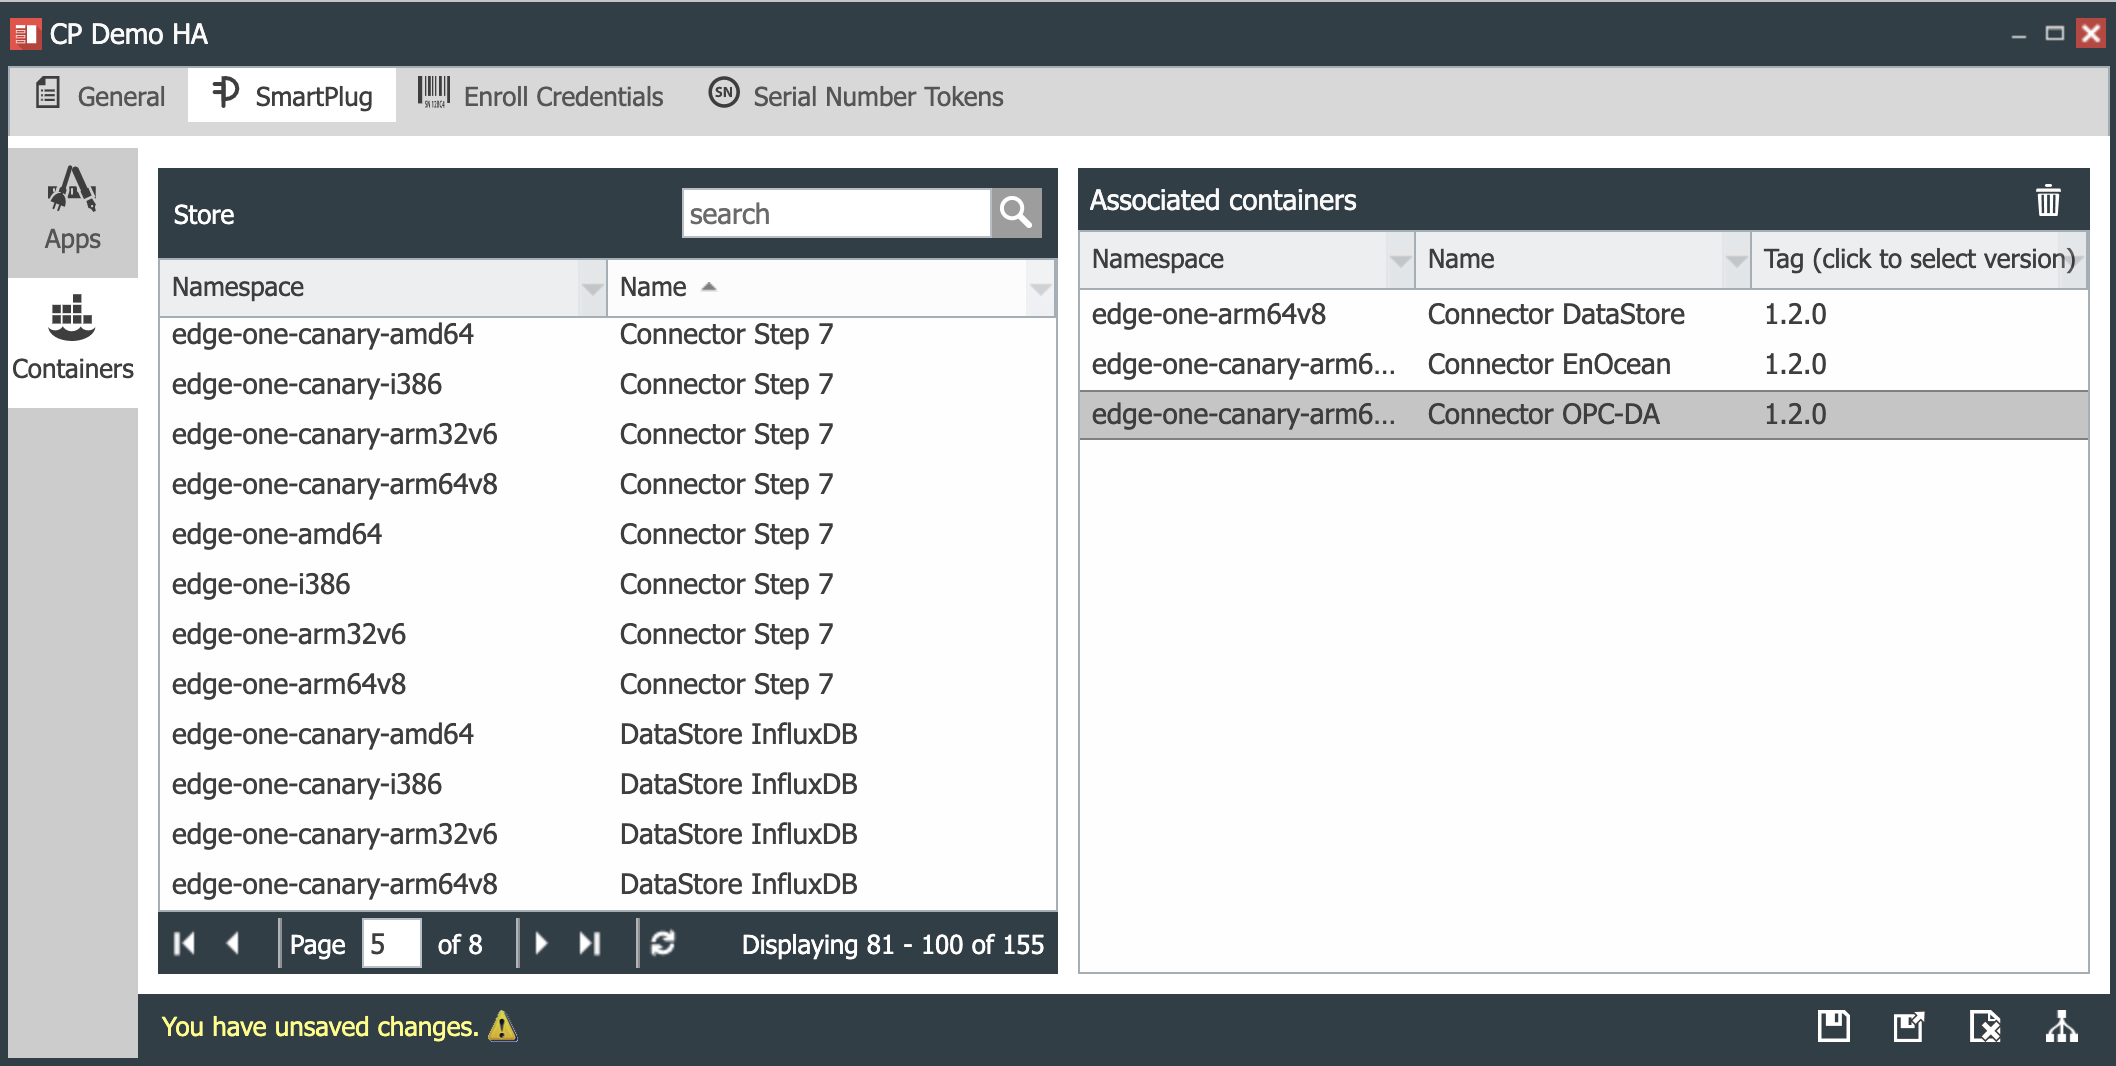
The image below shows the Template CP-Demo’s Containers panel with three Containers provisioned.
Configuring the Production Things Enroll Credentials
In order for Production Things to enroll in the platform, they must be provisioned by their Production Template with their individual enrollment credentials. Those credentials are:
- A serial number or hardware ID (required). This is a user defined unique identifier for each Production Thing. You cannot have two Production Things belonging to the same Production Template with the same serial number.
- An Enroll password (required). User defined password that the platform uses once along with the serial number to generate the device's Plug-ID and connectivity/activation password.
- A Control password (optional). User defined password that a Controller needs to control the Production Thing.
When there is a large number of devices that need to be provisioned and it is impractical to enter the device serial numbers, Enroll and Control passwords manually, they can be uploaded from a .CSV (Comma Separated Values) file. The following is an example of a valid CSV file with three serial numbers and their respective enroll and control passwords.
rpi-001,enroll_pasword,control_password
edison-003,enroll_password
BBB-384-A,enroll_password,control_password
Enroll and Control passwords may also be generated by the platform using a Secret Key. In addition, Production Templates allow the creation of tokens, which can be used by external applications to make REST request calls to CloudPlugs IoT to generate credentials. For more details, please refer to the Creating Tokens for Programmatic Generation of Serial Numbers section of this guide.
A Production Template’s Production Thing serial numbers, Enroll and Control passwords are entered using the Serial Numbers panel accessible through the Serial Numbers tab (![]() ).
).
It consists of two panels:
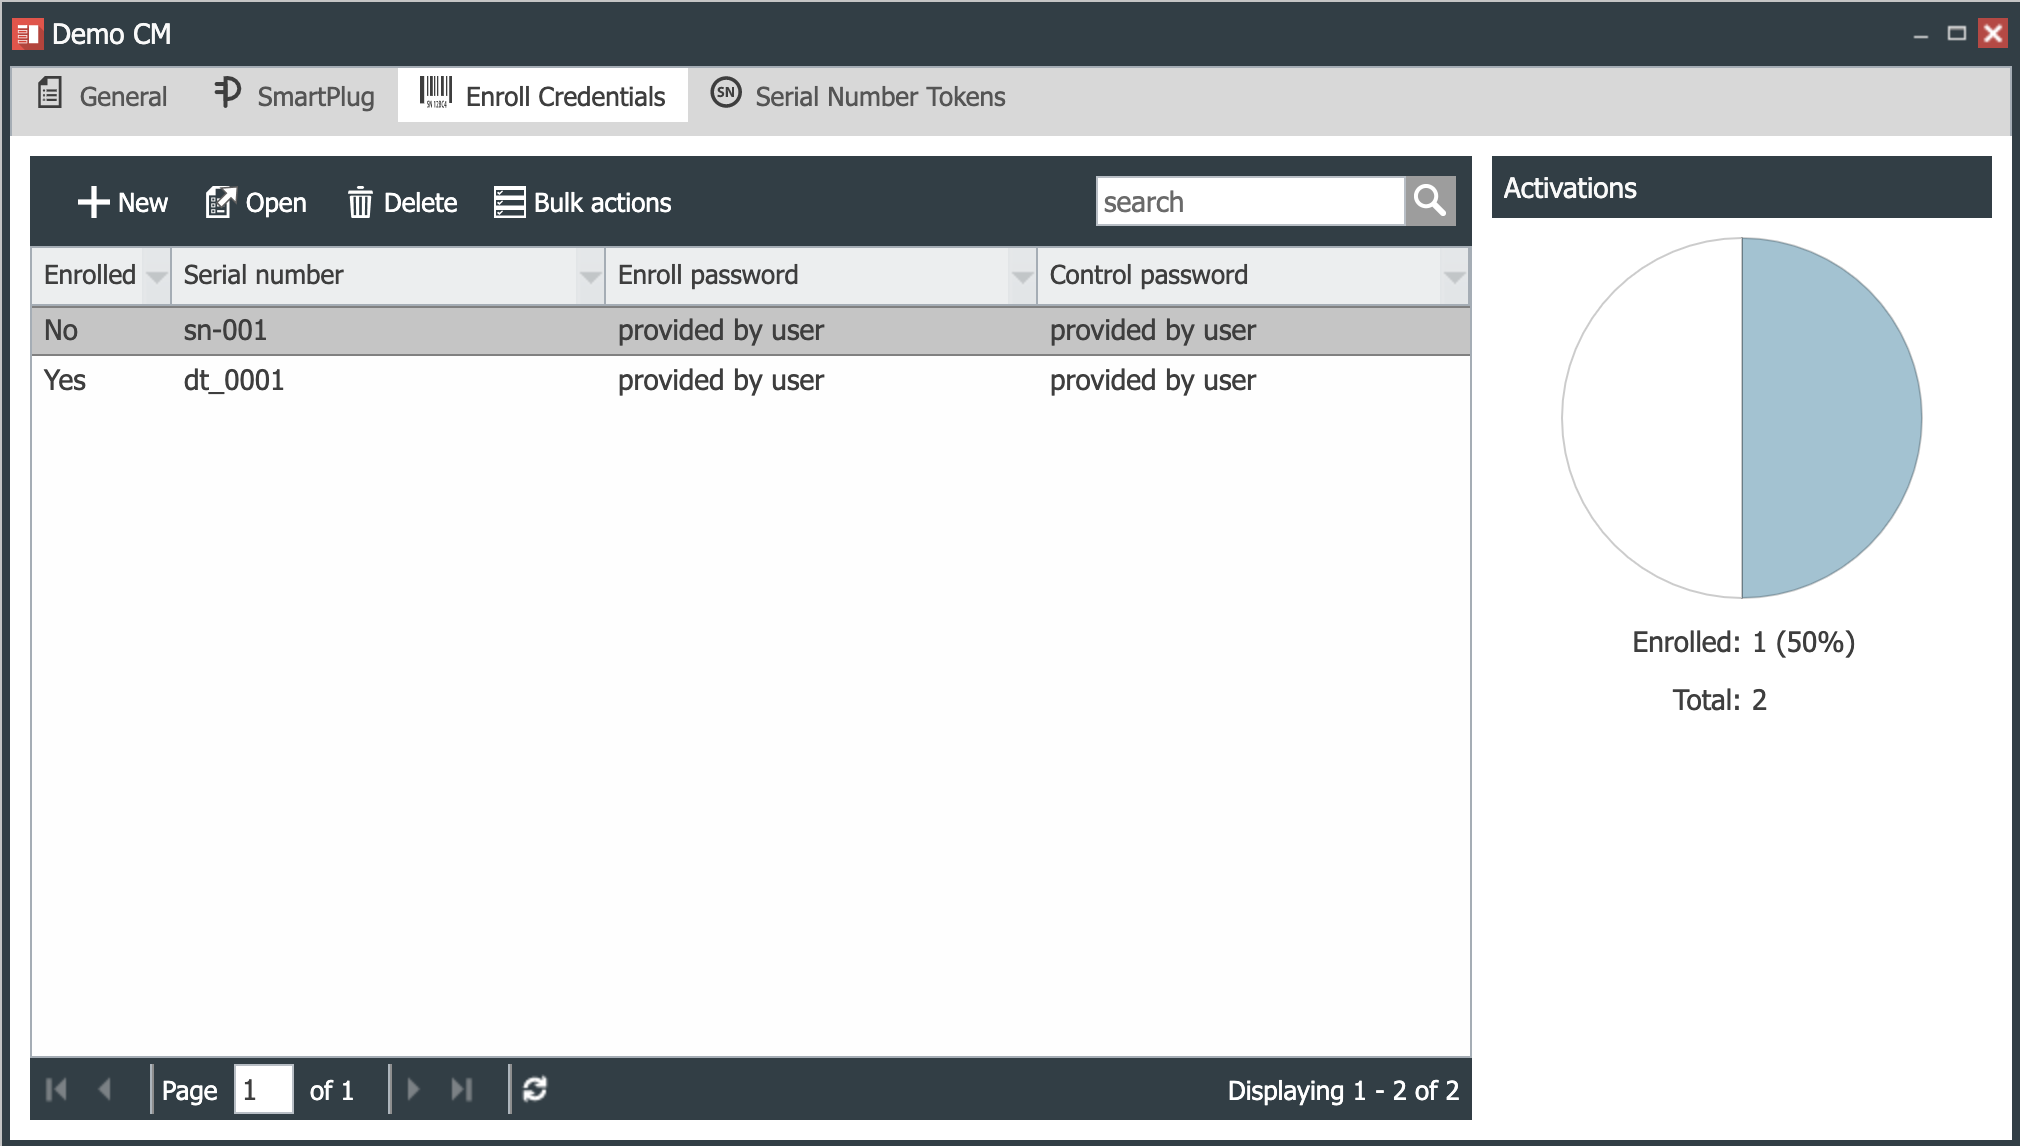
- The main panel that allows to issue commands and lists the serial numbers.
- The Activations panel which shows how many and what percent of the devices with serial numbers saved in the Template are currently enrolled.
Serial Number Main Panel
The main panel allows you to:
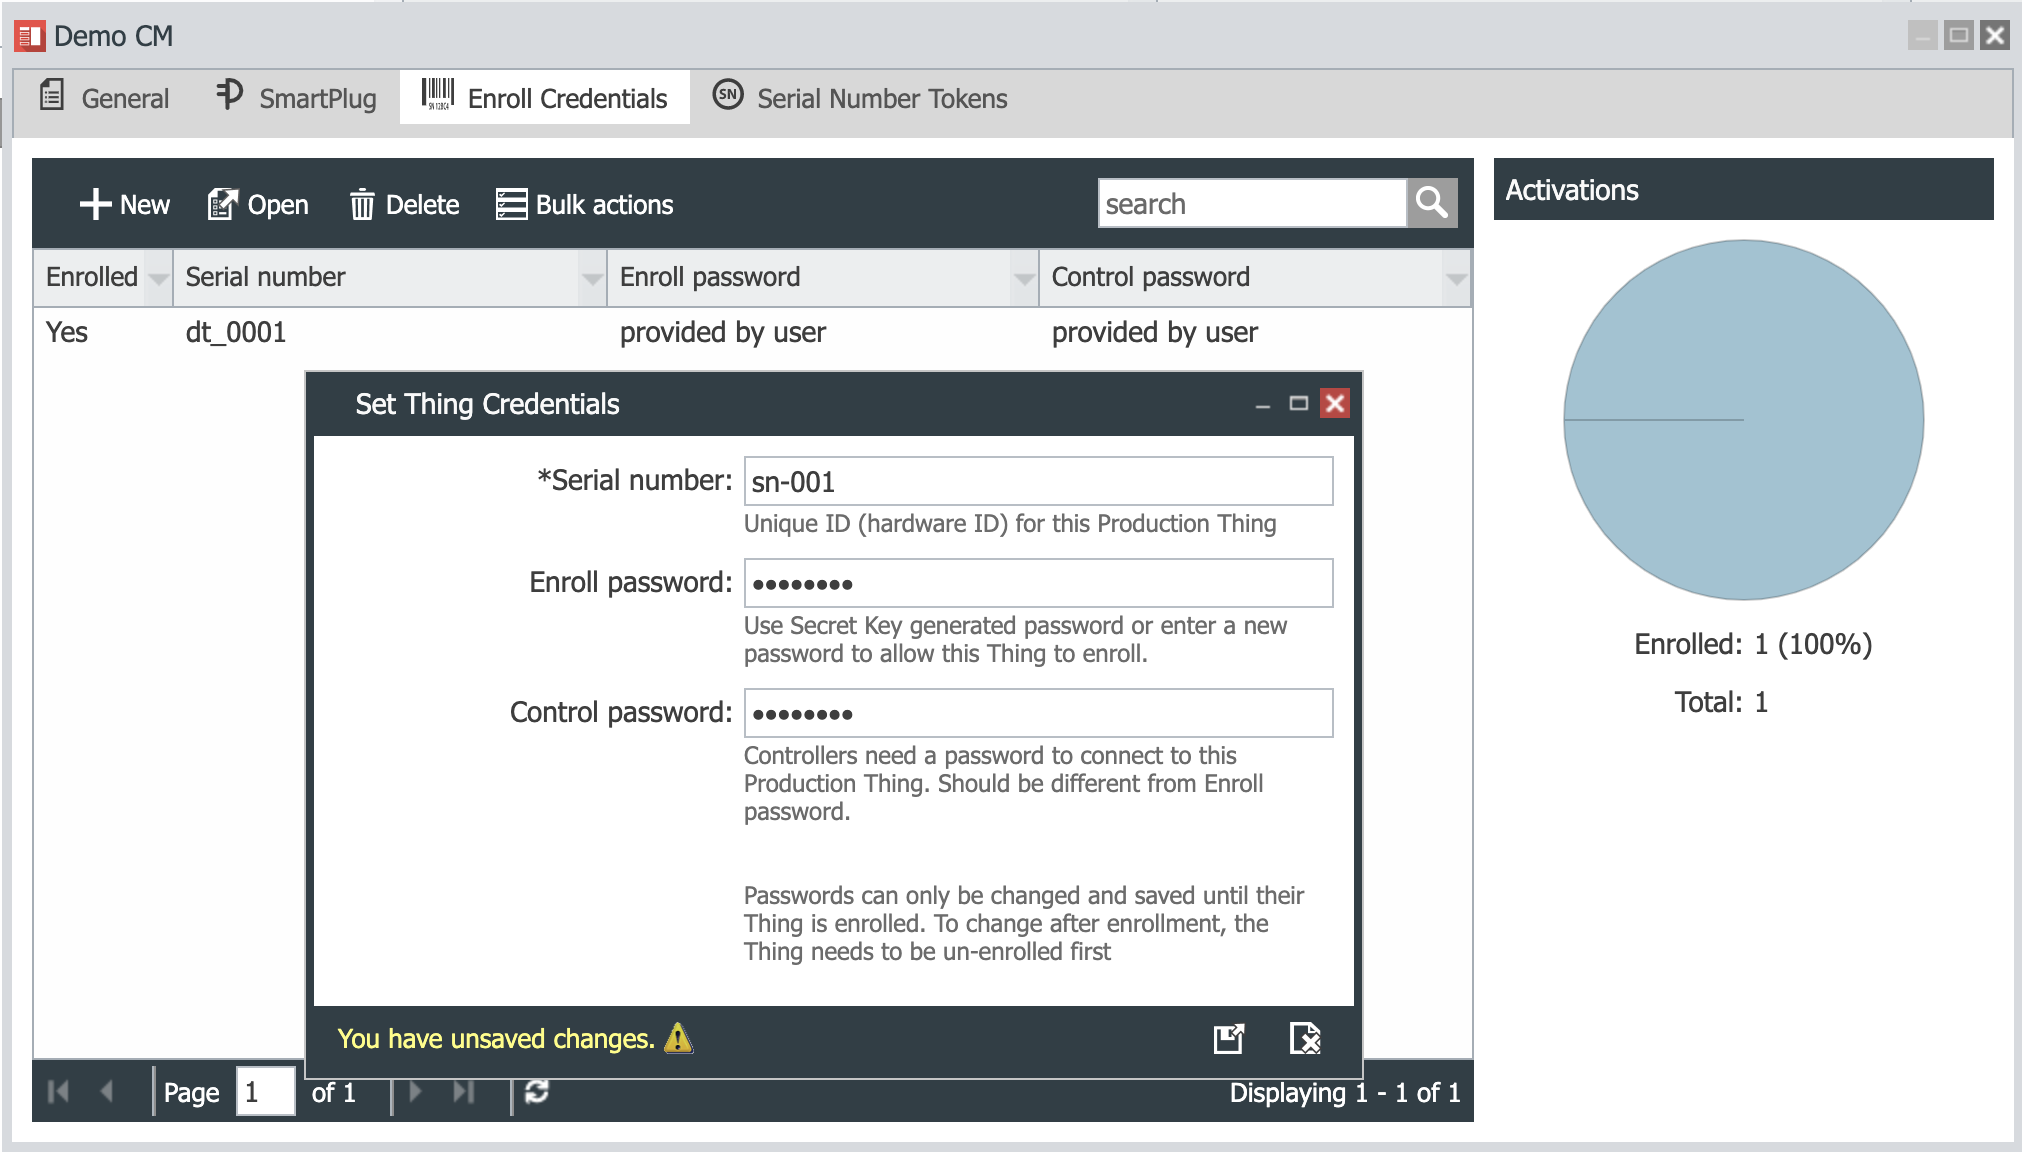
- Add ( ) a new serial number, which opens the credential input window shown below, and once it is saved ()
produces the results shown on the image to the right.
| Add a New Serial Number and Credentials | List displays the Serial Number and status of its enrollment and credentials |
|---|---|
 |
 |
IMPORTANT!
Enroll and Control passwords can be changed and saved only before their Thing is enrolled. Once the Thing is enrolled, they cannot be modified. The only way to change them is for the Thing to become un-enrolled, which is equivalent to deleting the Thing from the platform.
- Open () an existing serial number.
- Delete ( ) an existing serial number.
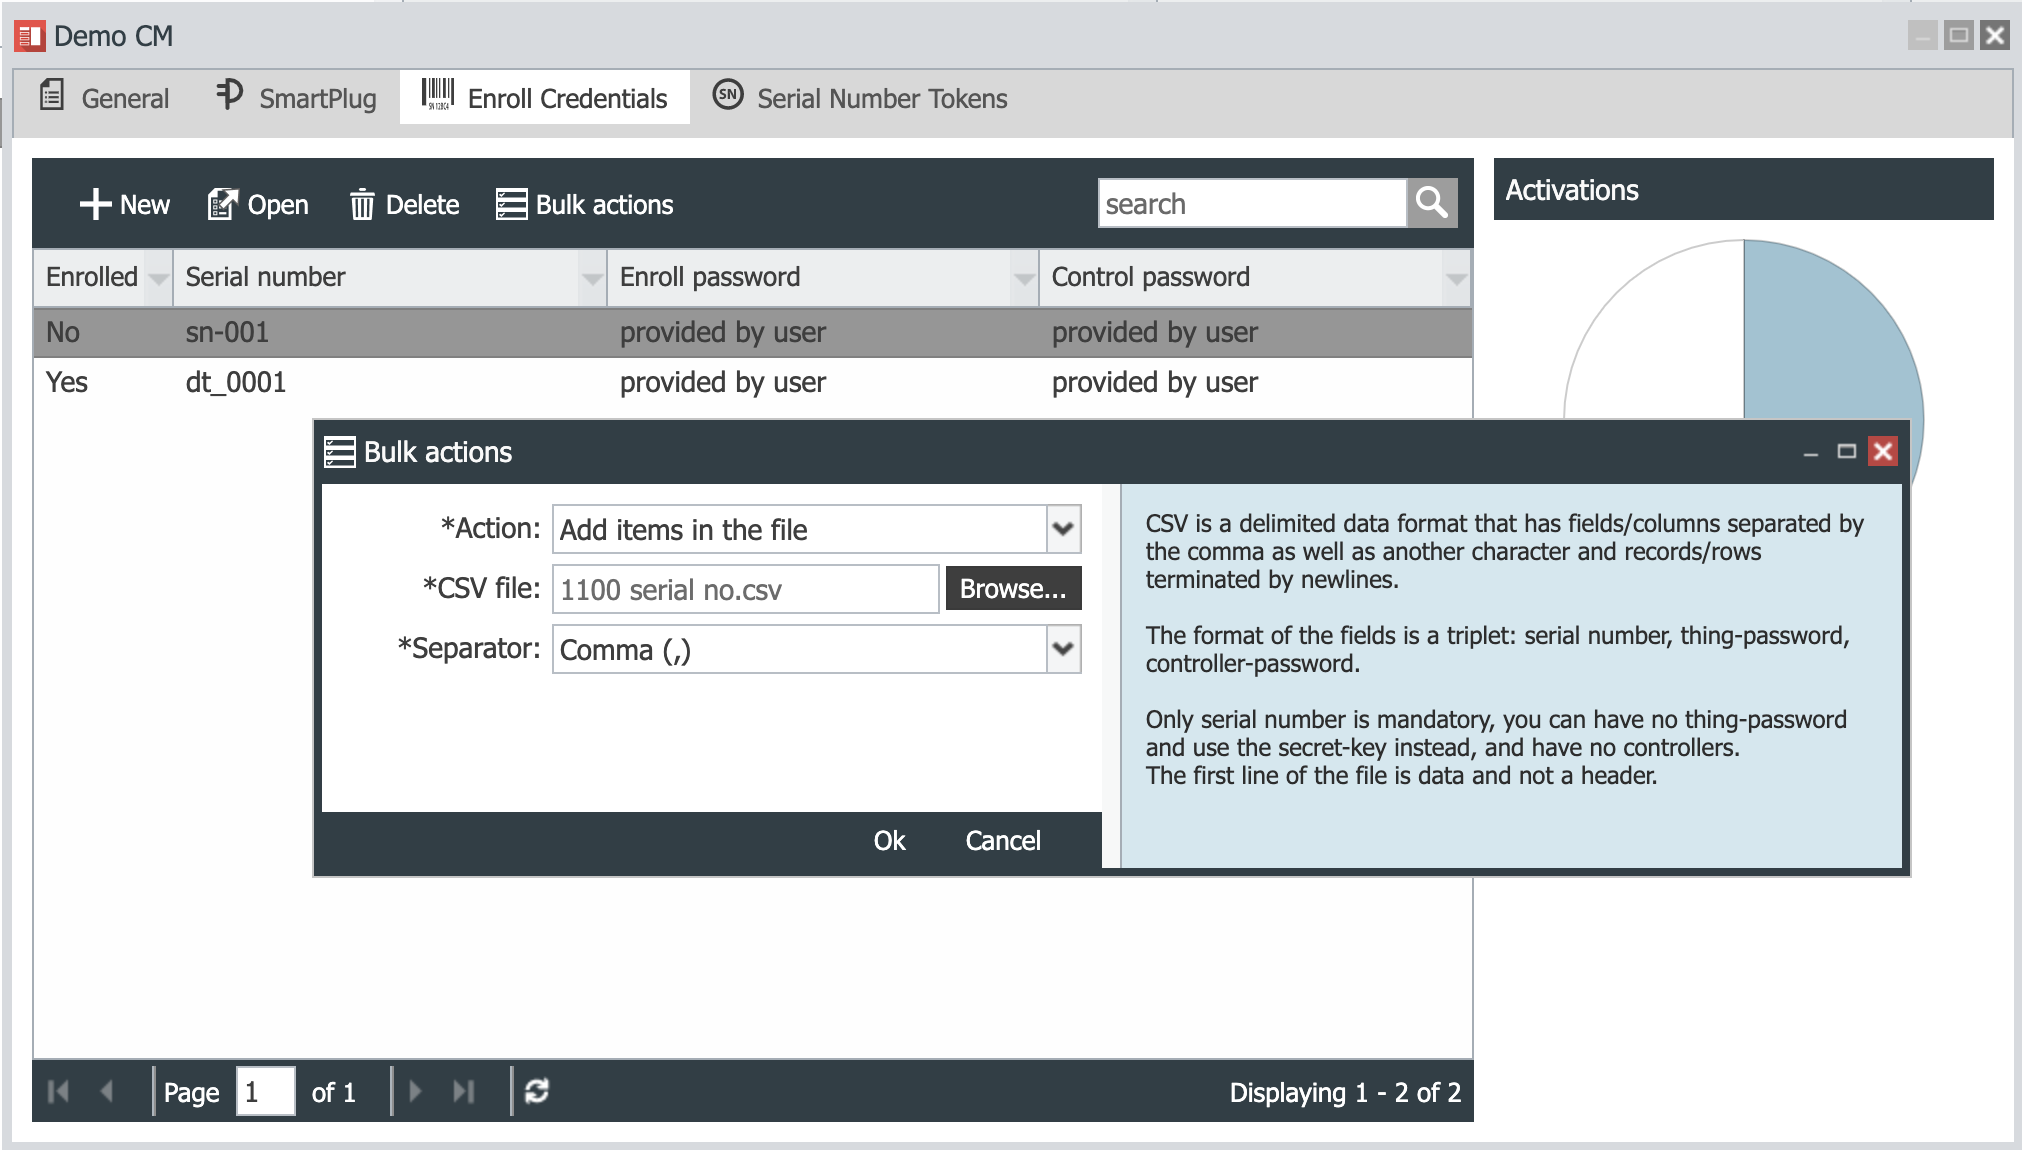
- Perform Bulk Actions (
 ). Bulk actions allow to perform single command actions across a large
number of serial numbers. Some of these actions are:
). Bulk actions allow to perform single command actions across a large
number of serial numbers. Some of these actions are:
- Add the items in a .CSV (Comma Separated Values) file. The file may contain rows with a serial number, enroll password and control password, or simply serial numbers. You can define the type of separator used for the .CSV file. It can be a comma (,), a semicolon (;) or a tab (ASCII 09).
- Delete the items in a .CSV file. All serial numbers in the Template matching the serial numbers in the .CSV file will be deleted.
- Delete all Enrollment Credentials and Things will delete all the serial numbers in the Template. If there are Things that have already being enrolled, they will also be deleted and will lose their enrollment.
- Clicking OK will execute the Bulk Action programmed.
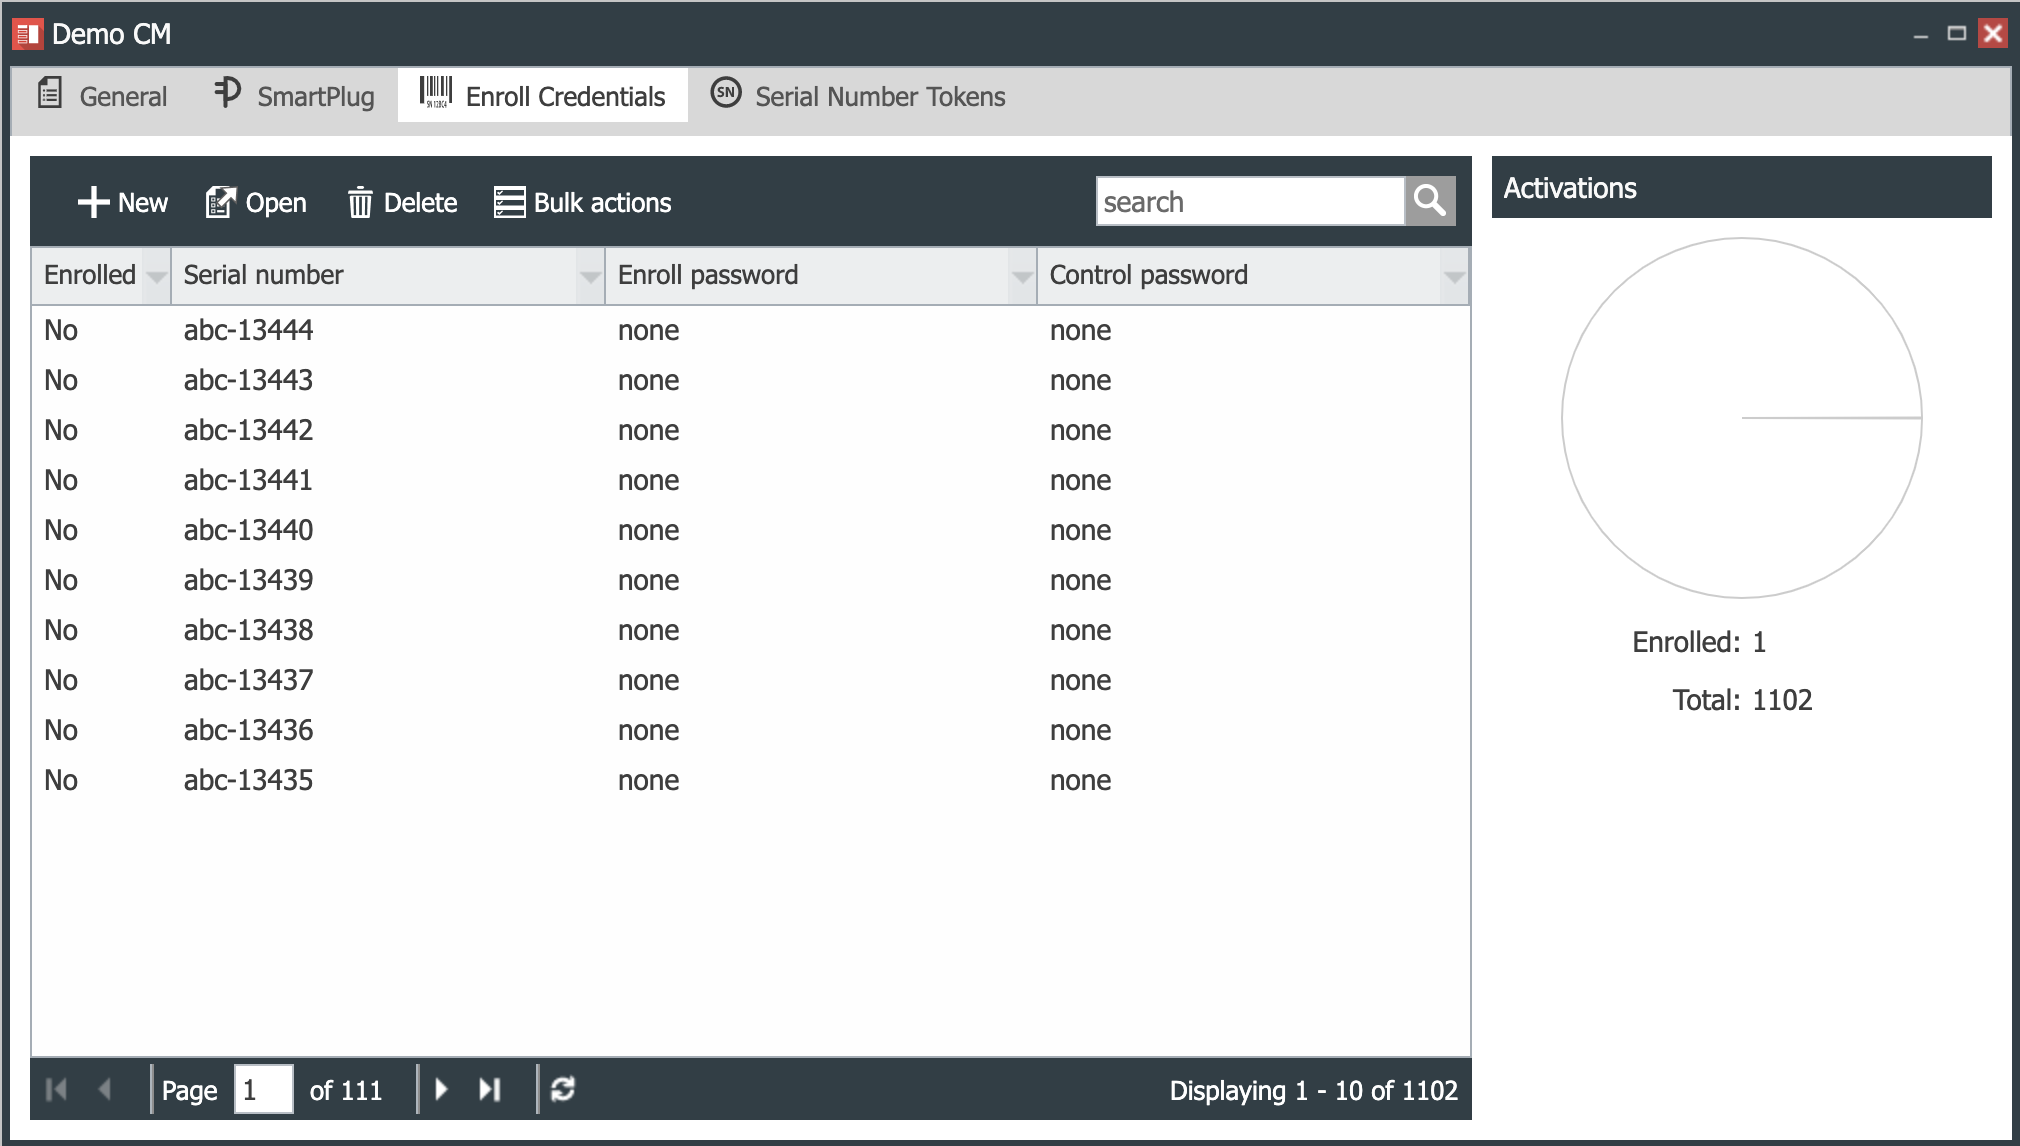
The example below shows an action to upload 1,100 serial numbers from a CSV file which will be added to 2 existing serail numbers.
The result is the upload of 1,100 serial numbers without enroll or control passwords. If defined in the CSV file, they would have been uploaded as well.
- Search the serial number list.
The bottom ribbon allows you to navigate through the list of available serial numbers and to reload the list if needed.
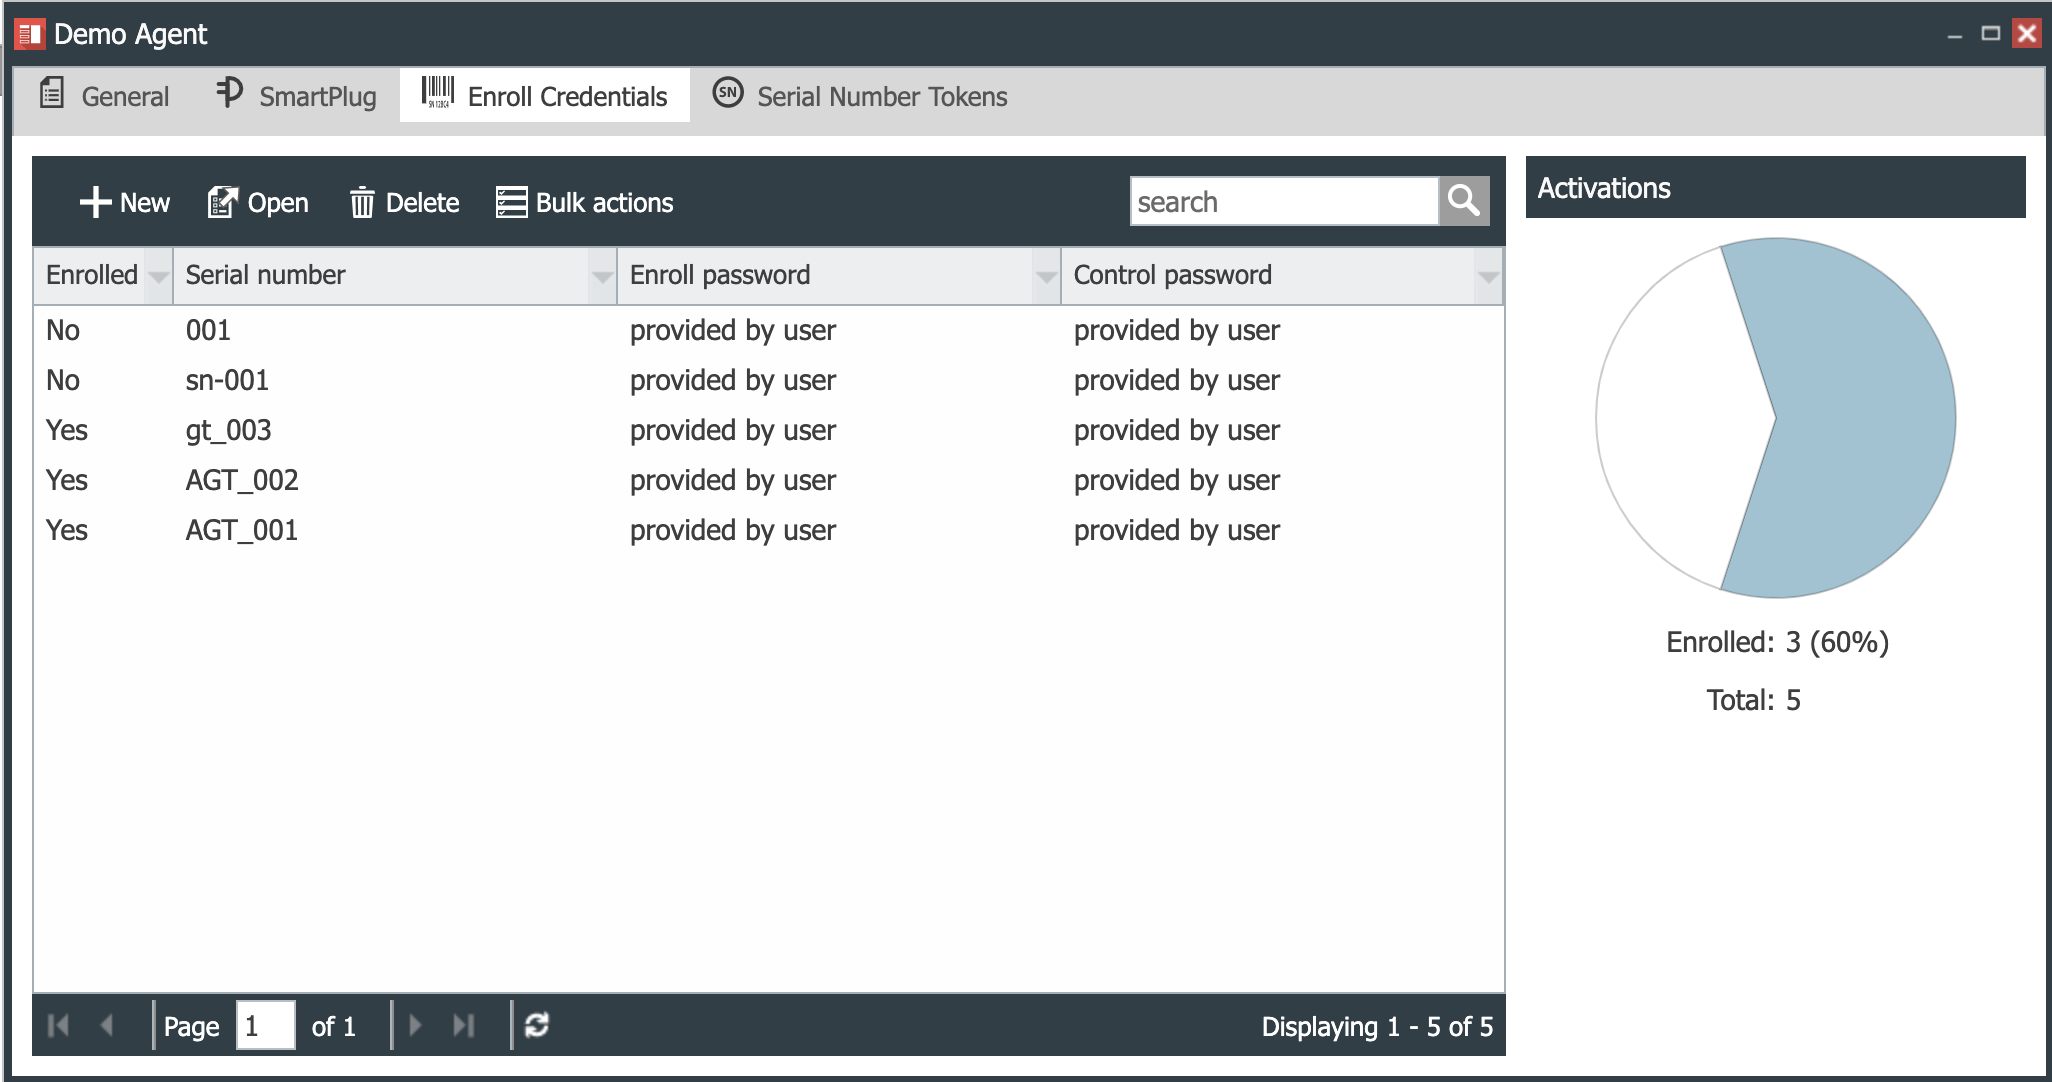
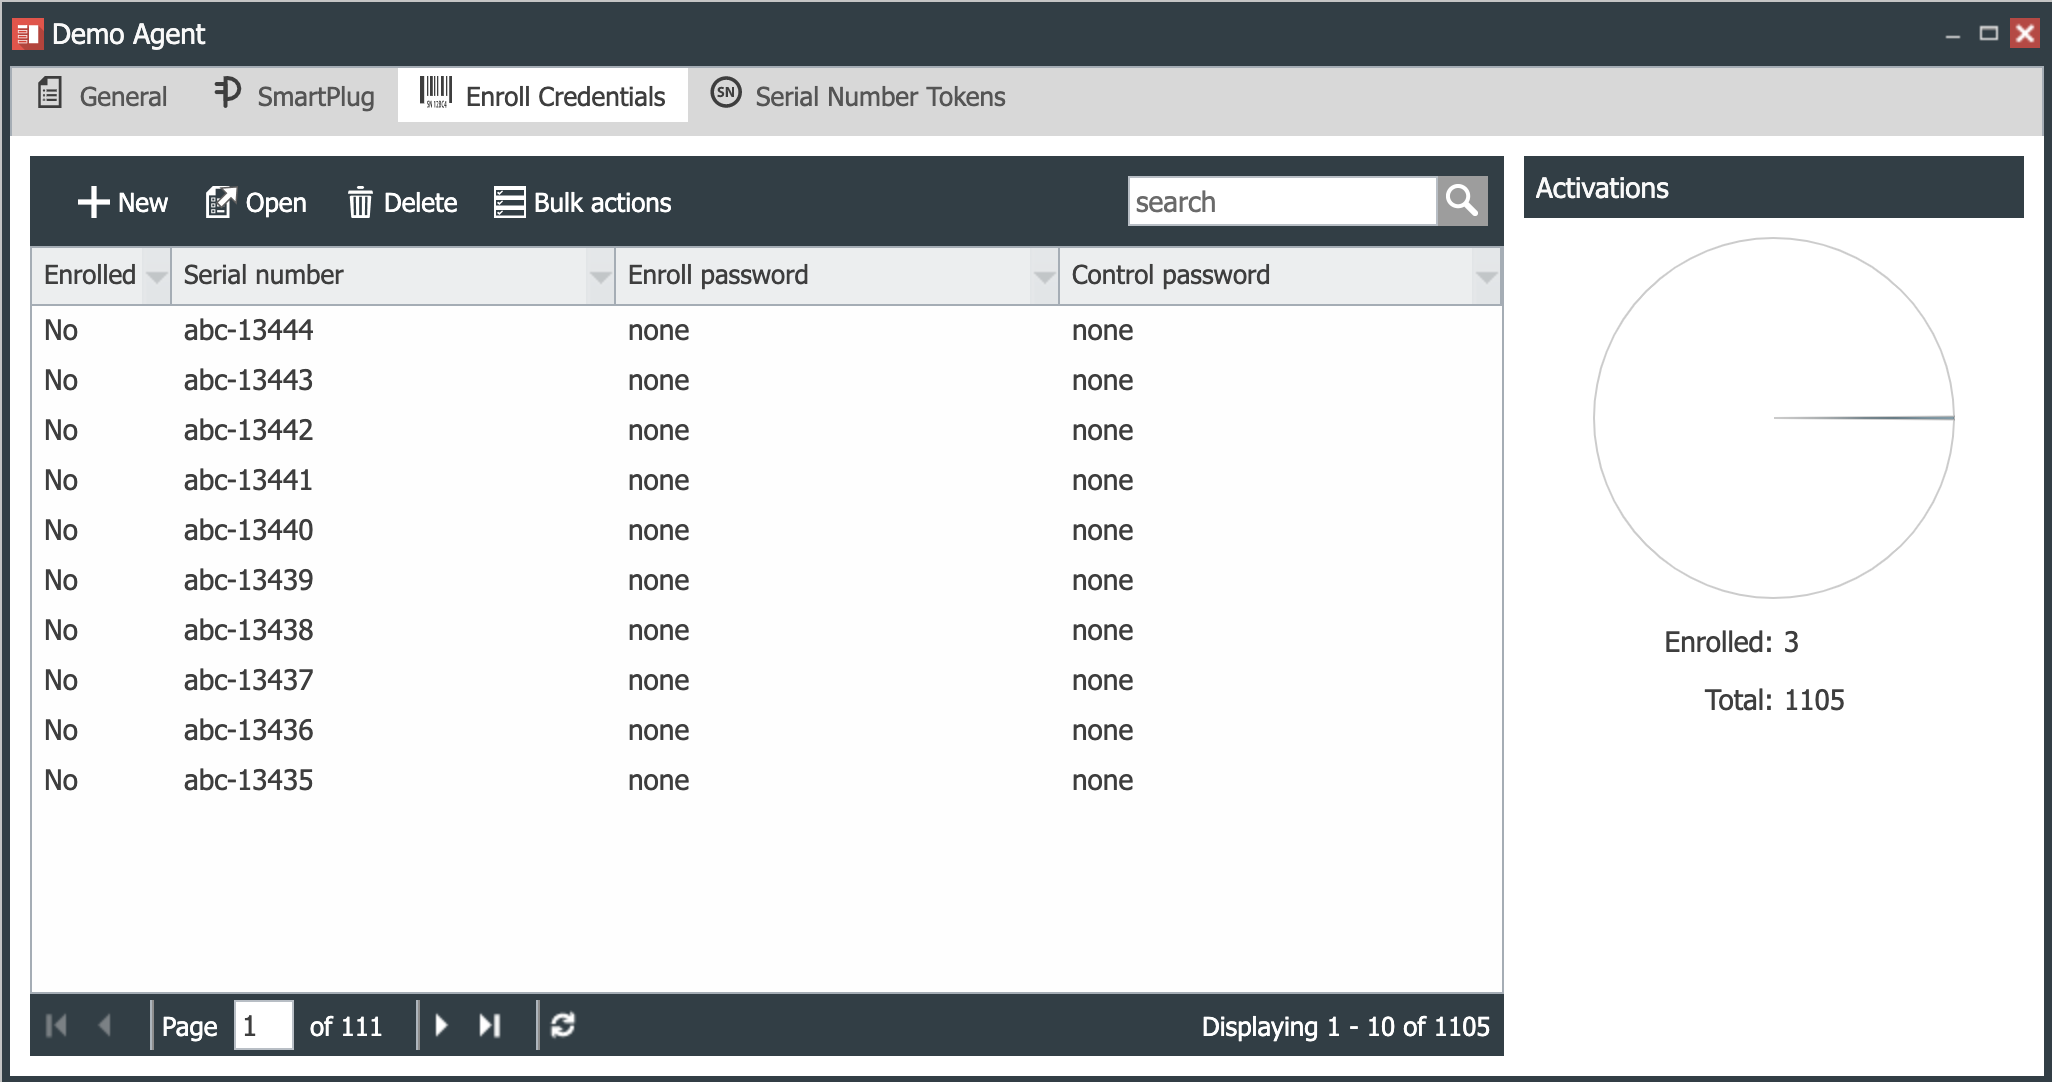
Activations Panel
The Activations panel shows a pie chart with the percent of devices with serial numbers in the Template are currently enrolled. It also lists the number of devices enrolled and the total number of devices that the Template has.
Here are the images of the Serial Number panels of two templates. The Template CP-Demo has 5 serial numbers for which Enroll and Control passwords have been provided manually and 4 of its devices have been enrolled. The Template Test1 has 1,000 serial numbers with Enroll and Control passwords generated by the platform using a Secret Key. None of the devices with those serial numbers have enrolled into the platform.
|
 |
|---|
Creating Tokens for Programmatic Generation of Serial Numbers
Companies that need to produce a large number of devices to be connected to CloudPlugs IoT may want to use an application external to CloudPlugs IoT to generate the enrollment credentials for their devices. CloudPlugs IoT allows to make REST request calls using tokens to automatically generate serial numbers and enrollment credentials for each individual device. Each token also specifies the maximum number of serial numbers that can be created with it.
These tokens are created using the Production Template’s Serial Number Tokens tab.
To create a new token:
- Click on the New Token ( ) to open the token configuration panel.
- Enter an alphanumeric Prefix for the serial numbers to be generated (e.g., CPI10).
- Enter the Length or number of digits to be generated after the prefix. A length of 6 will result in serial numbers such as -123456.
- Enter the Expiration date of the token in number of days.
- Enter the Quota or maximum number of sequential serial numbers that can be generated by REST calls using the token.
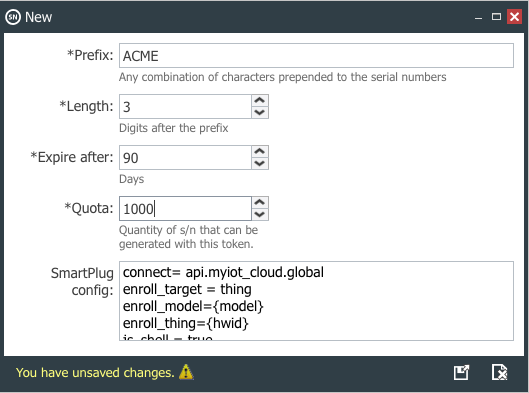
- If SmartPlugs are going to be used, the (smartplug.conf) configuration files with the enrollment credentials can also be generated. Simply enter the configuration parameters in the SmartPlug config panel.
- Save and Close ( ) the new token.
The following example shows how to create a token valid for 90 days to generate enrollment credentials with serial numbers of the form ACME-100 for up to 1,000 SmartPlug™ driven devices with a configuration file such as:
connect= api.myiot_cloud.global
enroll_target = thing
enroll_model={model}
enroll_thing={hwid}
js_shell = true
fm_perms = r
 |
|---|
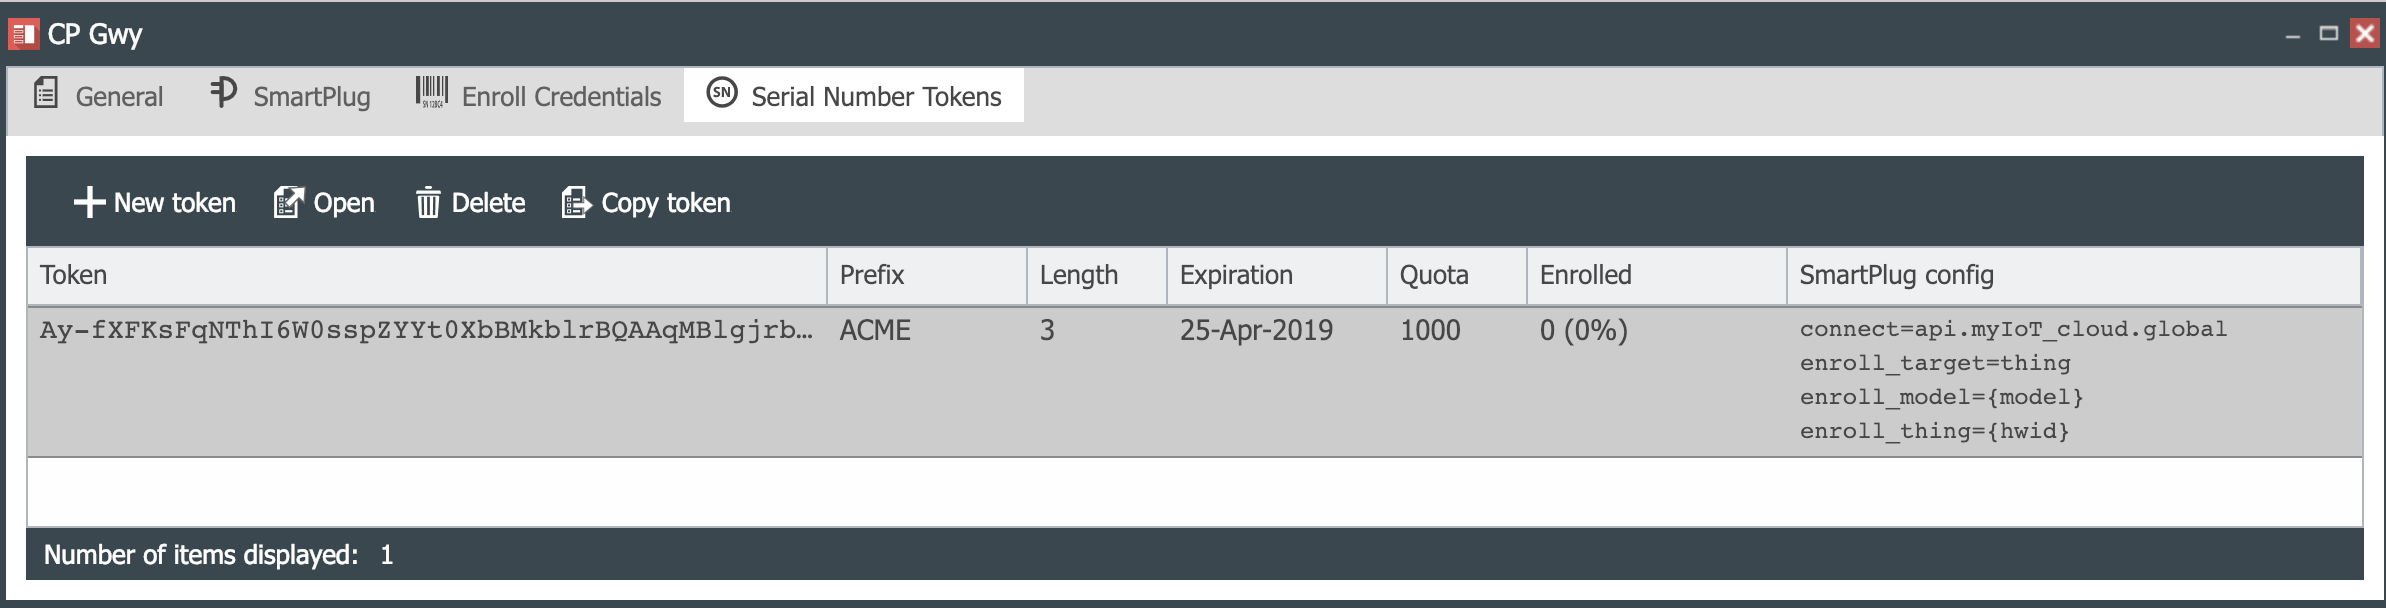
The resulting token looks as follows:
 |
|---|
Tokens may also be opened and edited, deleted and copied to the system’s clipboard to then paste it into the REST call in the application used to generate the serial numbers.
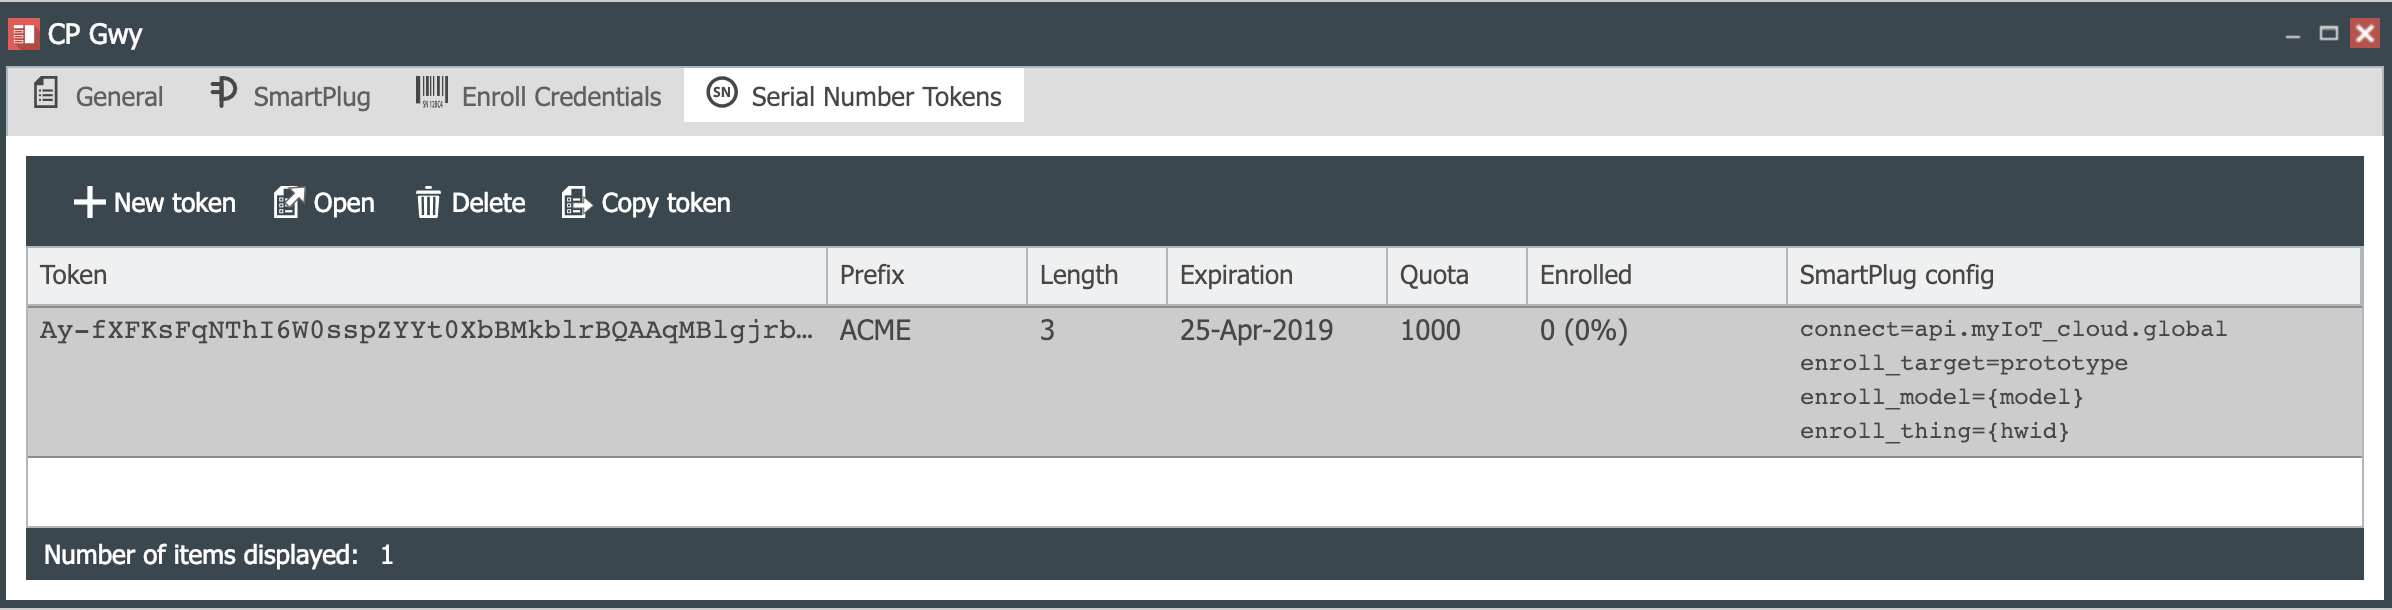
Editing a Serial Number Token
Once a token is created, only its SmartPlug configuration can be edited.
To edit an existing token:
- Click on the target token to select it.
- Either click on the Open ( ) button, or double click on the token.
- Edit the SmartPlug configuration.
 |
|---|
- Save and Close ( ) the token.
 |
|---|
Provisioning Production Things
To provision your Production Things:
- Save ( ) or Save and Close ( ) the Production Template.
- Click on the Provision () button to the right of the lower
ribbon of the General -> Template Profile panel.
Once the Production Things are provisioned in CloudPlugs, your devices can connect to the platform using a SmartPlug™ or a connection library. The devices must be programmed with the enroll credentials set in the Production Template.
As devices enroll, the platform automatically assigns a Plug-ID (AUTH_PLUGID) and a secret activation/connection password (AUTH_PASS) to the Things that have enrolled successfully. The activation/connection password, alongside the Plug-ID and serial number or hardware ID are used by the Production Things to connect to the platform.
For details on connecting a Production Thing, refer to the Connecting a device as a Production Thing Guide.
Deleting a Production Template
To delete a Production Template, there must be no serial numbers associated with the Template.
If a Template has serial numbers and you need to delete it, you must make sure that:
-
Any Production Things with serial numbers that belong to the Template and that are currently enrolled in CloudPlugs IoT must be deleted. This can be achieved from the Things Management Console.. Serial numbers associated with Things that are enrolled cannot be deleted.
-
Once 1 above is done, open the Production Temaplate.
-
Open the Enroll Credentials (
) panel. -
Delete all the serial numbers present in the Template.
-
Save ( ) or Save and Close (
) the Template. -
Select and delete ( ) the Template from the Production Template management Console.