Things
![]() Production Things (Things) are the virtual representations of your physical and any virtual devices in the CloudPlugs IoT platform.
Production Things (Things) are the virtual representations of your physical and any virtual devices in the CloudPlugs IoT platform.
The Things console is the core application for Device Lifecycle Management in CloudPlugs IoT.
This guide includes the following sections:
- Overview of Production Things.
- Things Management Console.
- Thing Property Console.
- Deleting a Production Thing.
Overview
Production Things represent you connected devices or gateways. They are provisioned into the platform by Production Templates, and devices with proper enroll credentials are allowed to enroll and to connect to CloudPlugs IoT.
Production Things that enroll successfully receive two connectivity credentials from CloudPlugs IoT:
- AUTH_PLUGID – the device Plug-ID assigned to the device in the form dev-57be56cabbd6b3c78c96fcb9, and
- AUTH_PASS – the device activation/connection password.
The credentials can be retrieved programmatically or manually as explained in the Credentials guide.
Production Things can be controlled by other Production Things, devices and applications that act as Controllers. To allow devices to control Production Things, a Control Password must be configured for the Thing’s serial number in the Production Template.
Production Things are managed through the Things Management Console and the Thing Properties Console.
Things Management Console
The Things Management Console allows you to manage your Production Things. The main console gives you all the details for each Thing that has been activated by the system. Things that have serial numbers assigned to them by a Production Template, but that are not enrolled, will not show in the Things management console.
To open the console click on the Things tile (![]() ) in the platform’s web desktop.
) in the platform’s web desktop.
The console provides a List View and a Map View of Production Things as shown below.
 |
 |
|---|
Each view is described in the sections below.
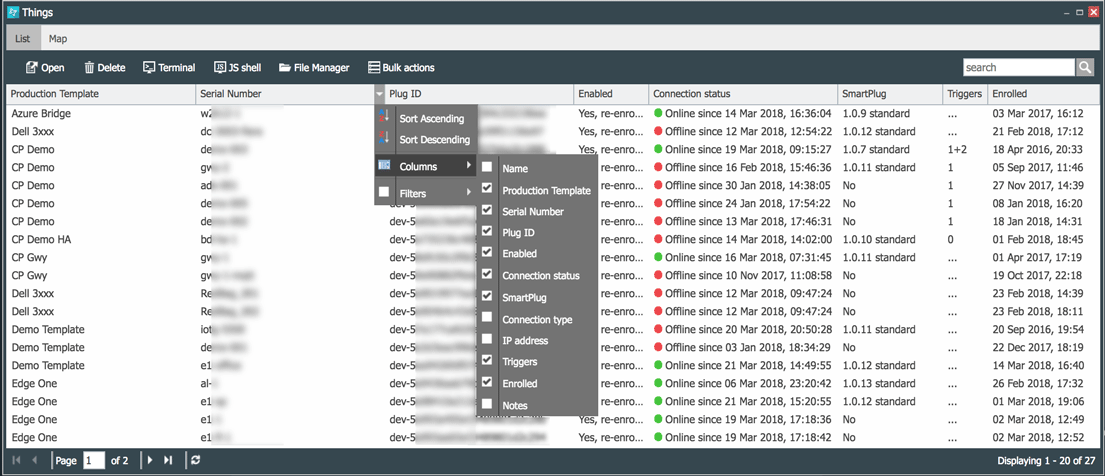
Things List View
The List view displays a list of all the Production Things enrolled in the platform. It allows the following operations on a selected Production Thing:
- Open and edit (
 ) the Thing through its Properties Console.
 - Delete (
 ) a Thing.
 - Open a Remote Terminal (
 ), which
provides a full Linux terminal to access SmartPlug™ based Things from anywhere.
), which
provides a full Linux terminal to access SmartPlug™ based Things from anywhere. - Open a JavaScript Shell (
 ), which
allows remote monitoring of JavaScript application execution on SmartPlug™ based Things, and
), which
allows remote monitoring of JavaScript application execution on SmartPlug™ based Things, and - Open a Remote File Manager (
 ), which
allows remote file operations such as upload, download, create, delete or rename files on SmartPlug™ based Things.
), which
allows remote file operations such as upload, download, create, delete or rename files on SmartPlug™ based Things. - Bulk Actions (
 ) which allows several actions on multiple devices
simultaneously. These actions are:
) which allows several actions on multiple devices
simultaneously. These actions are:
- Add/Delete Properties
- Add/Delete SmartPlug Apps/Scripts
- Add/Delete Containers
- Change the enabled status of the devices.
For more information on Bulk Actions refer to the Bulk Actions section of this guide.
In addition, the Management Console shows the Production Things’:
- Name - name of the Production Thing.
- Production Template - name of the Production Template of the Thing.
- Serial number - the unique hardware ID assigned to the Things in the Production Template.
- Plug-ID - the unique id assigned to the Thing by the CloudPlugs platform.
- Enabled - indicates whether the Thing is currently enabled, disabled or need to re-enroll in the platform. This status can be modified by opening the Thing.
- Connection Status - indicates where the Thing is currently connected to the platform.
- SmartPlug - indicates the SmartPlug™ version that the Thing is running, if any.
- IP Address is the IP address of the Thing.
- Notes - any notes associated with the Thing and they can be modified by opening the Thing.
- Triggers - indicates how many if any Triggers are set for the Thing. They can be modified by opening the Thing.
- Enrolled - shows the date in which the Thing was enrolled by the platform.
You can filter or add columns to the Things Management Console by opening the dropdown menu on the right hand side of each column as shown below.
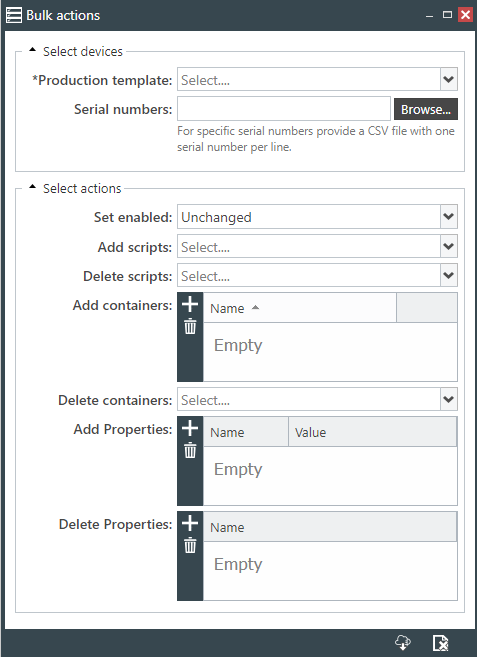
Bulk Actions
The Bulk Actions (![]() ) button opens the Bulk Actions panel which allows
the programming and deployment of selected actions on a list of devices belonging to a specific Production Template. The list includes the
target devices’ serial numbers in a Comma Separated Values (CSV) file.
) button opens the Bulk Actions panel which allows
the programming and deployment of selected actions on a list of devices belonging to a specific Production Template. The list includes the
target devices’ serial numbers in a Comma Separated Values (CSV) file.
To perform a Bulk Action:
- Open the Bulk Actions panel by clicking on the # Things Management Console button.
- Select a Production Template. The list of valid Production Templates is available through the dropdown menu.
- Upload the CSV file with serial numbers that exist and belong to the Production Template. The file must contain one serial number per row.
- Program the actions as required by your environment.
- Deploy the actions with the (
 ) button.
The deploy action will execute the programmed actions in all the devices with the serial numbers included in the CSV file and belonging to the Production Template selected.
An example of a Bulk Action panel that has been programmed is shown below.
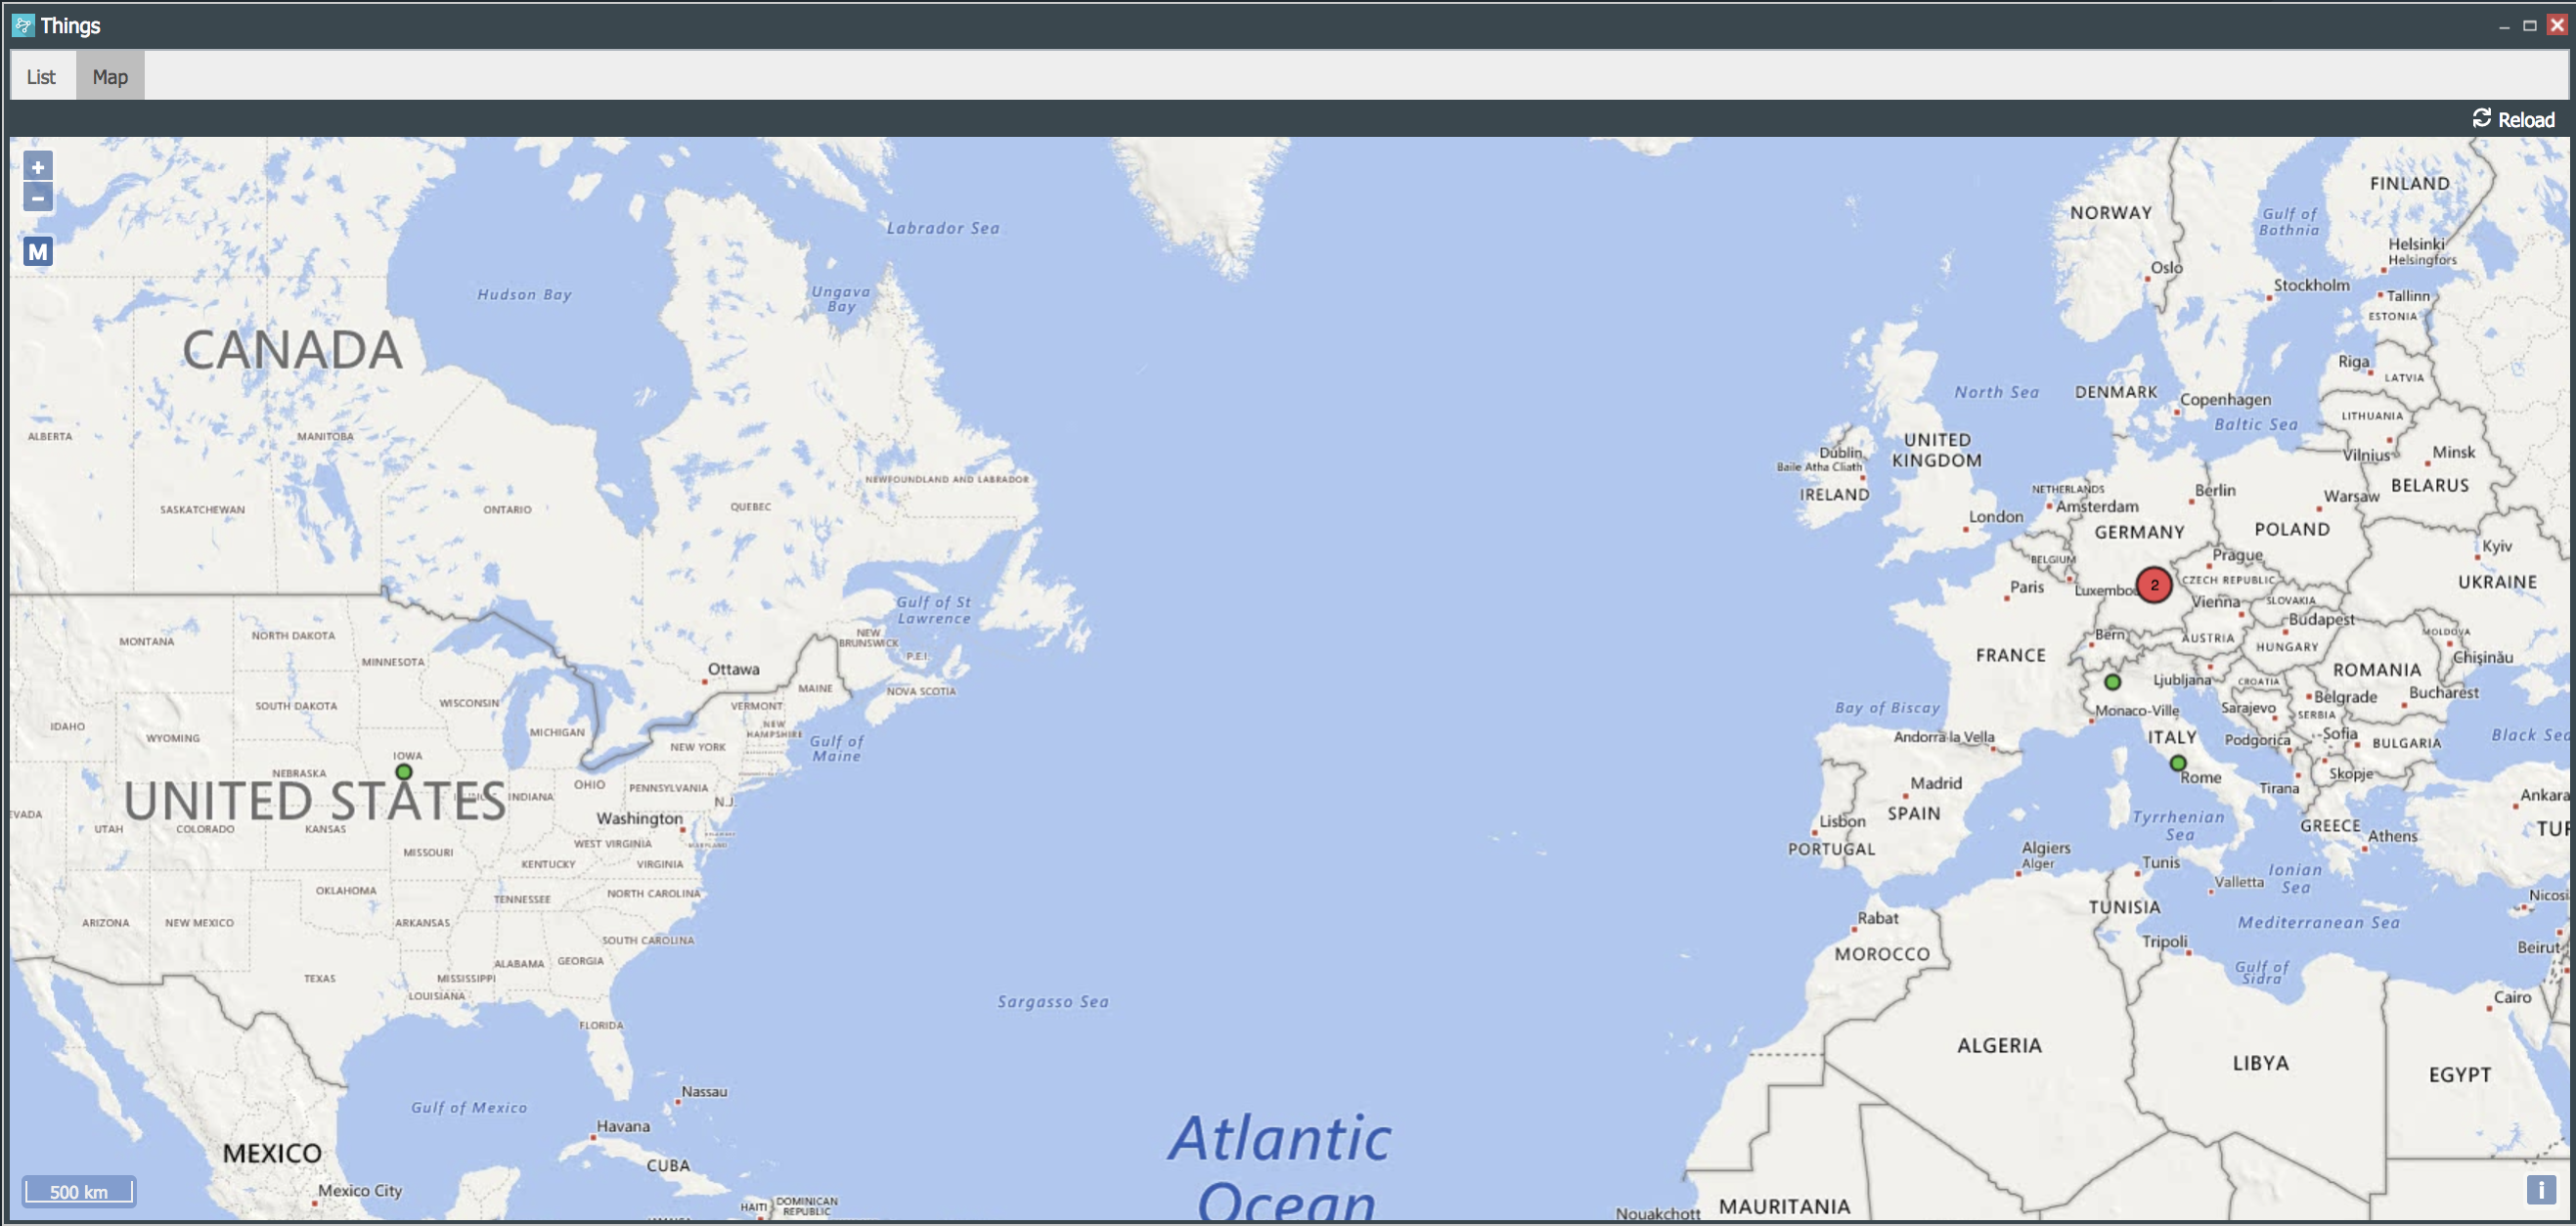
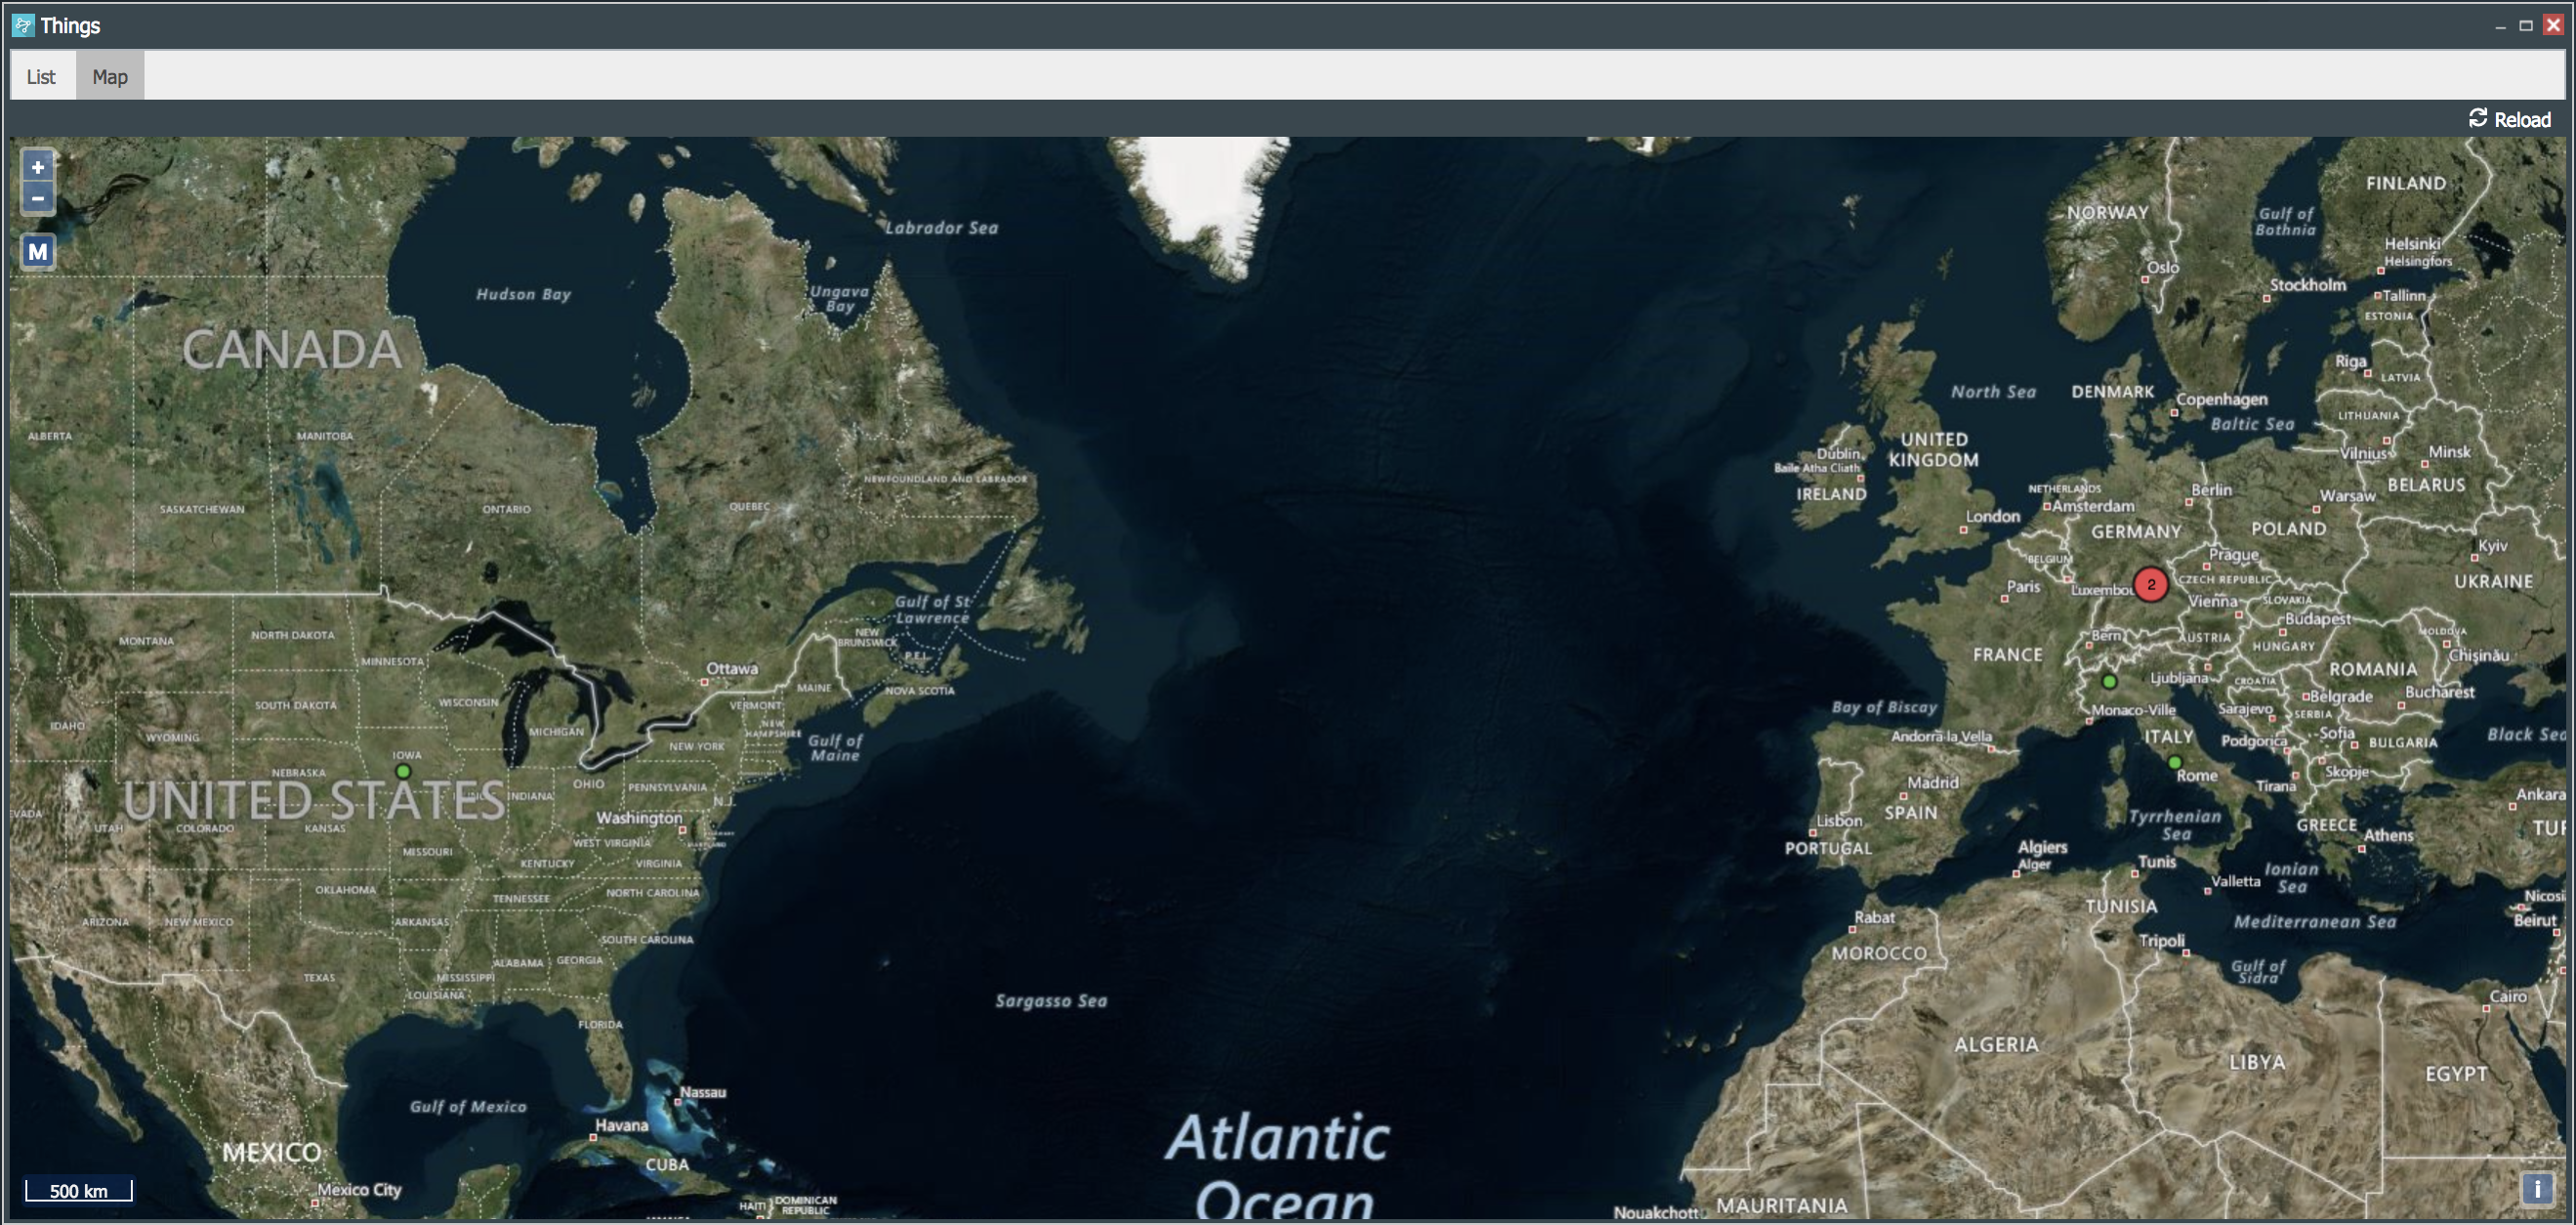
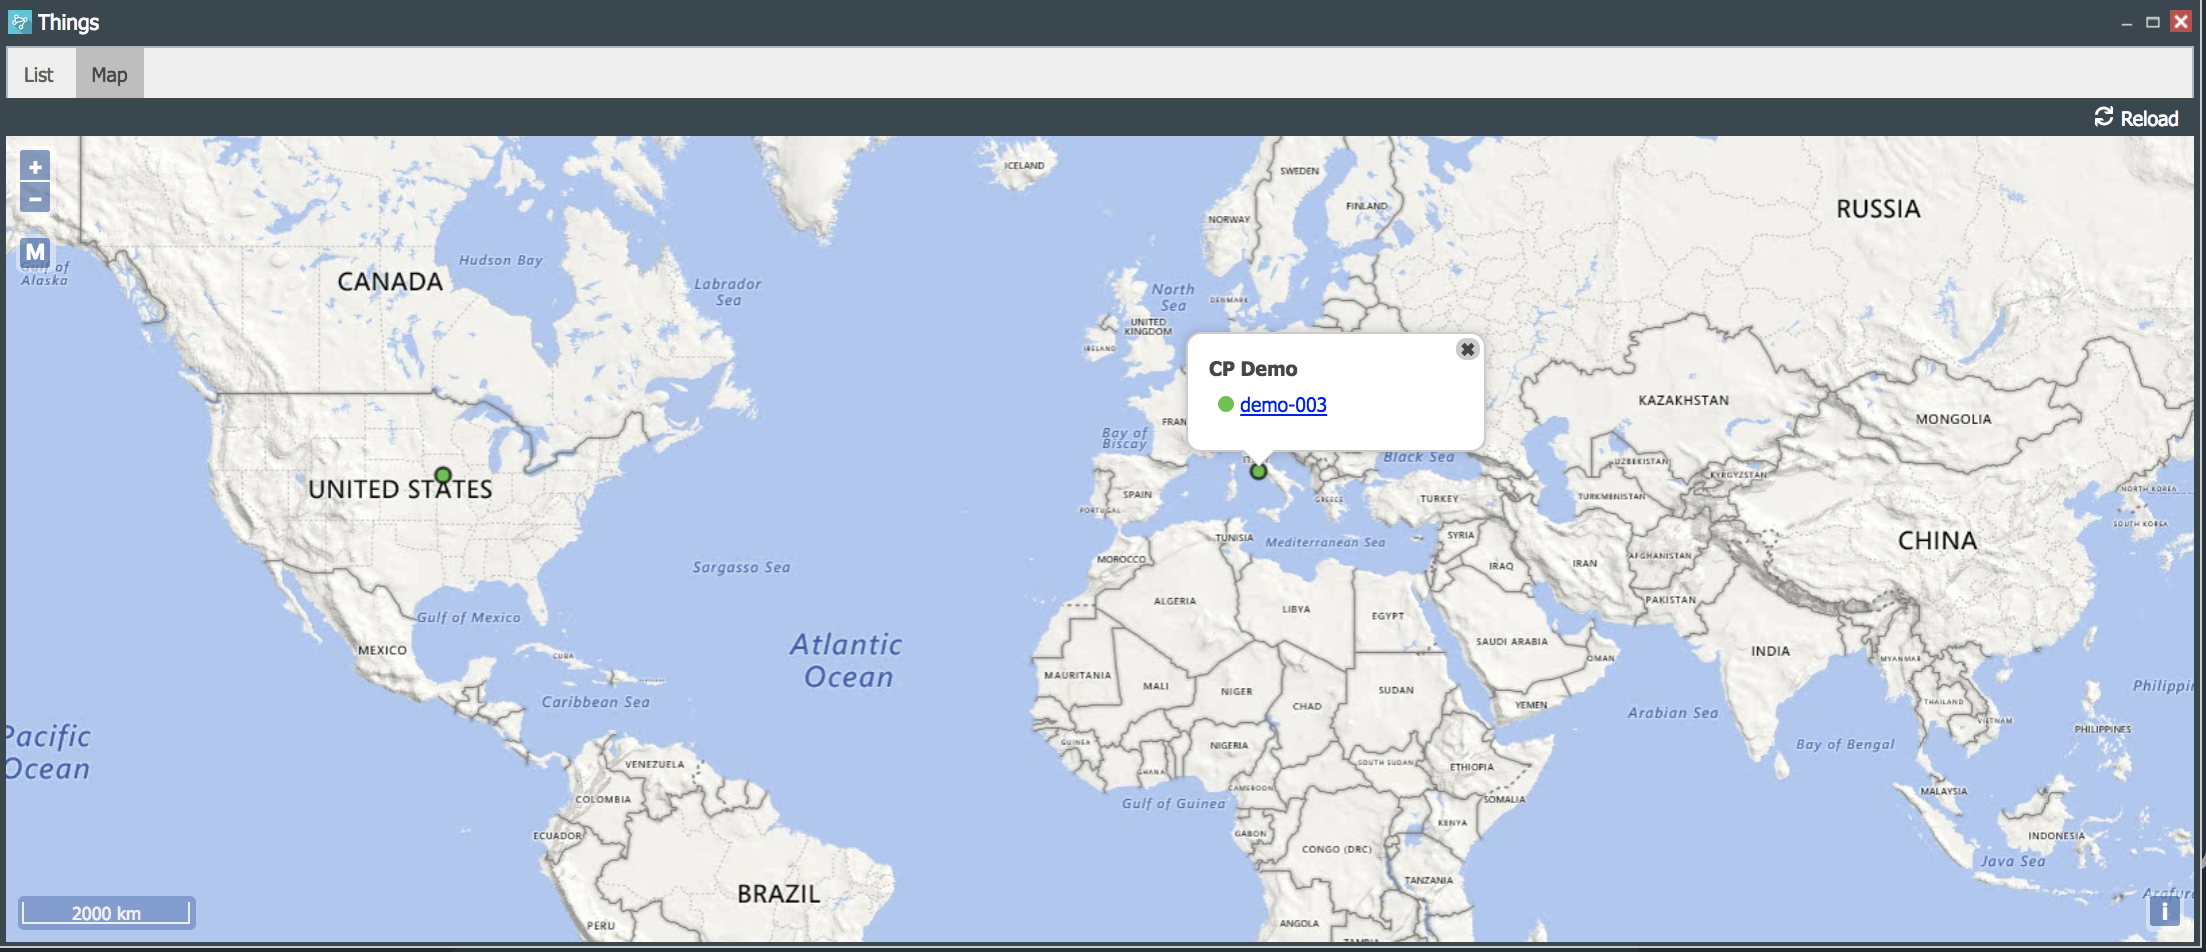
Things Map View
The Things Management Console Map View shows the enrolled Things on a Map. If multiple Things share the same location Property, a single circle is shown with the number of Things on that location. The serial numbers of Things are listed below their Production Template names.
Map View has two modes, street view and satellite view.
The default mode is the street view as shown below.
Clicking on the M icon below the +/- zoom buttons, changes the display to satellite view as shown below.
To view individual Things:
- Click on the location circle, and
- Select a serial number and the Thing’s Properties Console will open.
See an example below.
Thing Properties Console
The Thing Properties Console allows the configuration and management of individual Things.
To view a Thing’s Properties console:
- Open the Things Management Console by clicking on the Things tile (
 ) in the platform’s web desktop.
 - Select a Thing.
- Open the Thing’s Properties console either by double-clicking on it, or using the Open button ().
The result is the image below.
The Console ribbon menu allows the following actions:
- Configure General Properties. (
 )
) - Publish Data and view published data. (
 ).
). - Manage a Thing’s SmartPlug™. (
 )
) - View Control Designer applications (
 ) for the Thing.
The next sections describe each action in detail.
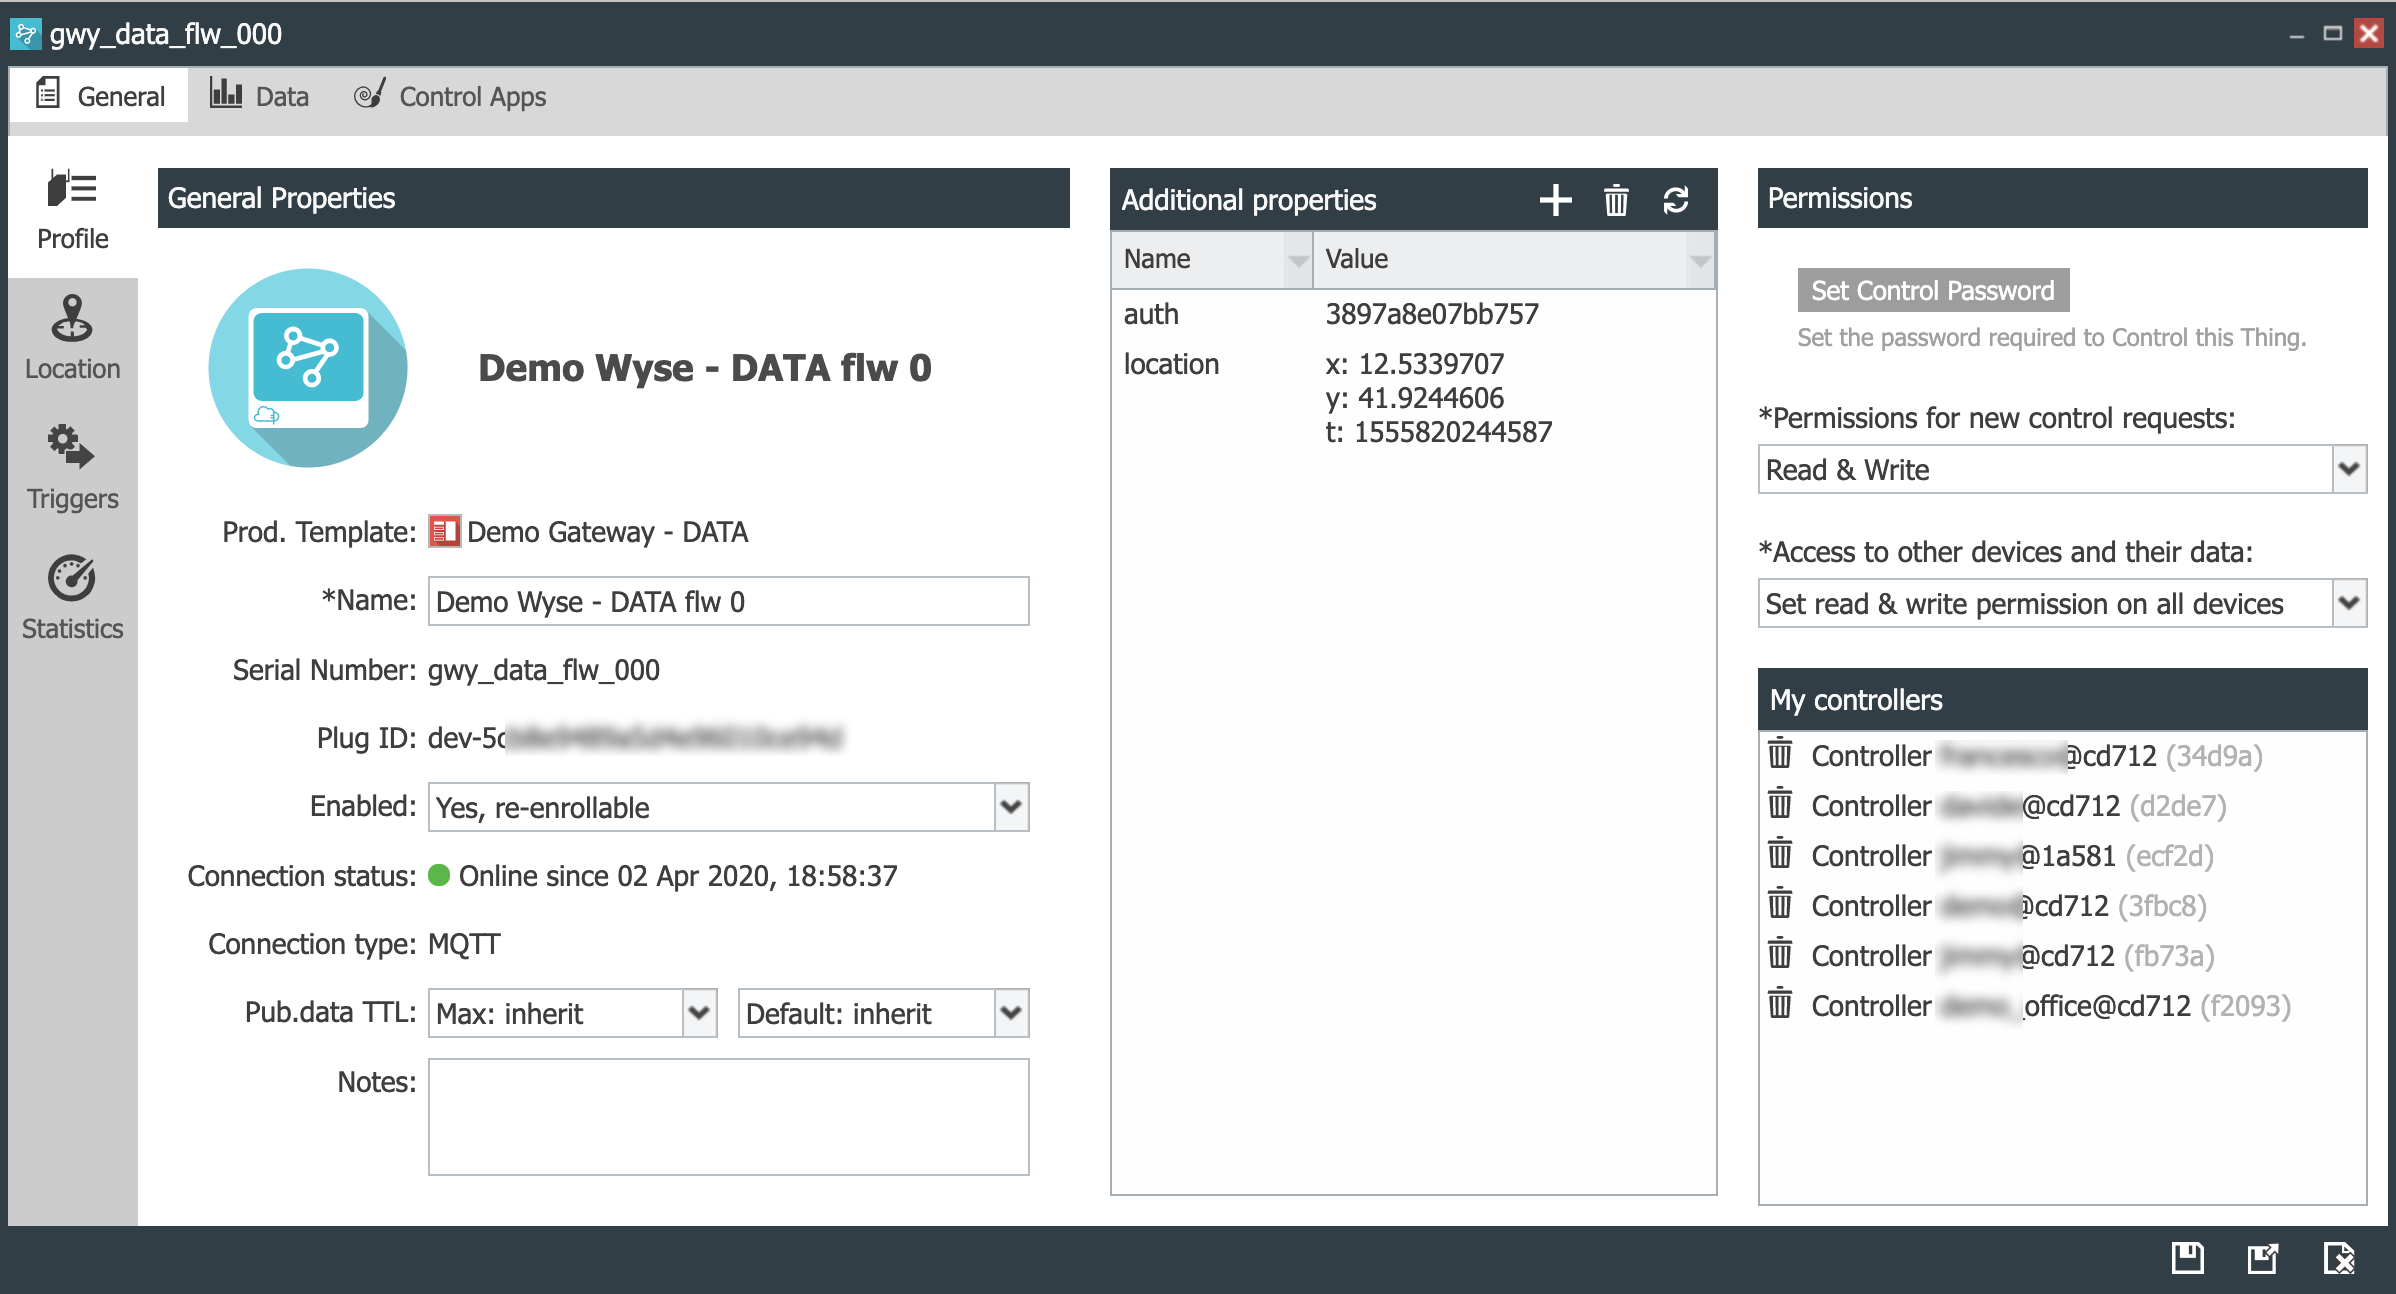
General Properties
The General (![]() ) section of the Properties panel of a Thing allows to view and
configure basic properties of a Thing such as the:
) section of the Properties panel of a Thing allows to view and
configure basic properties of a Thing such as the:
Device Profile
The Device Profile panel has three sections:
- General Properties
- Additional Properties
- Permissions
General Properties
The General Properties panel provides the following information:
- Device Image the device image shown is the image loaded into the Thing’s Production Template. To modify the image, it must be updated in the Production Template and the Template must be saved and provisioned.
- Name given to the Thing. The default name is the Thing’s Production Template name. The name can be changed.
- Production Template - the Template to which the Thing belongs to.
- Serial Number - The Things serial number or Hardware ID.
- The Plug-ID of the Production Thing which is its unique identifier in the platform.
- Enabled which has two options:
- Yes, re-enrollable, which allows the Thing to access to the platform and allows it to re-enroll if required.
- No, which disables the Thing’s access to the platform temporarily.
- Yes, which allows the Thing to access the platform.
- Connection status indicates whether the device is Online or Offline.
- Connection Type indicates whether the device uses a SmartPlug™ agent or a library. If it uses a SmartPlug™ agent, it indicates the version of the SmartPlug™ used.
- Pub.data TTL. Allows to set the policy for time-to-live (TTL) or retention of data published by the devices belonging to the Thing. Two parameters can be set:
- Max TTL. When a published data message includes a TTL value, Max TTL defines the Maximum period that the data will be stored.
- If the message’s TTL is greater than Max TTL, it will be ignored and the data will be stored and deleted using the value of Max TTL.
- Max TTL can be set to inherit, which means that the Max TTL will the same as the Max TTL of the Thing’s Template.
- Default TTL. When a published data message does not include a TTL value, Default TTL defines the period that the message data will be stored. Default TTL can be set to inherit, which means that the Default TTL of the Thing’s Template will be used,
- Notes or comments that you can add to the device’s properties.
Additional Properties
The Additional Properties panel allows the configuration of additional device metadata. For more details, please refer to the Additional Properties Guide.
Permissions
The Permissions panel allows to set the following security measures:
-
Set the Control Password required to control the Thing. The button allows to set a new control password, or to modify an existing control password entered previously or set in the Production Template.
-
Set the Permissions for new control requests. This configures the security for the Thing’s interaction with control applications that have its control password.
- Deny - does not allow control applications to read or modify the Thing’s metadata.
- Read only - allows control applications to read the Thing’s metadata.
- Read & Write - allows control applications to read and modify the Thing’s metadata.
The My controllers sub-panel displays the list of Controllers with permission to access the Thing. To deny permanent access to a Controller:
- *Select the controller.
- Click on delete ().
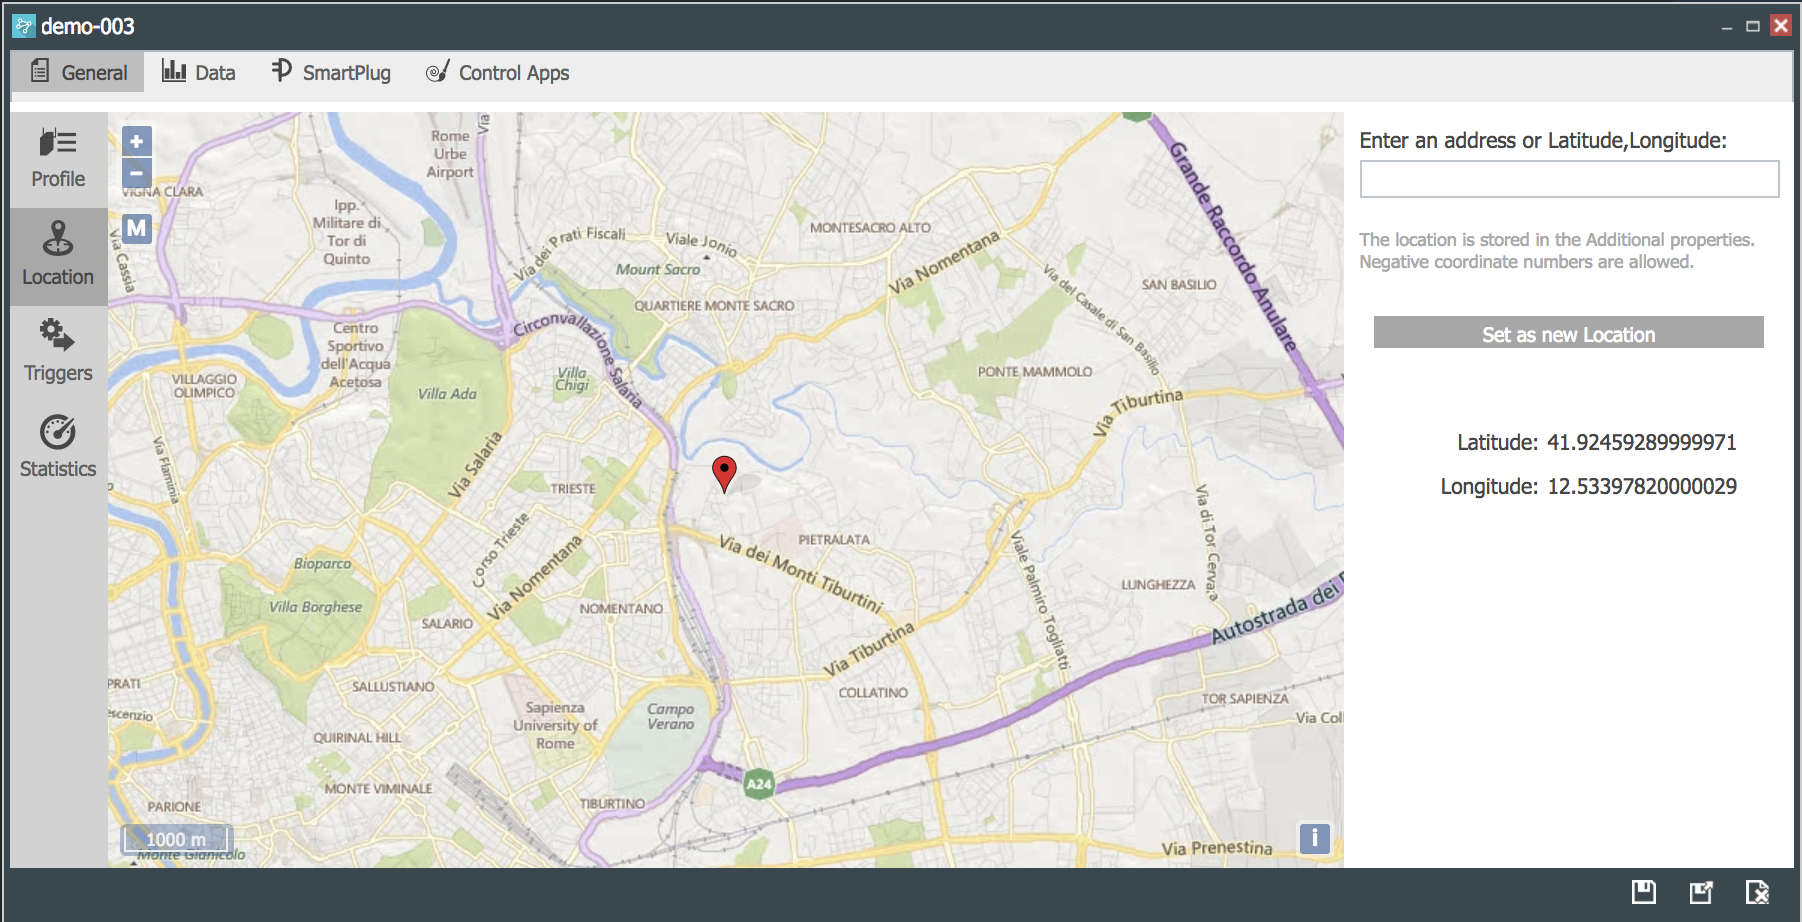
Location
The location panel allows to set a location property for the Thing. For instructions on how to set up the location property, refer to the Location Guide under Things.
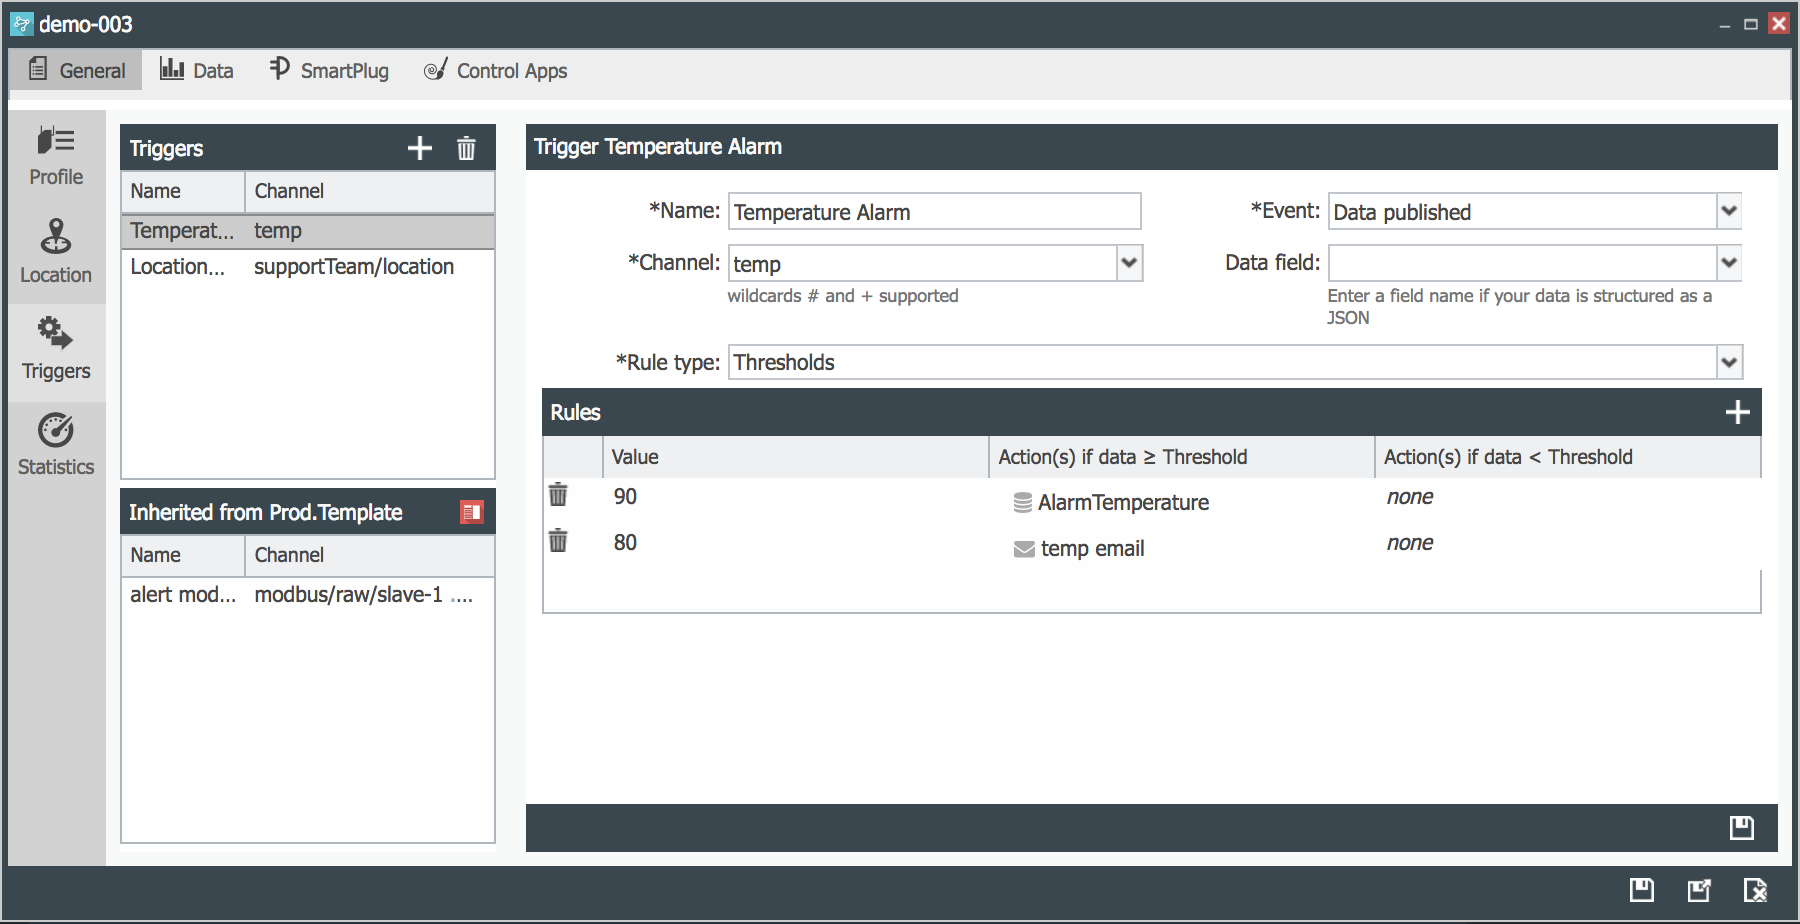
Triggers
The Triggers panel allows to program triggers for the Thing. For instructions on how to set up triggers, refer to the Triggers Guide.
Statistics
The Statistics panel provides information on the CloudPlugs IoT services use of the Production Thing.
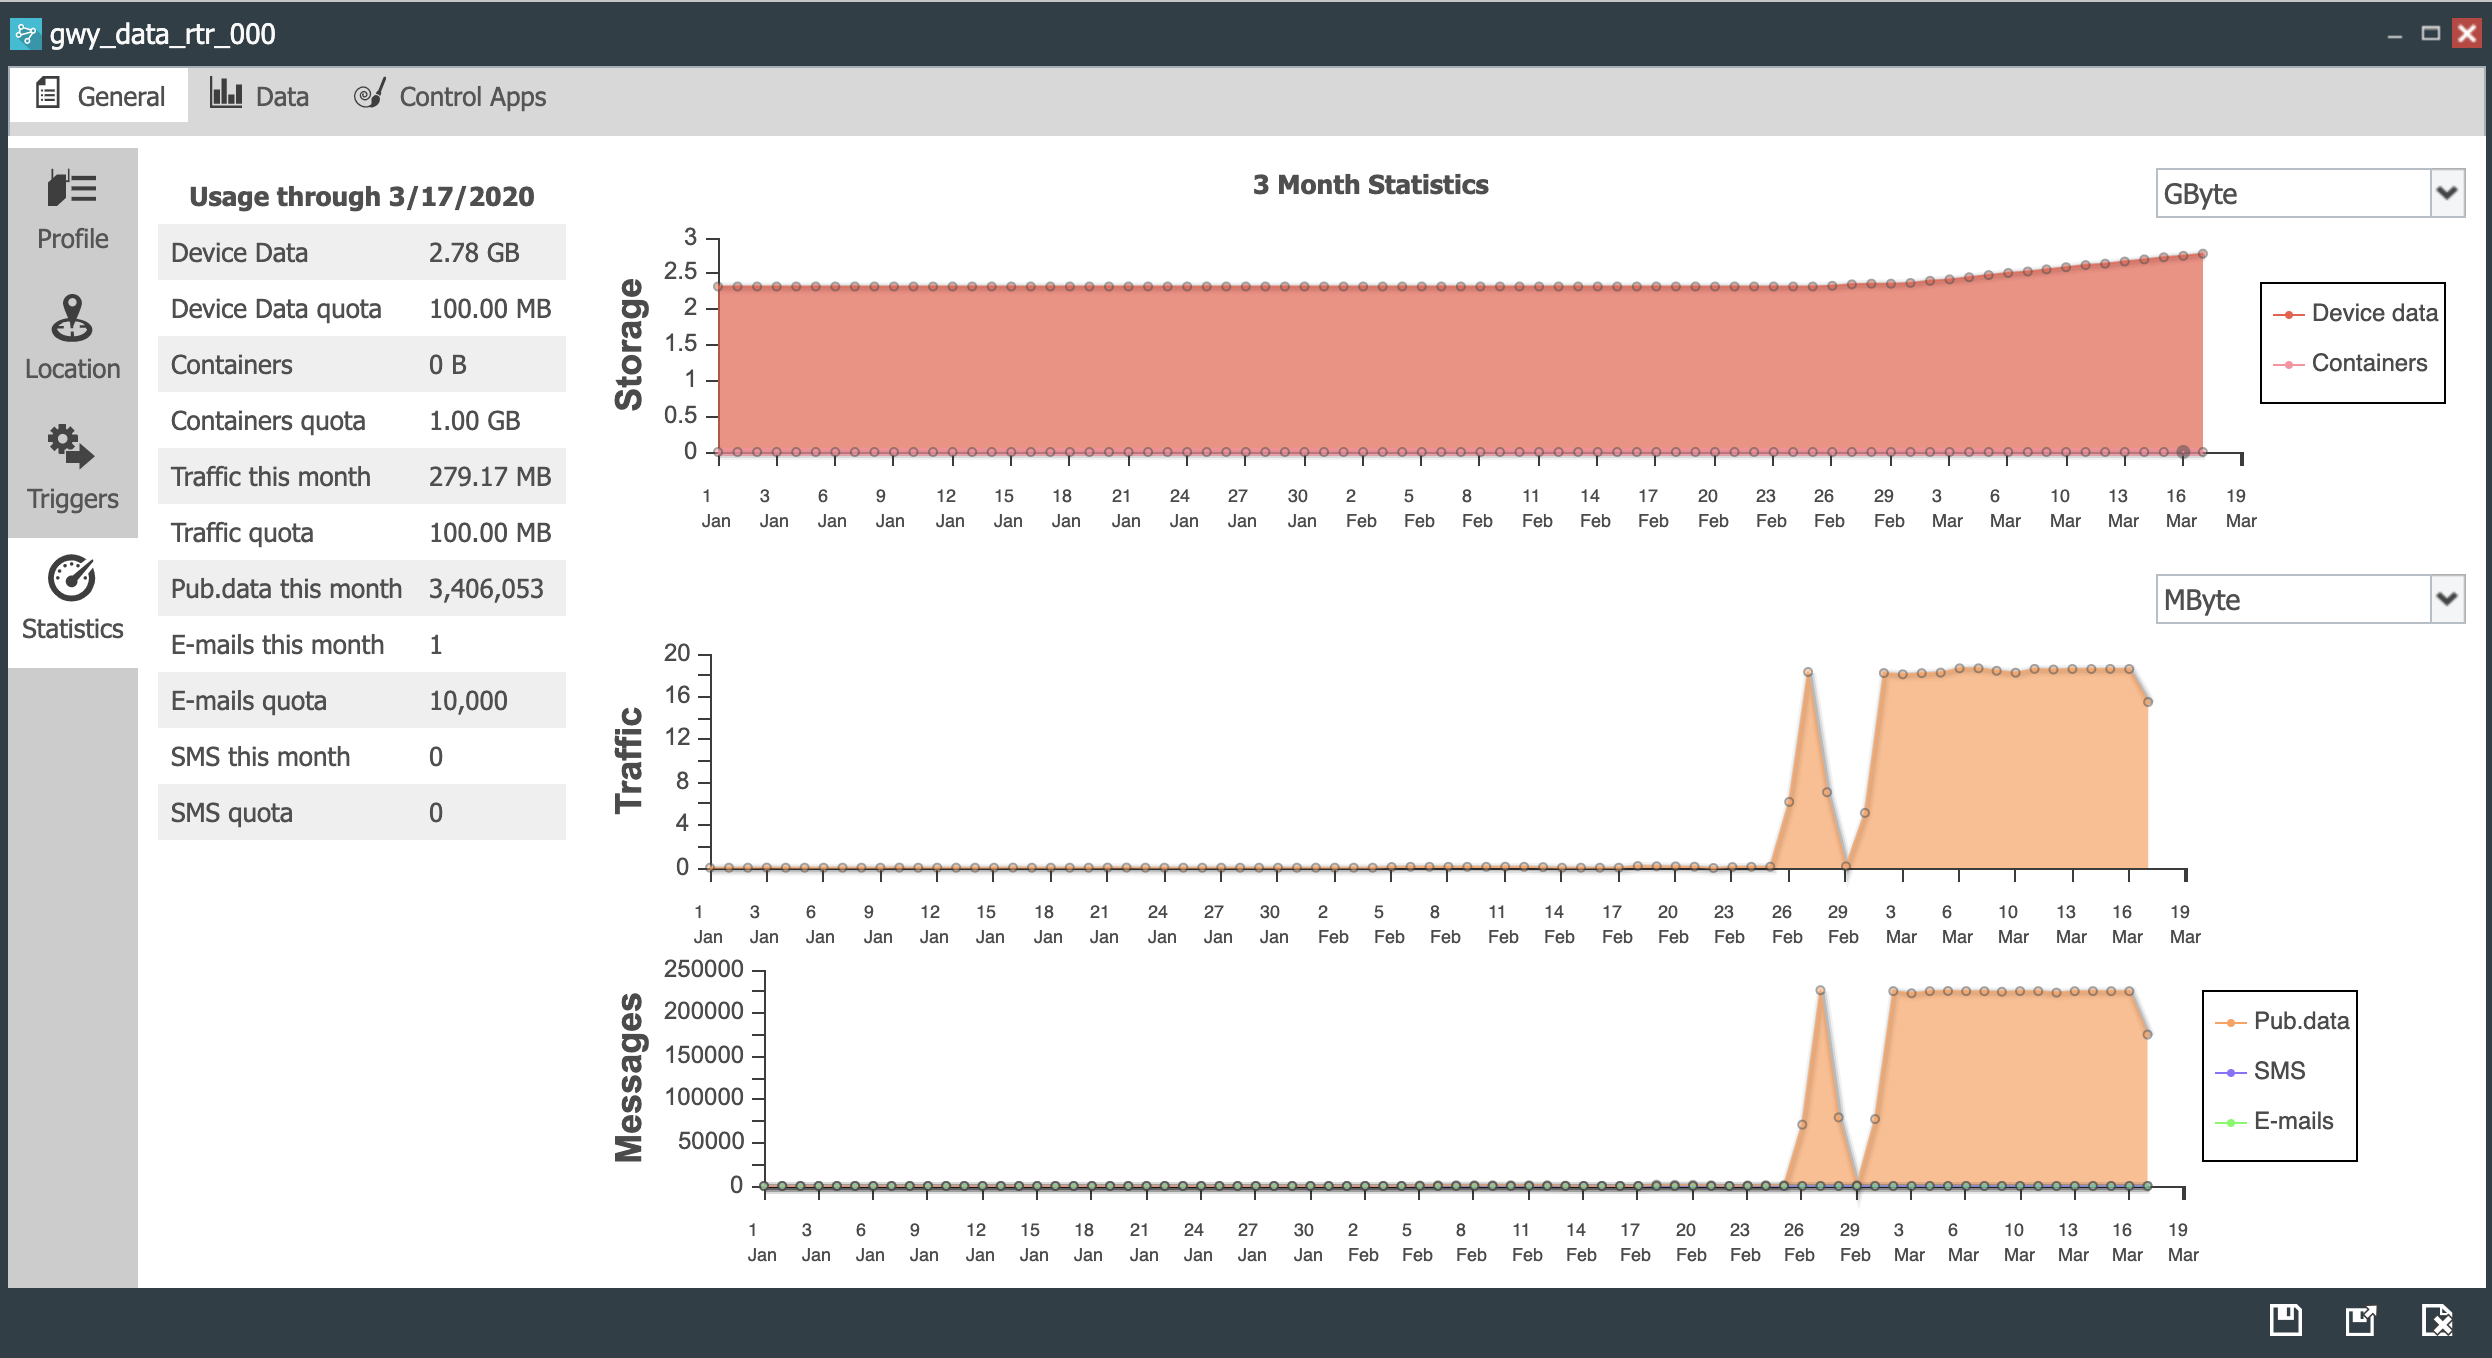
The left table of the panel presents a summary of the service and resource consumption of the device:
- Device Data. Displays the amount of CloudPlugs IoT storage that the device was using as of midnight the previous night.
- Device Data quota. Indicates the monthly storage allowance for the company account.
- Containers. Indicates the amount of storage buckets and containers used by the device.
- Containers quota. Indicates the monthly storage for containers in the company account.
- Traffic this month. Indicates the amount of traffic used by the device this month.
- Traffic quota. Indicates the monthly traffic allowance for the company account.
- Pub.data this month. Indicates the amount of data published by the device to date in the current month.
- E-mails this month. Indicates the number of emails sent by triggers programmed in the device.
- Emails quota. The number of emails allowance for the company account.
- SMS this month. Indicates the number of SMS messages sent by triggers programmed in the device.
- SMS quota. Indicates the SMS allowance for the company account.
The Storage chart displays the traffic consumption across the last 3 months. The chart data can be shown in kBytes, MBytes or GBytes.
The Traffic chart displays the traffic consumption across the last 3 months. The chart data can be shown in kBytes, MBytes or GBytes.
The Messages chart displays the messages published by the device during the last 3 months. The chart data can be shown in kBytes, MBytes or GBytes.
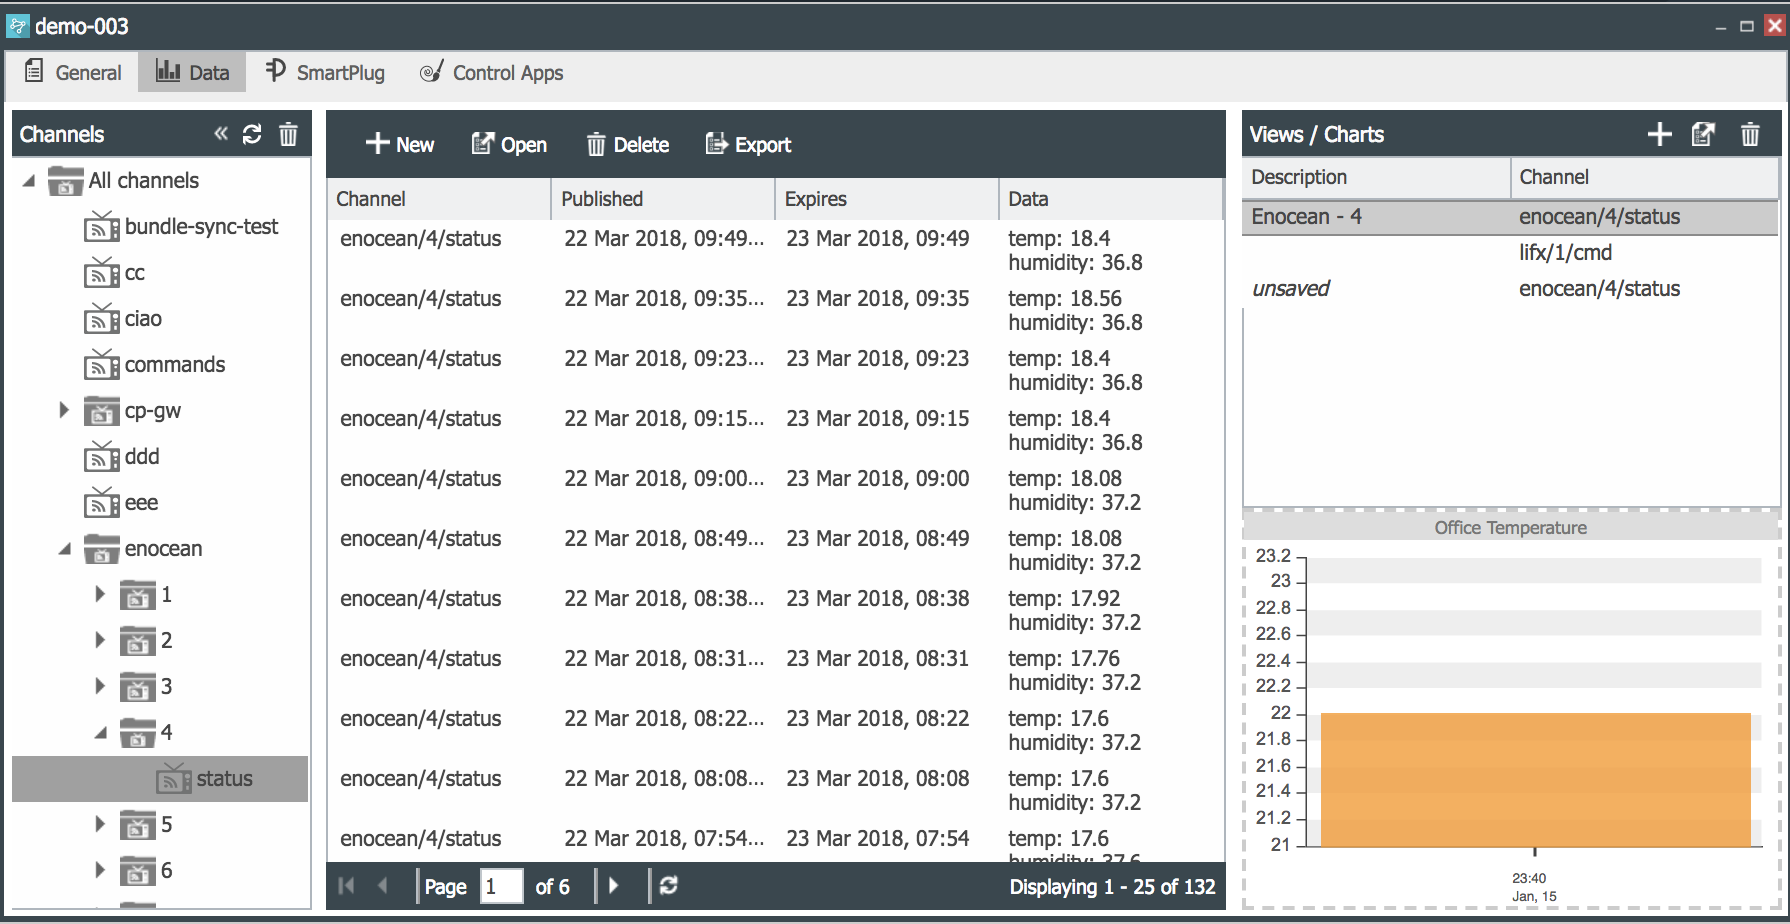
Publish and View Data
The Data panel allows to view data published by the Thing in the platform, as well as to publish data. For details on how to use this feature, refer to the Publish Data Guide.
SmartPlug™
The SmartPlug tab (![]() ) in the Properties Console has three menu items:
) in the Properties Console has three menu items:
- Overview (
 ), which allows to view the system information and to provide remote access to the Thing connected with a SmartPlug™.
 - SmartPlug Apps (
 ), which allows to provision and manage SmartPlug applications on the Thing.
 - Containers (
 ), which allows to provision and manage Containers on the Thing.
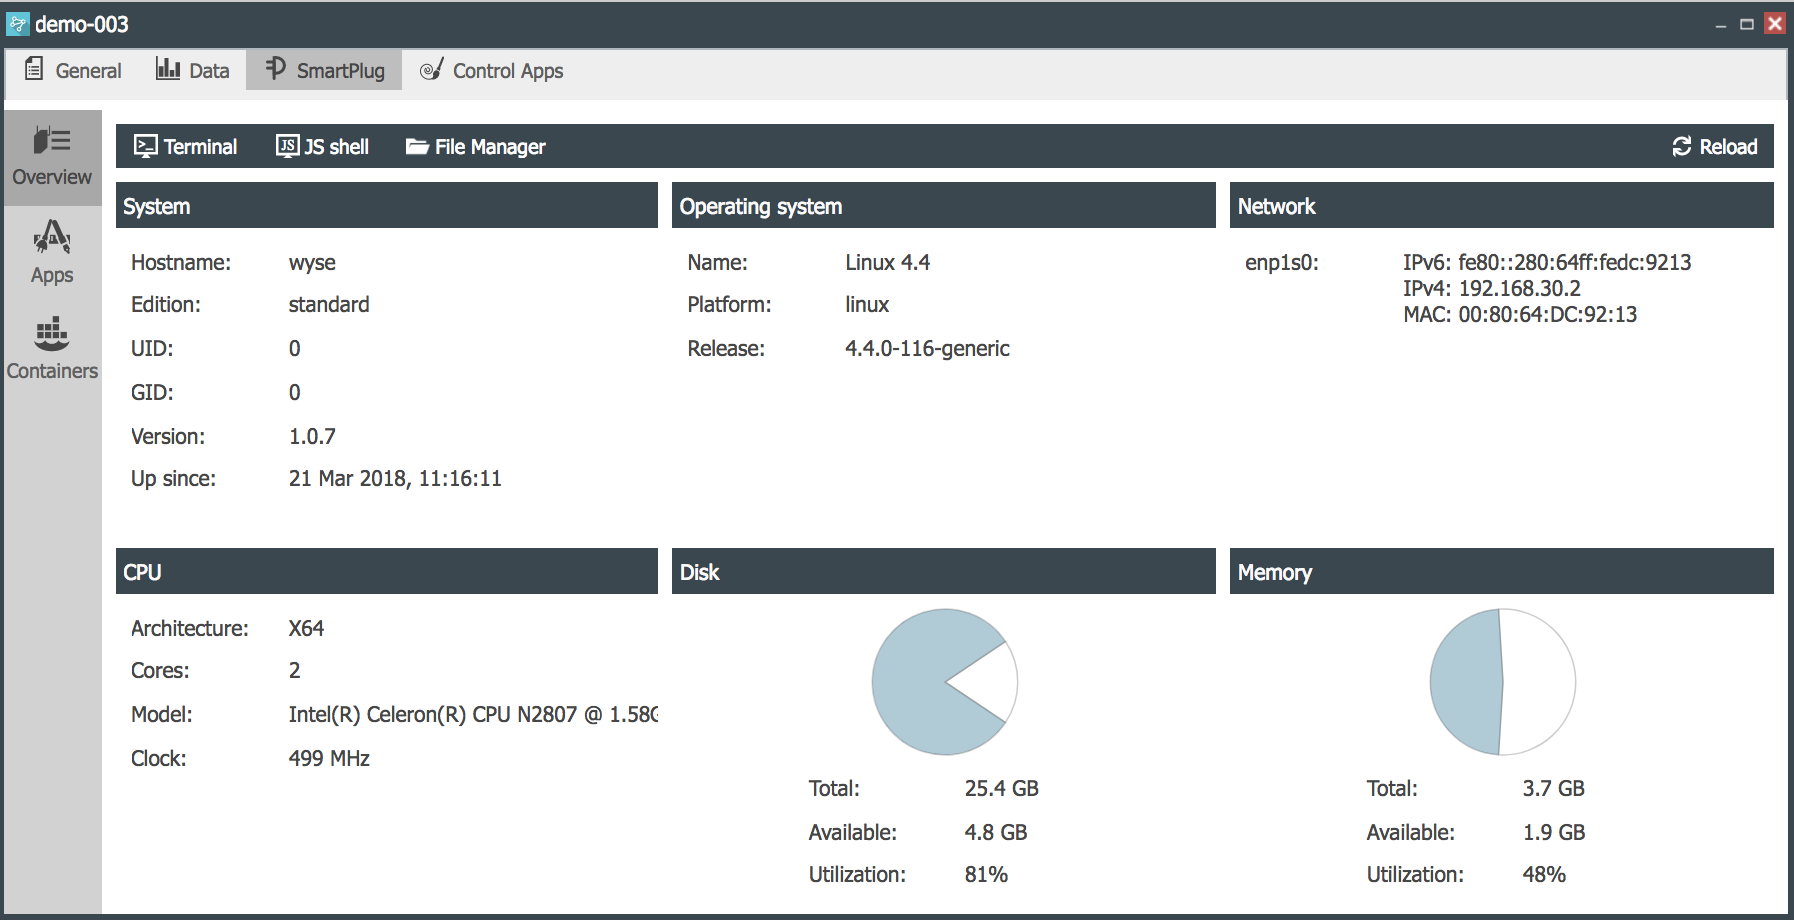
SmartPlug Overview
The Overview panel includes a top bar with the SamrtPlug™ remote management tools and various panel with information on the system running the SmartPlug™.
Three tools are accessible through the remote management toolbar:
- The Remote Terminal, which opens a firewall-friendly full VT100 compatible terminal on the remote Thing.
- The Remote JavaScript Shell, which allows to monitor in real-time the execution of JavaScript applications on the SmartPlug™.
- The Remote File Manager, which provides a remote file manager with a graphical interface on the system running the SmartPlug™.
To learn more about each individual tool, follow their individual links.
The main panel of Overview displays the following information:
- System shows the Hostname, UID and GID of the device or gateway running the SmartPlug™, as well as the SmartPlug™ version and when it was last started.
- Operating System displays the name, platform and release version of the operating system of the device or gateway running the SmartPlug™.
- Network displays the IPv6, IPv4 and MAC addresses of the host of the SmartPlug™.
- CPU displays the architecture, cores, model and clock rate of the system running the SmartPlug™.
- Disk displays the total disk space of the SmartPlug™ host, how much disk is free and available and what percent of the system’s disk storage is currently used.
- Memory displays the total memory of the SmartPlug™ host, how much memory is free and available and what percent of the system’s memory is currently used.
Here is a sample Overview panel for a connected Thing.
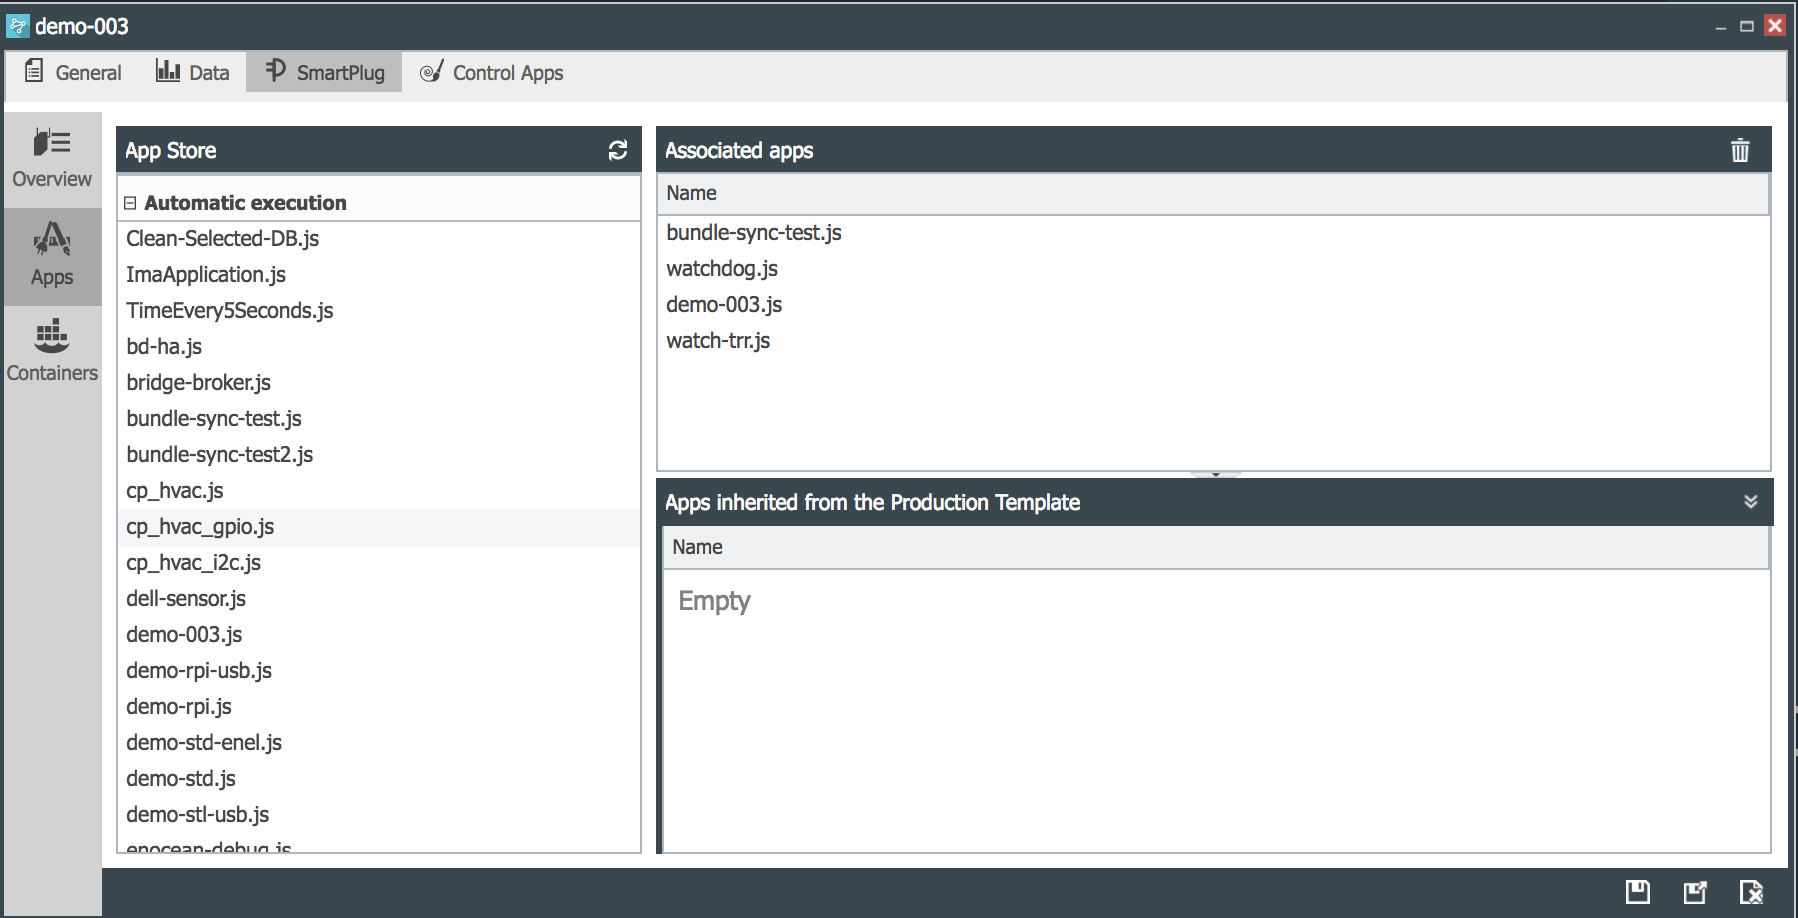
SmartPlug Apps
Production Things running a SmartPlug™ IoT agent can have any number of SmartPlug™ applications associated with them.
The applications can be provisioned by the Thing’s Production Template, or on each Thing individually through the SmartPlug Apps
tab ( ![]() ) on the top ribbon of the Production Thing Properties Console.
) on the top ribbon of the Production Thing Properties Console.
All the currently available applications in the SmartPlug App Store can be provisioned on Production Things. If the application list has been changed in the SmartPlug Apps store (![]() ),
the reload (
),
the reload (![]() ) command will refresh the list.
) command will refresh the list.
For details on how to provision applications on Things, refer to the Provisioning through a Thing’s Properties Console Guide.
The image below shows the Thing CP-Demo’s SmartPlug Apps panel with three apps provisioned.
Containers
Things running a SmartPlug™ IoT agent can be provisioned with application containers available in the CloudPlugs IoT container registry in your user account.
The containers can be provisioned by the Thing’s Production Template, or on each Thing individually through the Containers
tab ( ![]() ) available on the left menu bar of the Production Thing Properties Console, when SmartPlug is selected on the top
navigation bar.
) available on the left menu bar of the Production Thing Properties Console, when SmartPlug is selected on the top
navigation bar.
All the currently available containers in the CloudPlugs IoT registry in your user account can be provisioned on Production Things. If the container list has changed in the registry ( ![]() ),
the reload ( ) command will refresh the list.
),
the reload ( ) command will refresh the list.
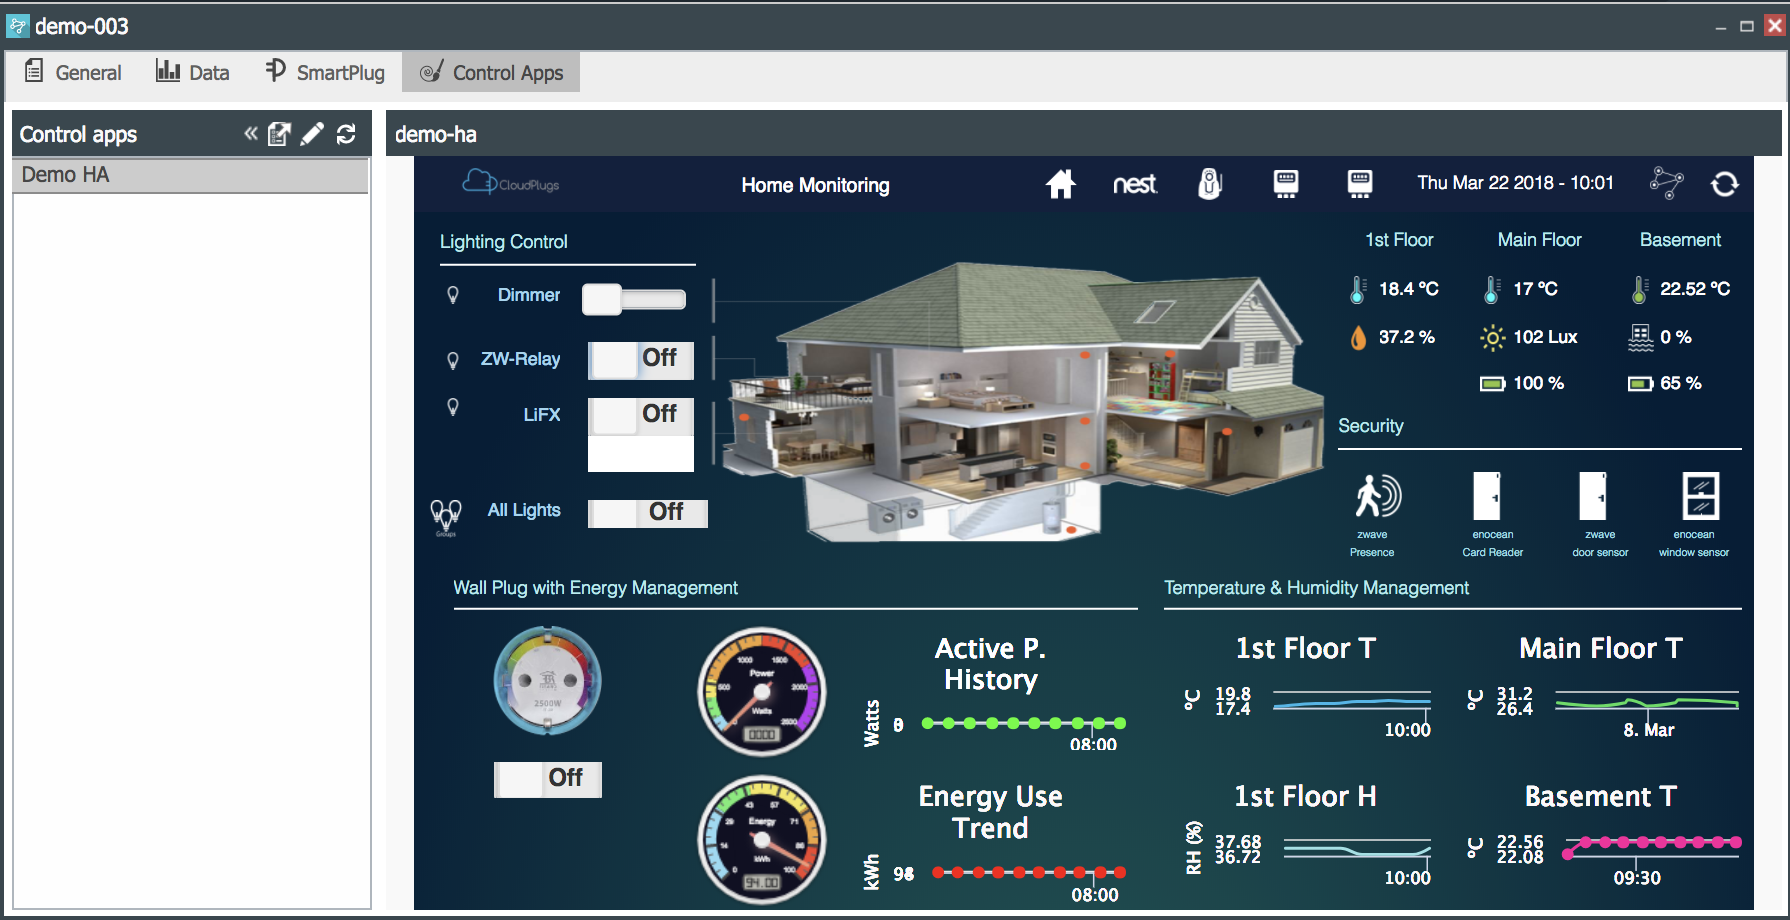
Control Apps
Control Apps displays the control applications built with the Control Designer and configured in the Thing’s Production Template. The applications are displayed inside a panel in the Thing console providing an easy way to:
- Verify the behavior of the Thing with the Control Application.
- Have visibility into the behavior of all the components and sensors connected to the Thing.
- Allow service and support personnel to see from the platform the exact same dashboard or HMI that an end user is seeing to help resolve problems.
Control Apps has two panels:
- Control Apps. It displays the Control Applications available and inherited from the Thing’s Production Template.
- Display panel. Displays the application selected. Your user account and password are used to automatically login to the control application.
In addition, it has a collapsable menu with three items:
- Open in window ( ) opens the control application in a new window, rather than inside the Display panel.
- Edit ( ) open the application in the Control Designer so you may make modifications.
- Reload ( ) refreshes the list of Control apps.
Here is a sample Thing console displaying a control application.
Deleting a Production Thing
Production Things can only be deleted from the Things Management Console.
WARNING!
Once a Production Thing is deleted, it cannot be recovered. All its data will also be deleted from the CloudPlugs IoT Timeseries database.
If the data of the Thing to be deleted is important to you, you should back it up by exporting it using the Export ( ![]() ) button in the Thing's Published Data tab.
) button in the Thing's Published Data tab.
To delete a Thing:
- Open the Things Management Console by clicking on the Things tile () in the platform’s web desktop.
- Search for the Thing you want to delete and select it.
- Click on the Delete button.