SmartPlug Apps IDE
![]() The SmartPlug Apps IDE is the tool to use to develop SmartPlug™ applications. The applications can be developed directly on the IDE’s Code editor,
or they may be developed with a different tool and loaded into the platform through the code editor.
The SmartPlug Apps IDE is the tool to use to develop SmartPlug™ applications. The applications can be developed directly on the IDE’s Code editor,
or they may be developed with a different tool and loaded into the platform through the code editor.
In general, applications developed for the SmartPlug™ are written in JavaScript. You may also use other development languages and use a JavaScript wrapper to execute them in the SmartPlug™.
- The features of the IDE.
- The benefits of the SmartPlug Apps IDE.
- How to configure the code editor style.
- How to develop a SmartPlug Application.
- How to deploy a SmartPlug Application.
- How to provision a SmartPlug Application on Production Things.
IDE Features
The main features of the SmartPlug Apps cloud IDE are:
- Develop on a browser anywhere.
- 100% JavaScript application development.
- Real-time JavaScript analysis to reduce programming errors.
- Support for the application development cycle
- Save (
)your code.
- Commit (
) your code once ready for deployment.
- Deploy (
) your code with one click.
- Icons display the state (saved, committed, deployed) of your application.
- Support for themes.
- Parenthesis, bracket, and quote character matching.
- Line numbers, warnings, and errors in the gutter.
- Invisibles Showing, Lines Wrap, Code Folding, Active Line and Selected Words Highlighting.
- Font Size, Print Margin Showing.
IDE Benefits
Some key benefits of the SmartPlug Apps cloud IDE are:
- Develop applications from anywhere, anytime on any browser.
- Develop in JavaScript. No more need for low level firmware development.
- Dramatic reduction in application development time and application maintenance costs.
- One click central deployment of IoT apps to thousands of devices.
Set your Code Editor Style
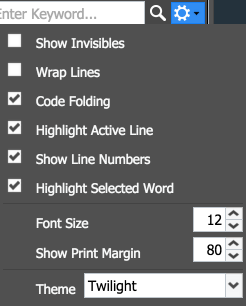
Select your favorite theme for the code editor and set your preferences using the Preferences wheel (![]() ) on the upper right hand of the SmartPlug Apps window.
) on the upper right hand of the SmartPlug Apps window.
The dropdown menu also allows you to select from a number of Themes.
 |
|---|
Developing a SmartPlug Application/Script
To start coding a new application, or to input already written code, simply:
- Press the New button (
 ) under the Scripts panel.
 - Name your script.
- Select whether the script will be:
- An application to be executed by the SmartPlug, or
- A re-usable library that can be included in your applications.
- Click the Save and Close button (
 ).
). - Add your code to the editor and using the commands in the top ribbon of the editor window:
- Save (
) to save your work and come back and continue working on it, or
- Save and Commit (
) your code to deploy it.
 |
|---|
Develop and Deploy your SmartPlug Application/Script
To develop your SmartPlug™ application:
- Enter your code in the code editor. The code editor includes a real-time syntax checking engine that will highlight any lines of code that contain syntax errors.
- Save your code as you develop it using the Save (
 ) button.
 - Save and Commit (
 ) your script once you are ready to deploy it.
Deploy your SmartPlug Application/Script
The Deploy (![]() ) button on the Scripts panel allows the deployment of
an application, or of an update of an application.
) button on the Scripts panel allows the deployment of
an application, or of an update of an application.
To deploy an application, the application must have been saved and committed (![]() ).
Applications that are only saved, cannot be deployed.
).
Applications that are only saved, cannot be deployed.
Important! Please note that code that is not committed, is not deployed in the platform. Trying to deploy Code that has been committed and then modified and saved, but not committed again, will result in re-deployment of the last committed version, not the last saved version.
Once the deployment is executed, all Production Thing devices running a SmartPlug™ and having the application provisioned (or associated), will start a Bundle Sync process which will re-spawn the SmartPlug™ worker process. Once the worker process is re-spawned, the new application or update will be executed by the SmartPlug™. The Bundle Sync process on a device can be monitored using its JS Shell.
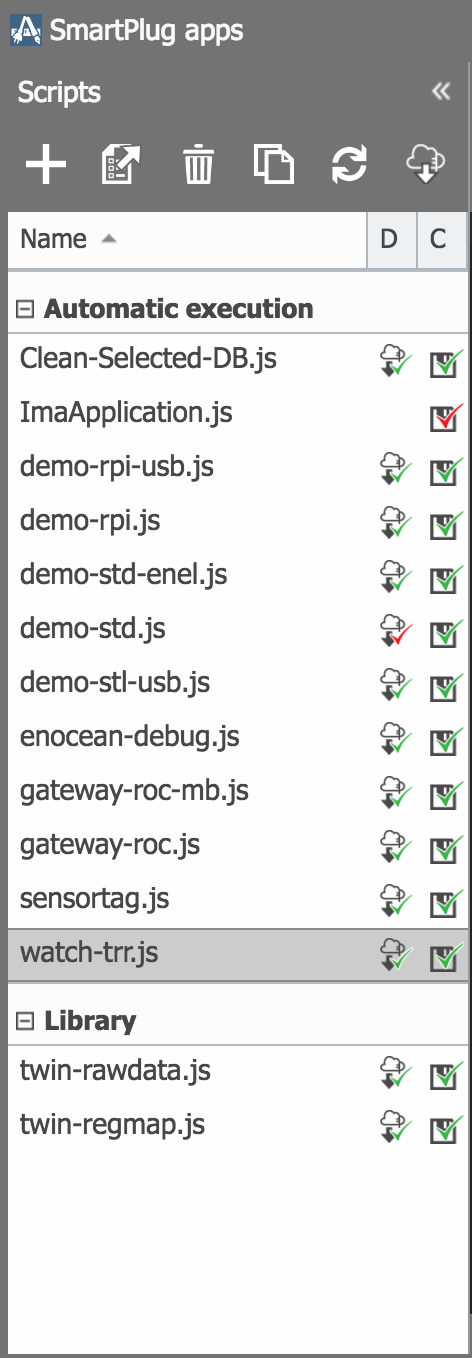
The Scripts/Application Store panel provides a graphical view of the state of all the scripts on two columns:
- Column D (for Deployed), and
- Column C (for Committed)
The possible states for an application are:
| Deployed ( D ) | Committed ( C ) | ||
|---|---|---|---|
| Application is Deployed and Synchronized with the last committed version of the application/script. | The current saved version of the application has been committed and is ready for deployment. | ||
| The Deployed version is no longer in sync with the last committed version of the application/script. | The current saved version of the application has not been committed. If the application is deployed, the last committed version will be injected in the Things with SmartPlugs associated to the application. |
Here is an example of a Script/Application store with the status of several applications:
 |
|---|
Provision SmartPlug Apps on Production Things
In order for a Production Thing device to run a SmartPlug™ application, the application must first be provisioned, or associated with the device.
SmartPlug™ applications are either through the Apps Panel under the SmartPlug tab in the Thing’s management console or the Thing’s Production Template.
When a SmartPlug App or a Container is provisioned on a Thing’s Template, the Thing will automatically inherit and provision the SmartPlug App or Container.
IMPORTANT!
1. SmartPlug Apps provisioned on Things through a Production Template can only be removed through the Production Template.
2. SmartPlug Apps provisiones in a Production Thing, cannot be provisioned on the Thing's Template. To provision the SmartPlug App through the Template, it needs to be removed from all the Template's Production Things that have it provisioned.
The following sections explain the process for each case.
Provision SmartPlug Apps Using the Thing’s Apps Panel
To provision a SmartPlug™ application on a Production Things through its Apps panel:
- Open the Things Management Console using the Things tile (
 )in the web desktop.
 - Select and Open an exiting Thing.
- Open the Thing’s SmartPlug Apps panel through the (
 ) tab.
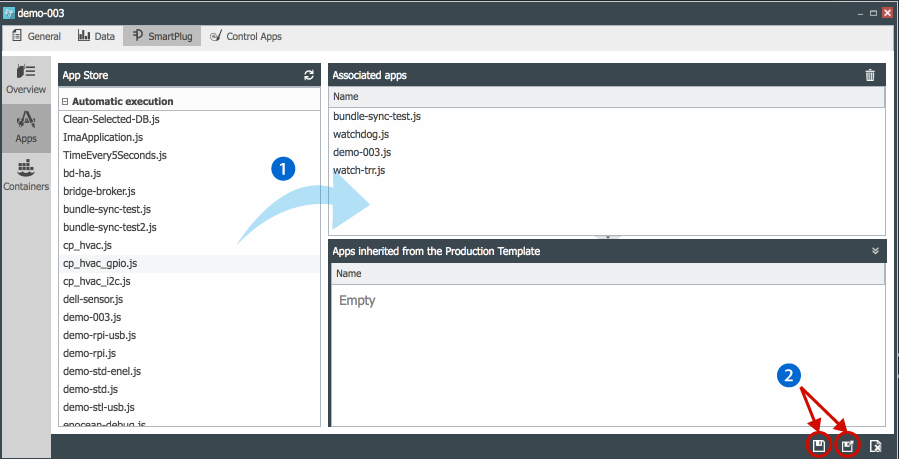
 - Select the desired application(s) from the App Store panel.
- Drag and drop the application(s) into the Associated Apps panel.
- Save (
 ) or Save and Close (
 ) the Thing.
Saving the new application configuration will provision the applications on the Thing’s SmartPlug™ as follows:
- If the device’s SmartPlug™ was already connected, the Save action will initiate a Bundle Sync process and the SmartPlug™ worker process will be re-spawned to start running the application(s) provisioned.
- If the device’s SmartPlug™ was not connected, once the SmartPlug™ is connected, it will download the application(s) and will run them.
Important! Notice that the Apps inherited from the Production Template panel will contain any applications provisioned in the Thing's Production Template before the Thing enrolled into the platform. These apps cannot be removed from the Thing. They can only be removed from the Production Template which must be saved for the changes to take effect.
The result of the process is shown in the image below.
 |
|---|
Provision SmartPlug Apps Using the Thing’s Production Template Apps Panel
SmartPlug™ applications can be provisioned through the Production Templates either:
- Before Things are enrolled, which means that once Things are enrolled they will inherit their Production Template applications.
- After one or more Things are enrolled.
To provision applications using the Production Template:
- Open the Production Templates Management Console using the Template tile (
 )in the web desktop.
 - Select and Open an exiting Template.
- Open the Template’s SmartPlug Apps panel through the (
 ) tab.
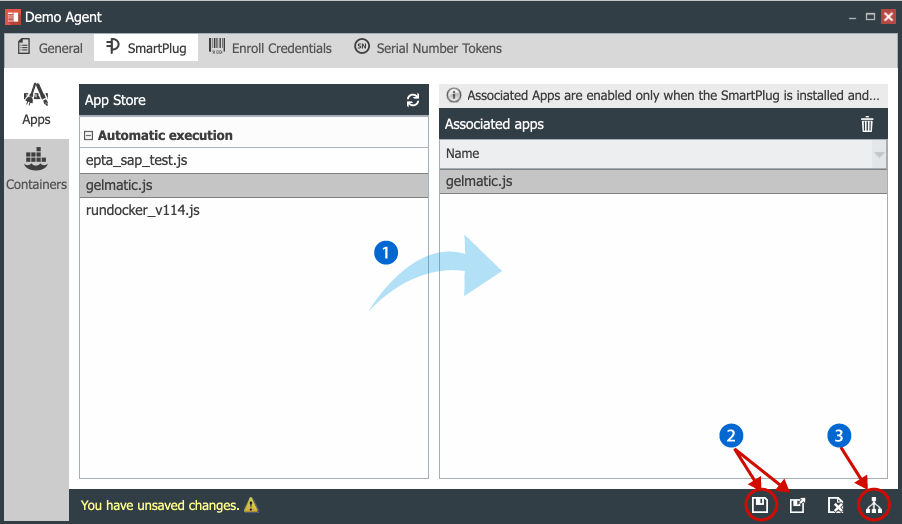
 - Select the desired application(s) from the App Store panel.
- Drag and drop the application(s) into the Associated Apps panel.
- Save (
 ) or Save and Close (
 ) the Template.
 - Provision (
 ) the Template.
Saving and Provisioning the new application configuration will provision the applications on all the Production Template Things SmartPlugs™ as follows:
- If the device was already enrolled and its SmartPlug™ was already connected, the Save action will initiate a Bundle Sync process and the SmartPlug™ worker process will be re-spawned to start running the application(s) provisioned.
- If one or more of Template’s Things were not enrolled or connected, once the devices enroll and their SmartPlugs™ connect, they will download the application(s) and will run them.
Please note that:
- Applications provisioned through a Production Template cannot be deleted using the Thing’s SmartPlug Applications panel.
- To delete applications provisioned by the Production Template, they must be deleted in the Production Template’s SmartPlug Apps panel.
The result of the Provisioning process through a Production Template is shown below:
 |
|---|
 CloudPlugs IoT Knowledge Base