3. Configuration
EnOcean Configuration Overview
This guide describes how to configure the Edge One™ EnOcean Gateway module and it includes the following sections.
- Requirements for installation of EnOcean.
- Configuring an EnOcean Project indicates the initial steps for configuring the EnOcean gateway.
- Configuring your EnOcean Devices describes how to discover and connect your EnOcean devices.
- Creating a Group indicates how to create, configure an EnOcean Group.
- Editing a Group describes how to edit the configuration of an EnOcean Group.
Note that since EnOcean devices have unique identifiers, the Import and Export features available for Groups are not available in the EnOcean module.
Once the project is configured and Saved you must create a Message Router project and configure the cloud access parameters to connect uni-directionally or bi-directionally to CloudPlugs or a supported IoT cloud service.
Requirements
The following are the requirements to connect EnOcean devices to the Edge One™.
- Edge One™ and the EnOcean container module need to be installed on the gateway or virtual machine running Edge One™.
- An EnOcean electric interface (USB dongle or local interface) available on the system running Edge One™ and accessible by the Edge One™ platform.
- Note that the Edge One™ EnOcean project must be running in order to connect and configure EnOcean devices.
- Configuration of a Message Router project and route to send the EnOcean data to CloudPlugs IoT, a supported public IoT cloud service or to a local MQTT server.
Configuring the EnOcean Project
- In the Project tab:
- Enter a name for the project.
- Enter the serial port that will be used to access the EnOcean controller. If the controller uses an EnOcean USB dongle, the default port is /dev/ttyUSB0. Note that the serial port must be valid. Otherwise, the project will not start and you will not be able to configure your devices.
- Set the log level.
- Silent - No logs will be printed on the console. This is the default log mode.
- Error - Reports only important and blocking errors that can cause malfunctions.
- Warning - All warnings for abnormal, non-blocking events as well as Errors will be reported in the logs.
- Info - All messages relevant to the current system status as well as Warnings and Errors will be reported in the logs.
- Debug - Full verbose mode. All errors, warnings, and information will be reported on the log console.
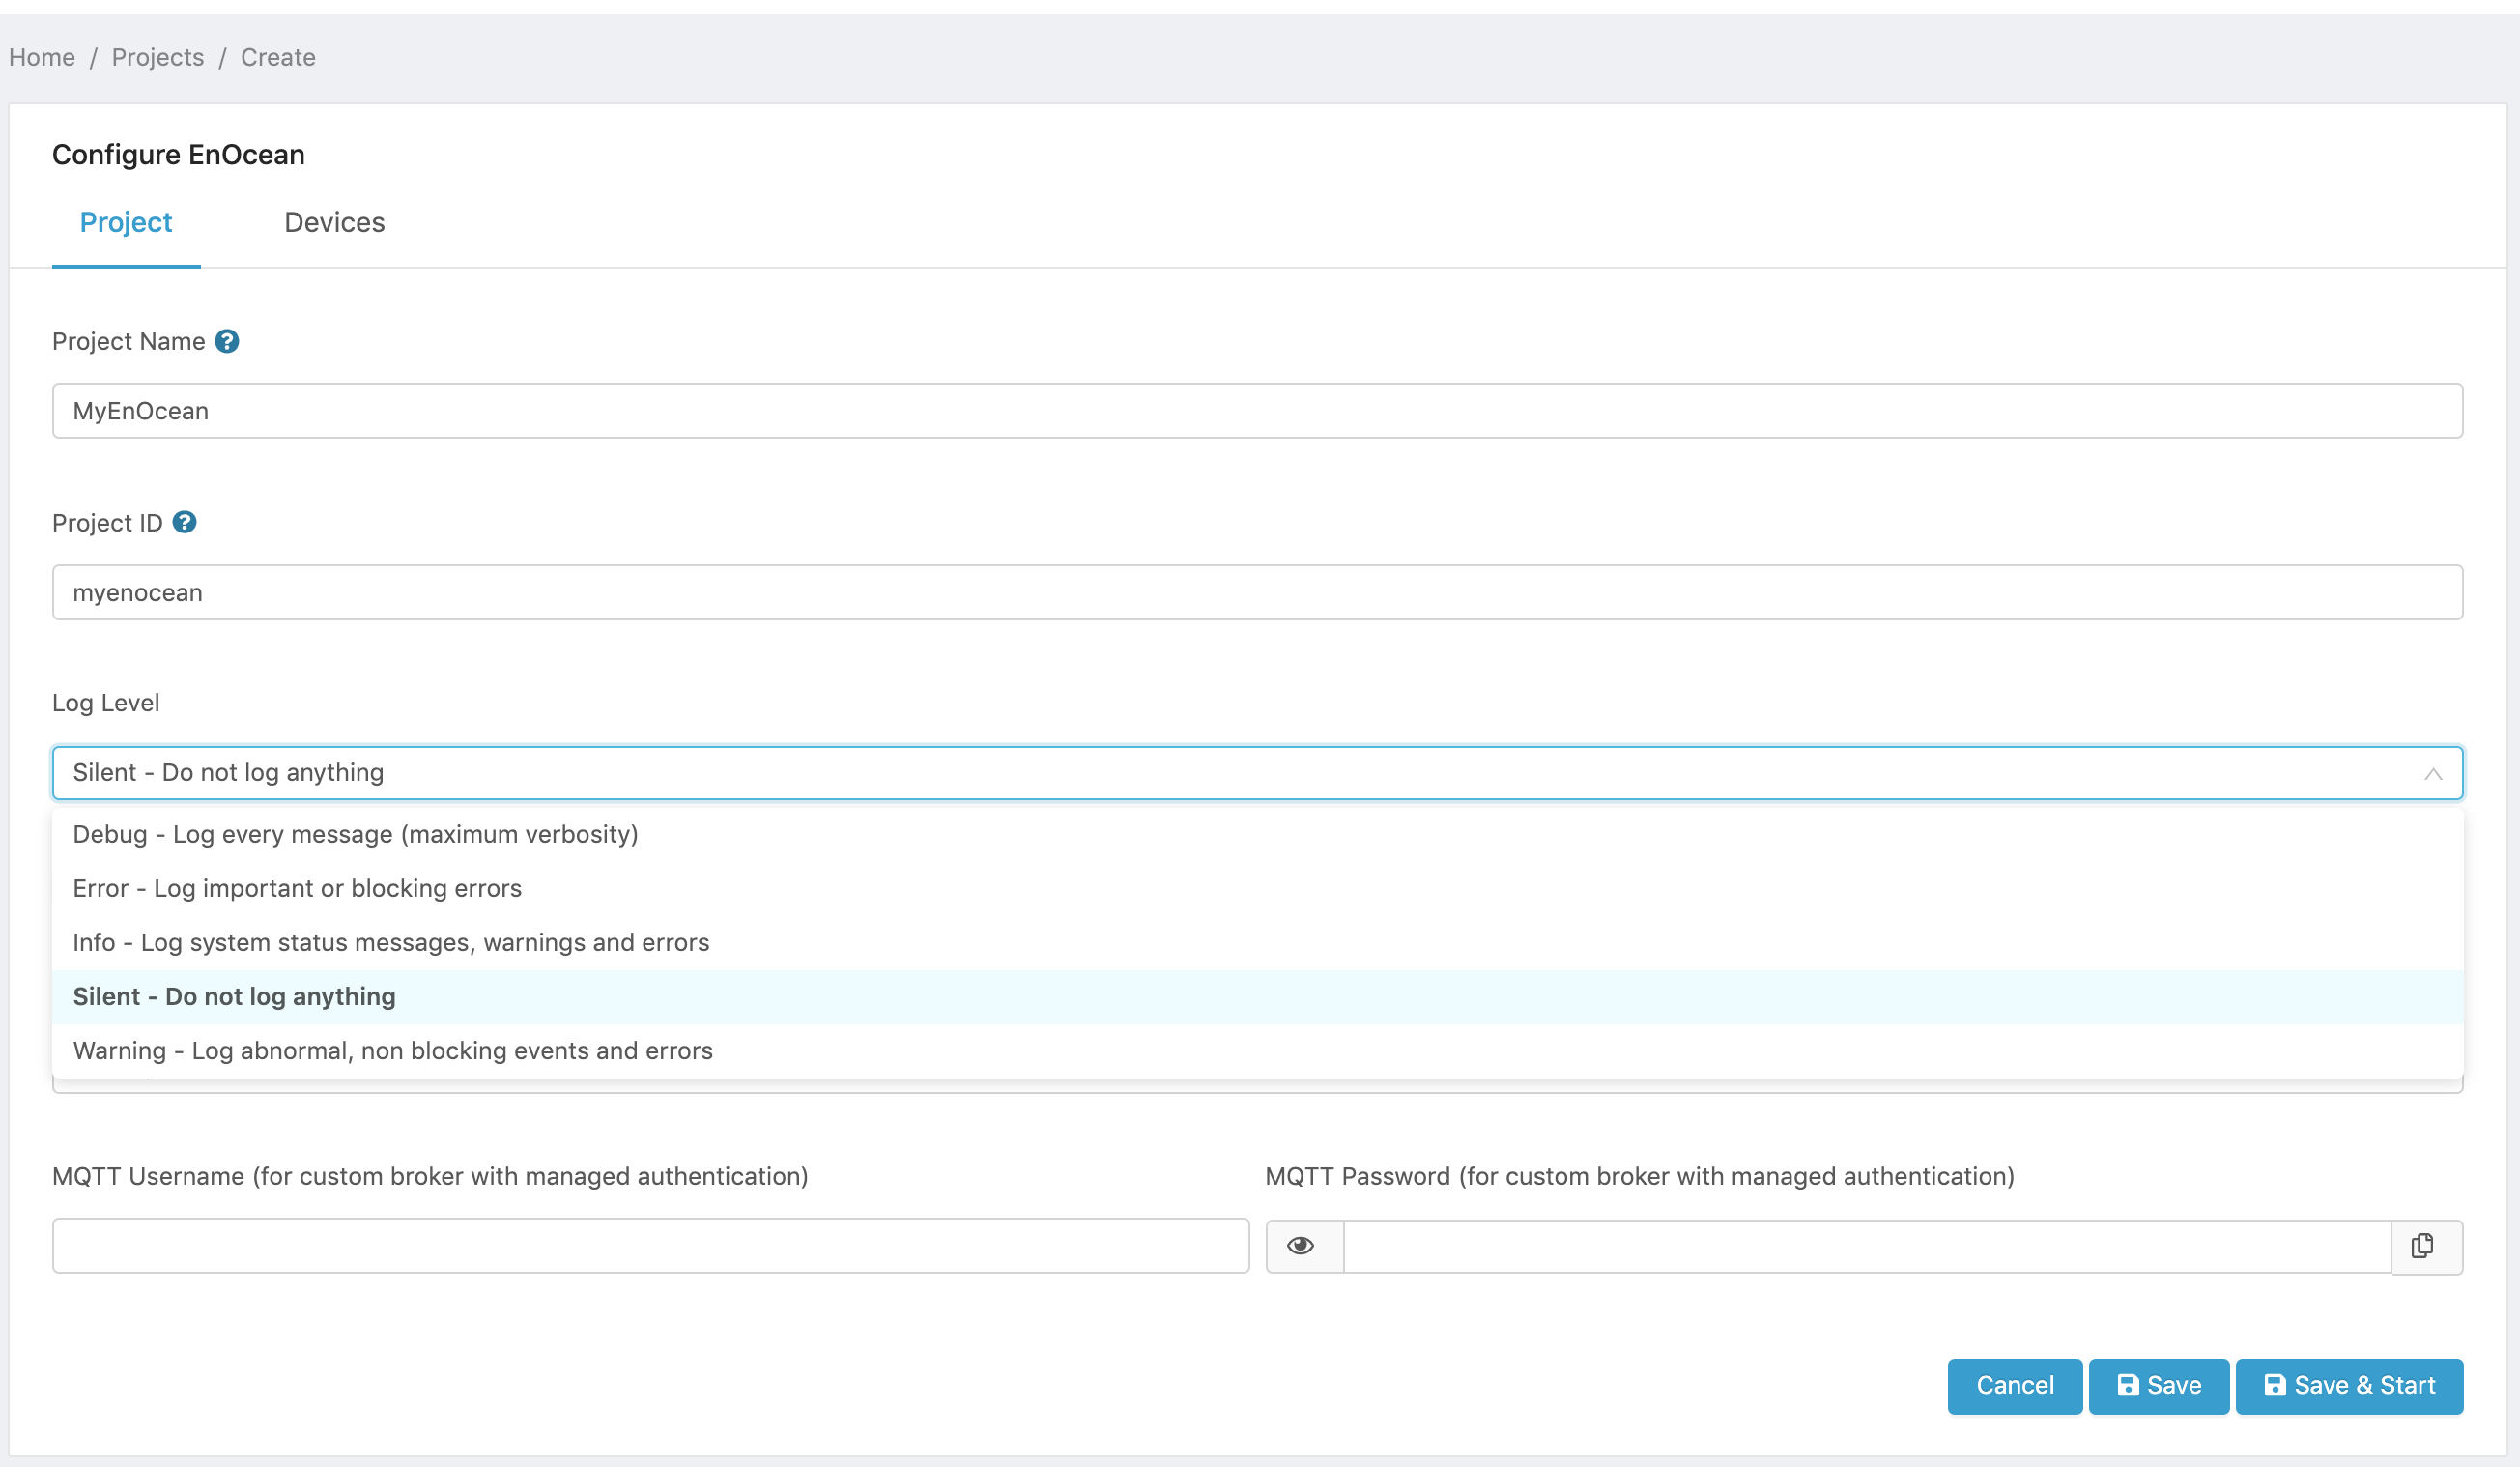
Figure 1. EnOcean Project log level.
- Select whether or not the project will be started automatically when the EnOcean container is started. To start the project manually using the web interface, set the Manual mode switch to ON.
- If an external, custom MQTT broker will be used for the project, and the broker has been configured in the Settings->Server->MQTT Broker page, enter the User Name and Password authentication credentials for the target broker.
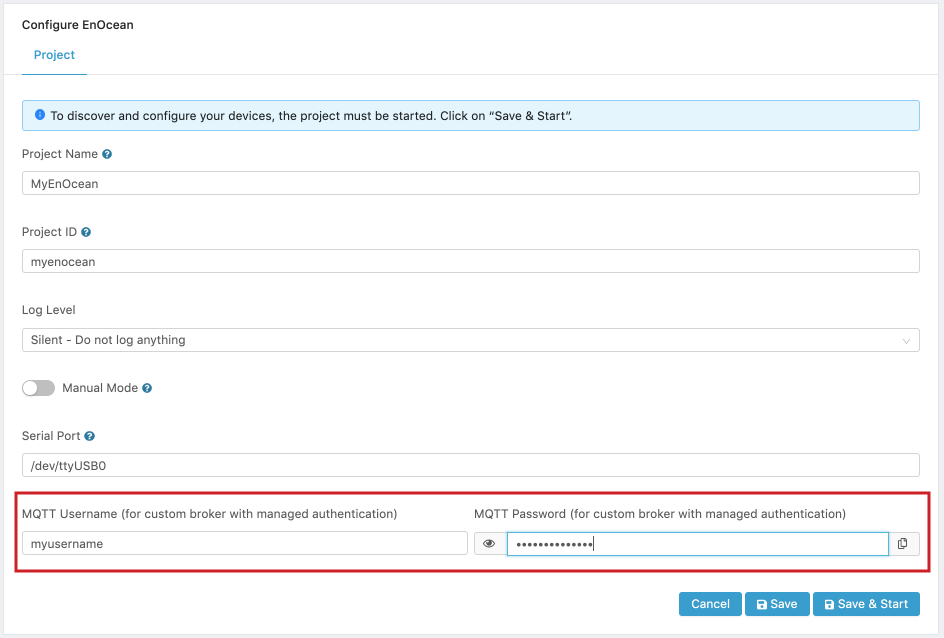
Figure 2. Custom MQTT Broker Credentials.
- Next there are three options for the project:
- Cancel which cancels the configuration of the project and returns to the Projects page.
- Save which saves the current configuration and allows you to return later to complete the configuration and pairing of devices.
- Save and Start which:
- Saves the current configuration and starts the EnOcean module using the serial port provided. The project must be running in order to configure devices using the Devices tab. If the serial port is not valid, the project will not run and you will be unable to configure your devices.
- Opens the Device tab so you may configure your devices.
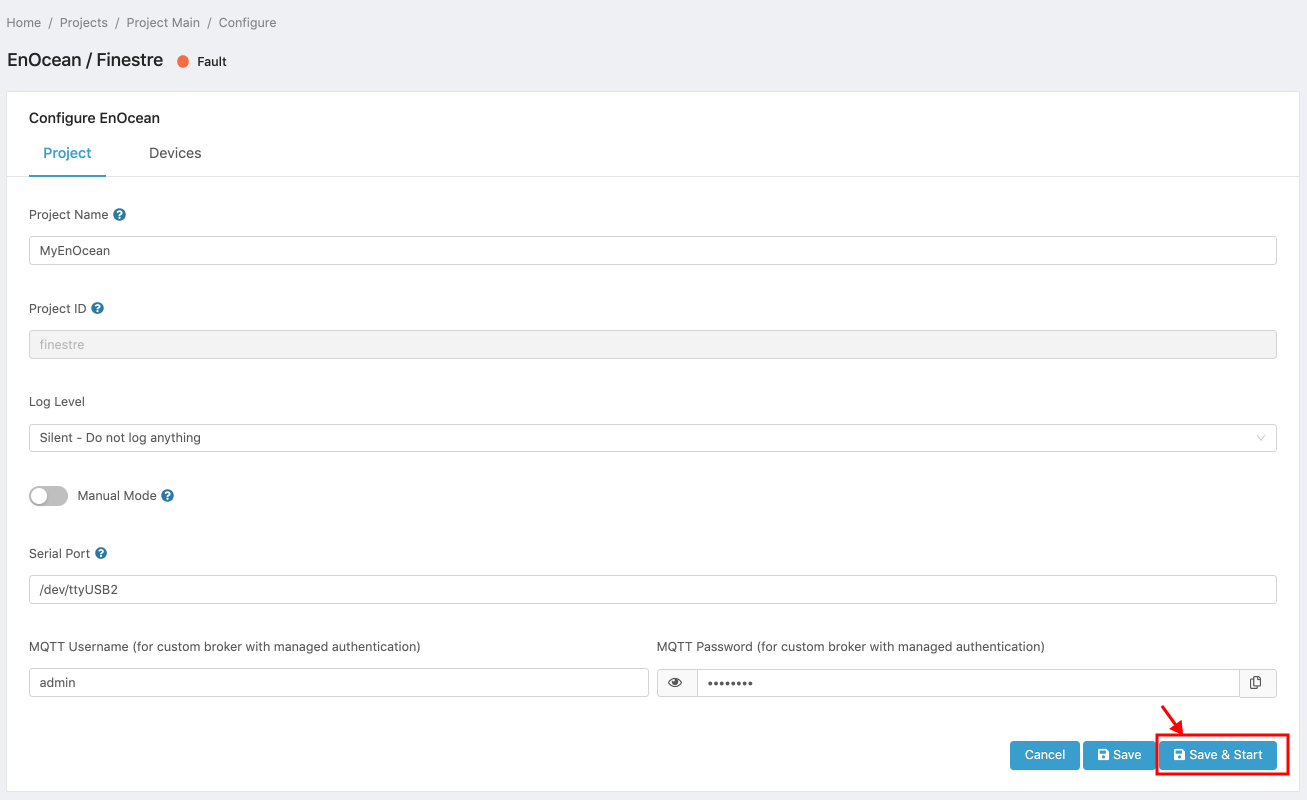
Figure 3. EnOcean Project configuration.
Configuring the EnOcean devices
To configure the EnOcean devices:
- In the Devices tab press Start Discovery to initiate the process of discovering the EnOcean devices available. The Stop Discovery button is also enabled to allow you to stop the discovery process.
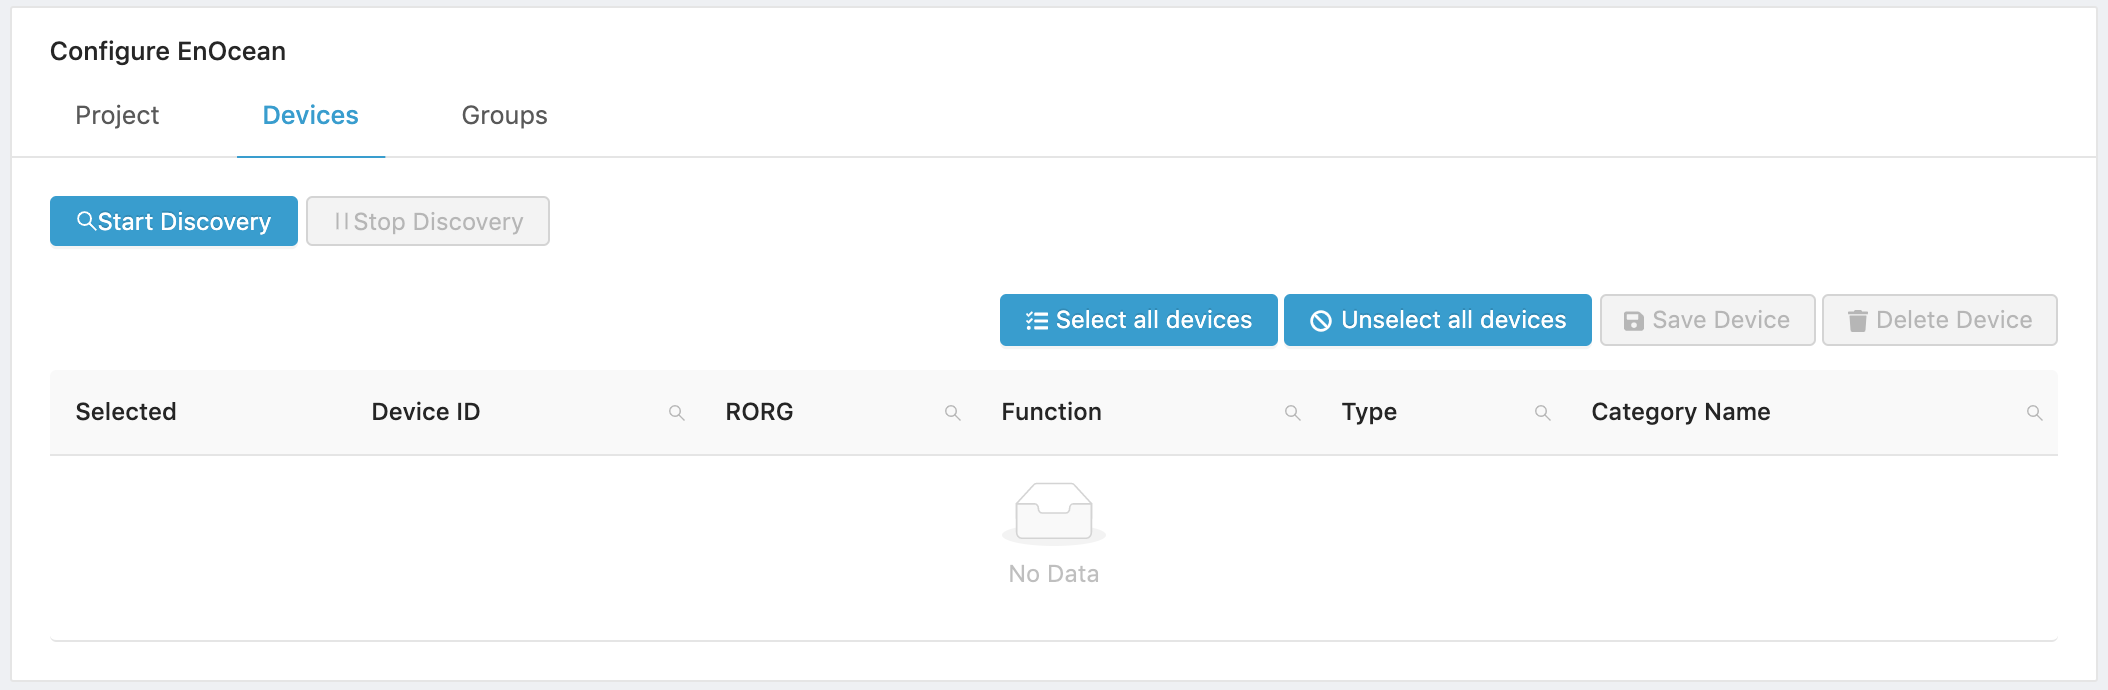
Figure 4. Discover and pair EnOcean devices.
-
Follow the instructions in the devices’ manuals to pair your EnOcean devices. Many of them require to press a pairing button or to toggle a switch so they may be discovered.
-
The devices discovered and paired will be displayed in the Devices section of the page. The following EnOcean Equipment Profile (EEP) information is listed in table format for each discovered device:
- Selected displays the switches to select devices from the list of discovered devices.
- *Device ID This is the device’s unique 32-bit ID (TXID/SourceID). No two devices have the same ID.
- RORG. The device’s ERP radio telegram type. The various Radio-telegram types are grouped ORGganizationally. The range of values is 8-bits (00…FF).
- Function. The basic functionality of the data content (FUNC). The range of values is 6-bits (00…3F).
- Type. The type of device in its individual characteristics (TYPE). The range of values is 7-bits (00…7F).
- Category Name. The module category, e.g., wireless transceiver module, wireless switch & sensor module, etc.
The profile fields, ROGR, FUNC, TYPE are represented by hexadecimal numbers, where the maximum value is limited by the available bits.
Up to 10 devices are displayed per device table. Additional devices are displayed in additional table pages accessible through the navigation buttons at the bottom of the table.
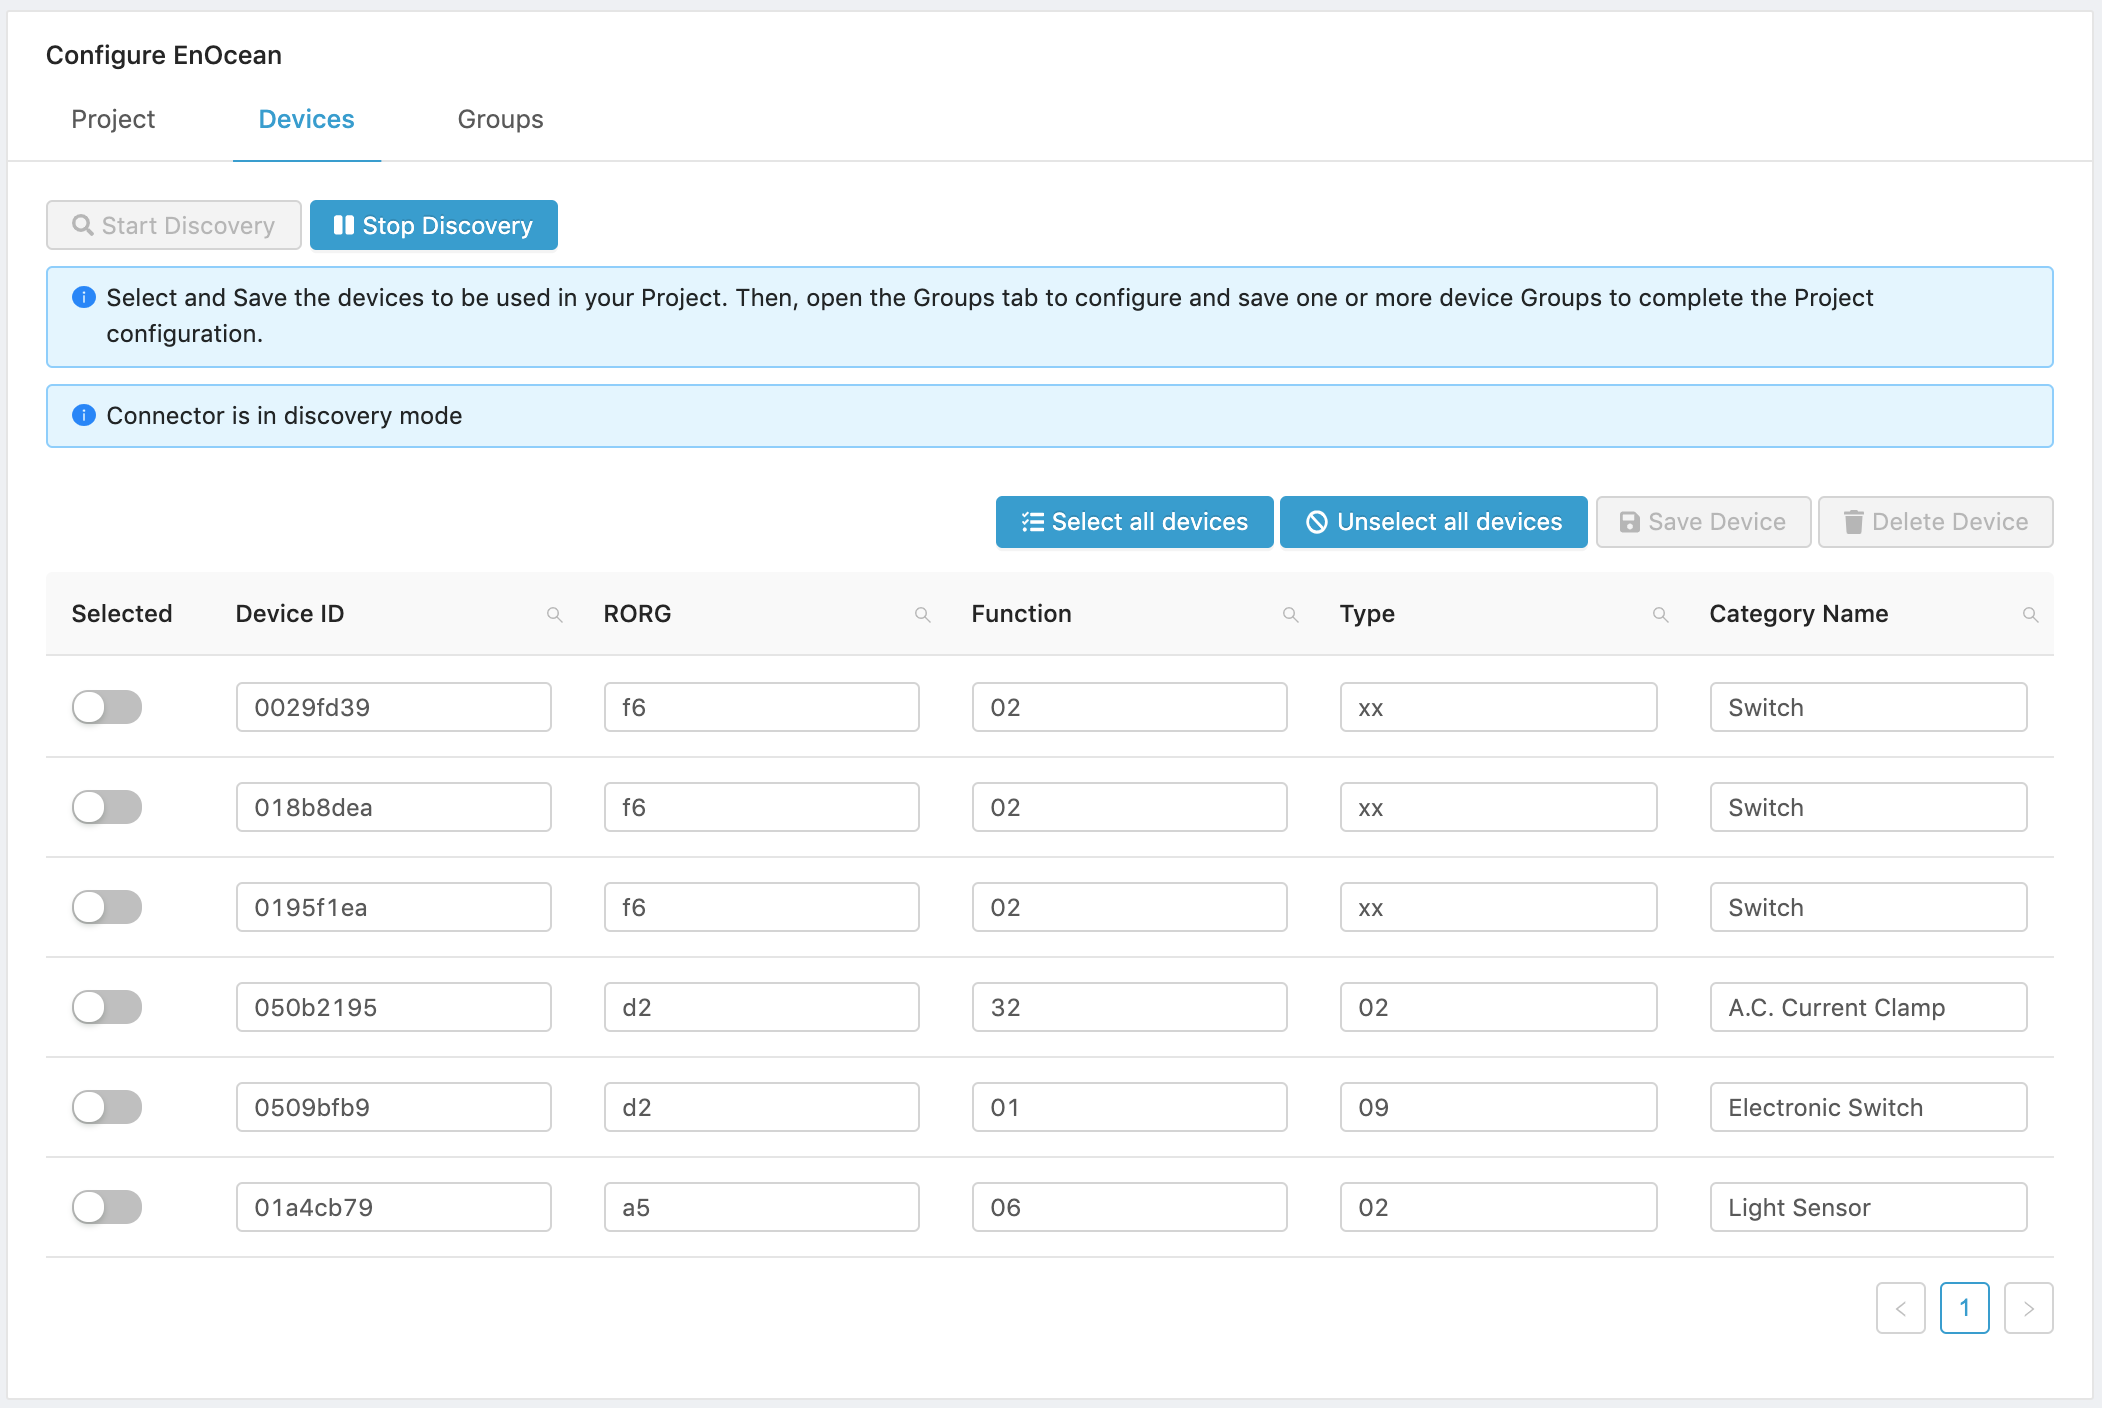
Figure 5. EnOcean devices list.
- When you are done with the pairing procedure, press Stop Discovery. You are now ready to select and save the devices that will be used for the Project.
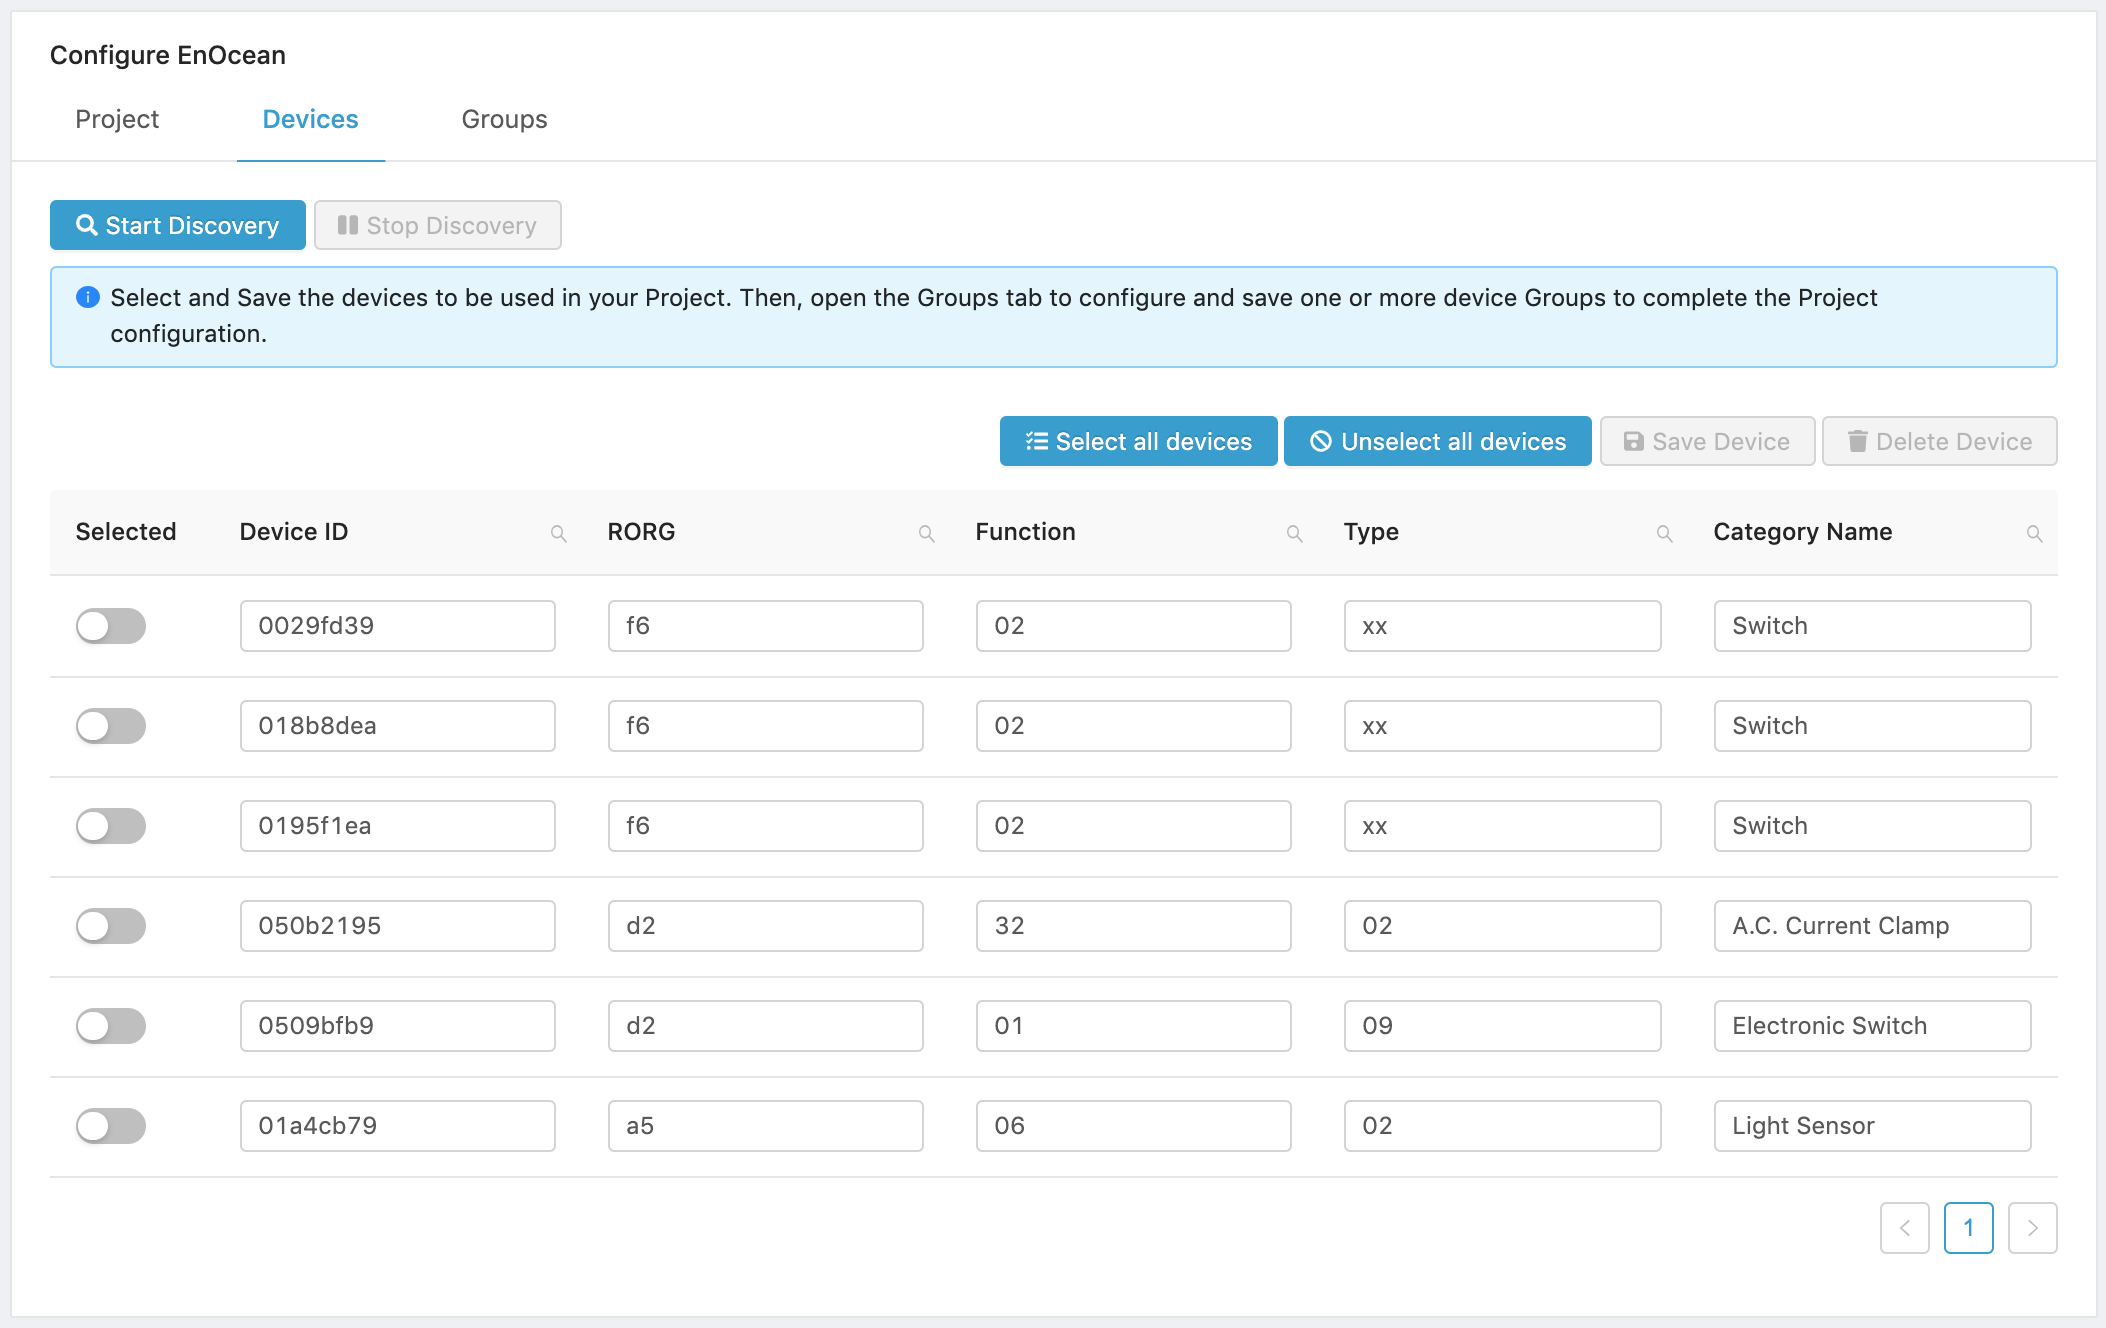
Figure 6. EnOcean devices list.
- Select the devices that you want to use in the Project. Devices can be selected by clicking on the select switch located before the Device ID field. When you select the first device, the Save device and Delete Device buttons are enabled. To select all devices, Click the Select all devices button. To unselect all selected devices, press the Unselect all devices button.

Figure 7. EnOcean devices selected for saving or deletion.
-
Save the selected devices for your project. You may also select devices and delete them.
-
Next, open the Groups tab to create and configure an EnOcean Group.
Creating a Group
To complete the configuration of your EnOcean devices and read their data, you need to create and configure a Group.
Data from the devices belonging to a group is published in the platform’s MQTT broker under the topic:
data/ProjectID/GroupID
The data messages and payloads can be seeing using the MQTT Client. You can open the MQTT Client from your Project’s main menu and add the topics whose published messages you want to display.
To create a Group:
- Open the Groups tab.
- Click on Group to add a new Group.
- Enter a name for the Group. The Group name is part of the topic used by the connector to publish messages,
- Enter a Group ID or use the Group ID suggested by the Connector. The Group ID is a numeric value and is part of the topic used by the connector to publish messages. A Group ID can only be used once in a project.
- Select the devices that will be selected for this Group by turning their selection switches on. Note that a device can belong to more than one Group.
- Click on Save.
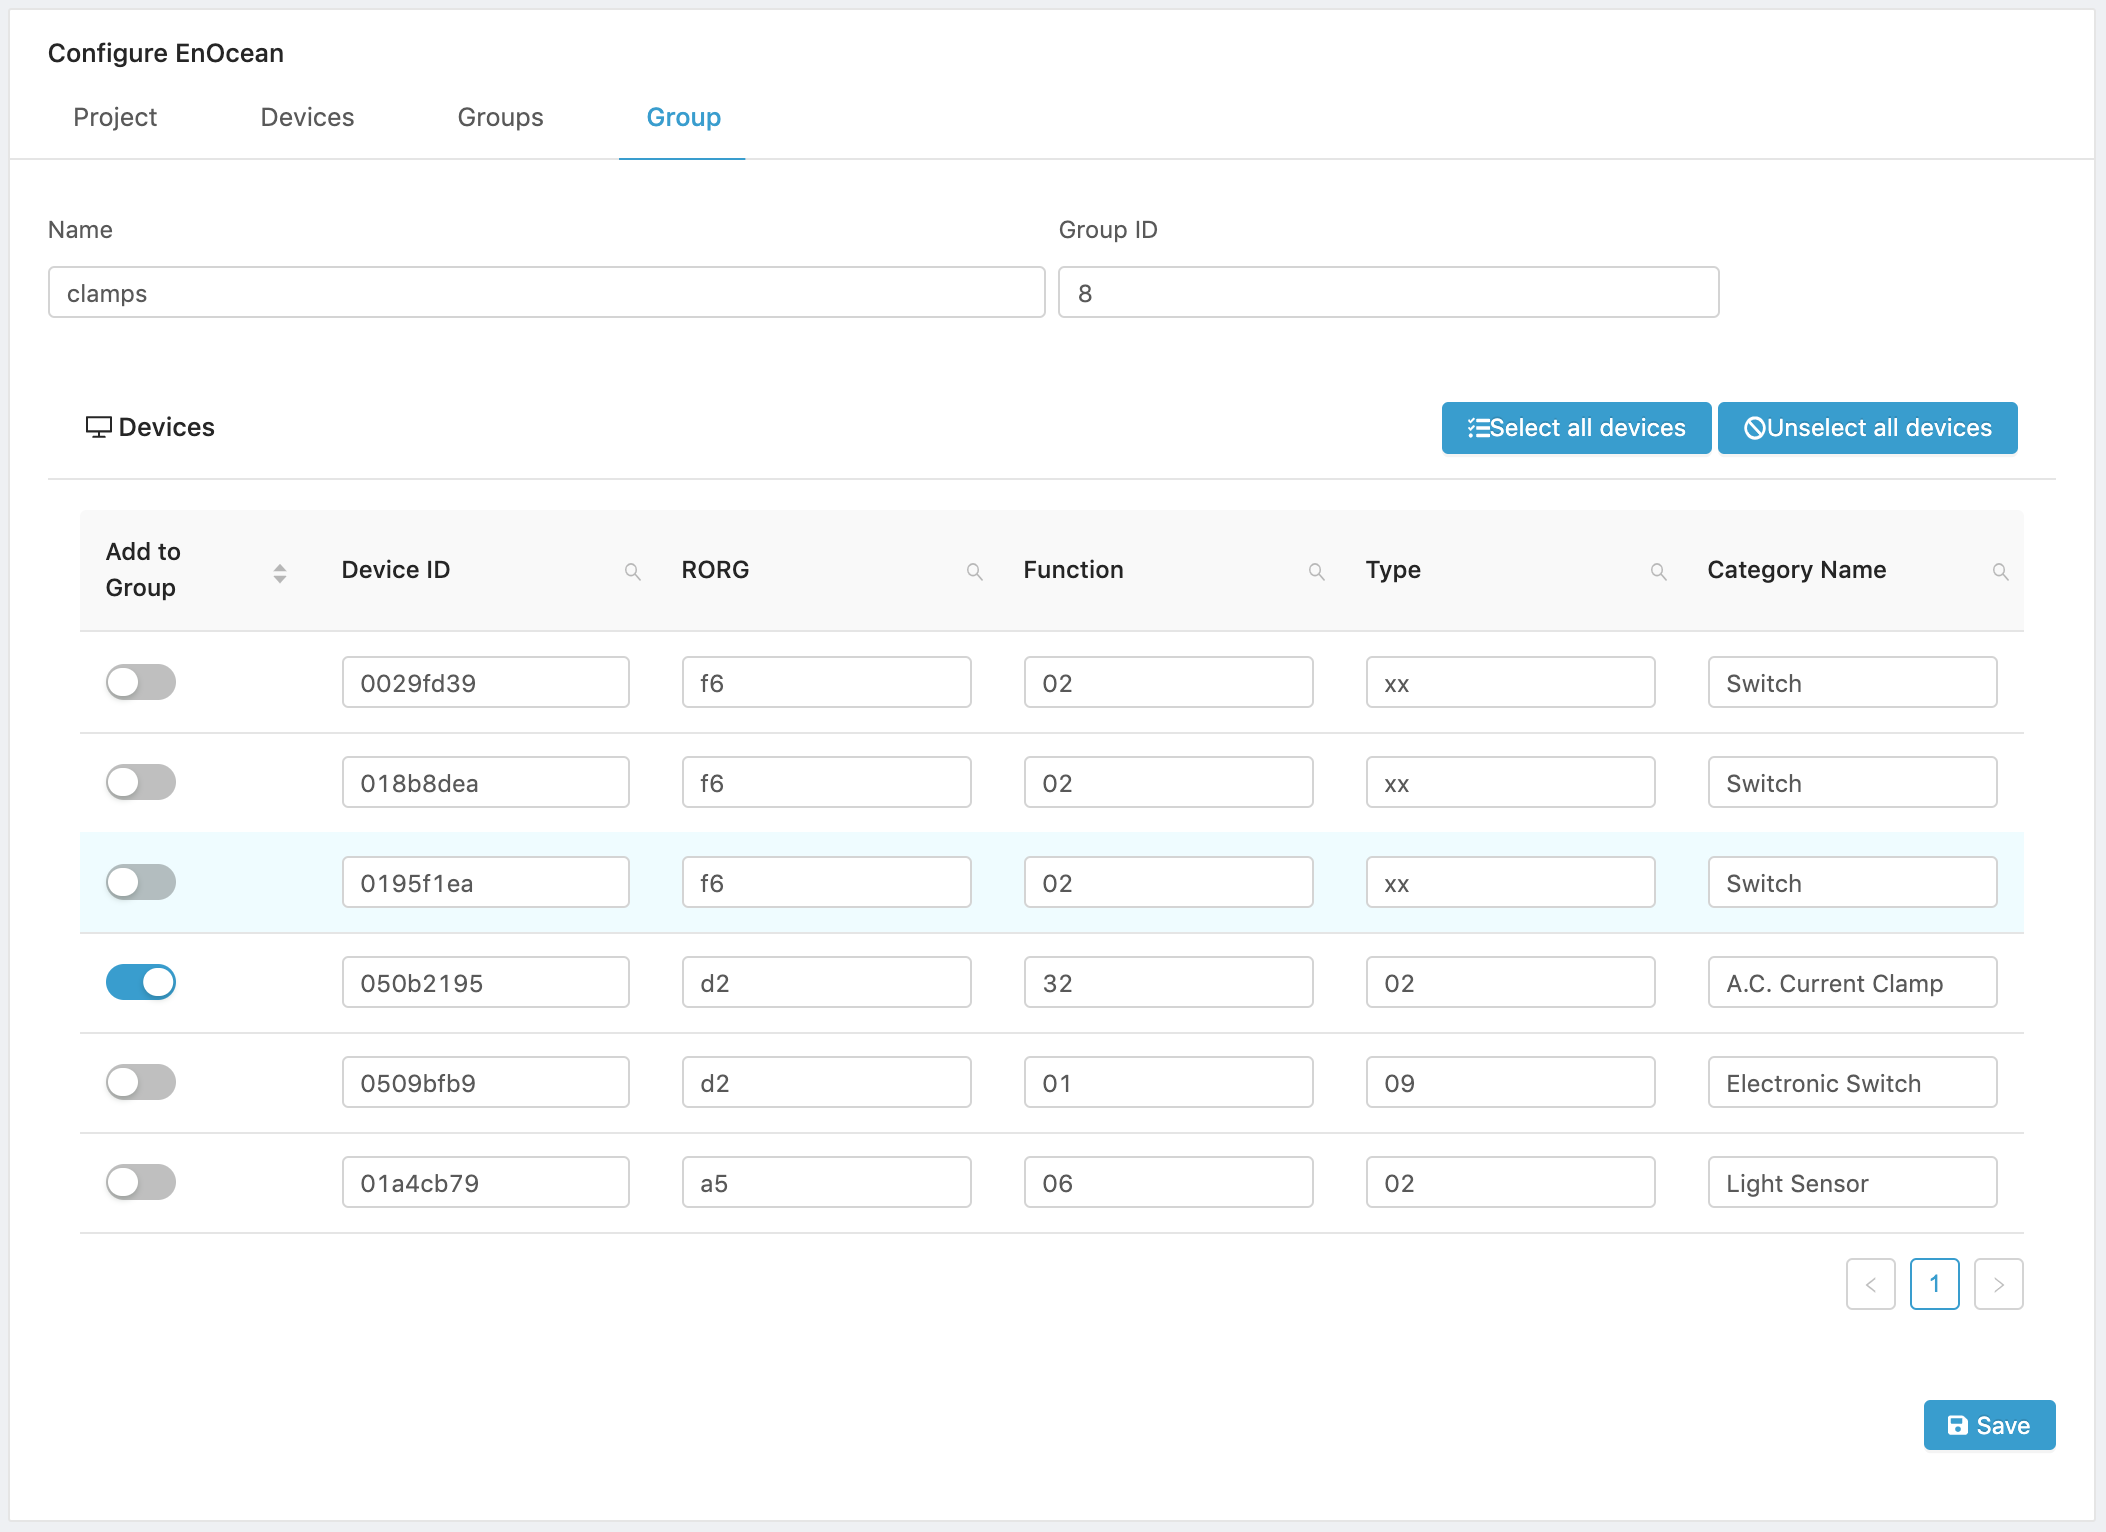
Figure 8. Creating an EnOcean Group.
The Group tab will open and you will see the list of available groups along with the platform assigned Group ID.

Figure 9. The Project's Group list.
To send the Project’s data to CloudPlugs IoT or to another IoT platform or MQTT Broker, you must create a Message Router project and configure the required cloud access parameters.
Editing a Group
To edit a Group:
- Open the Groups tab.
- Click the Edit icon ( ).
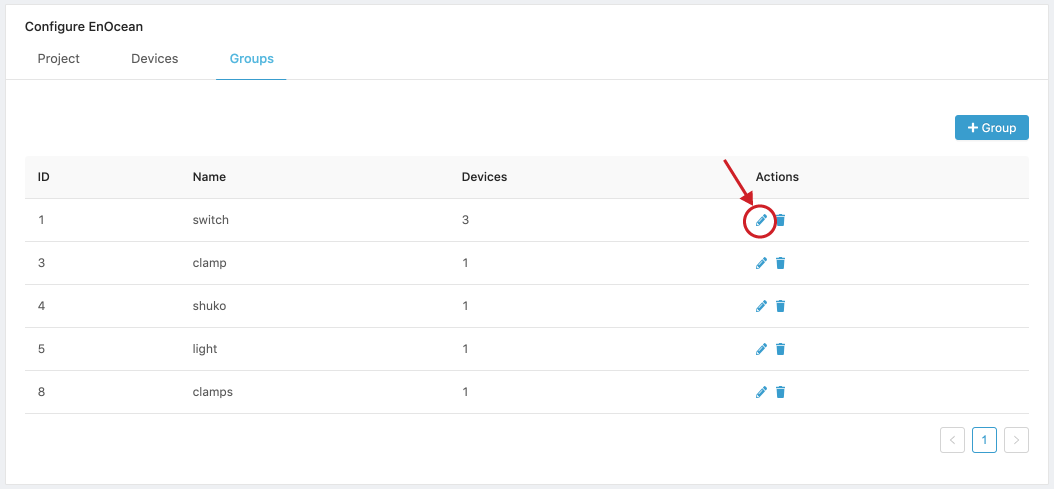
Figure 10. Edit a Group's configuration.
- Change the parameters desired. In this example, we are changing the Group name.
- Save the changes to the Group.

Figure 11. Edit a Group's parameters and devices.
- The Group list will be updated with the new name, Group ID and number of devices.