Beaglebone Black Tutorial
Connecting a Temperature Sensor
Introduction
This tutorial introduces the basics of how to quickly deploy an Internet of Things project with a working example of a Connected Product.
The example illustrates how to connect a temperature sensor to the CloudPlugs service through a BeagleBone Black board using the internal Ethernet controller.
You will need to open an account at CloudPlugs so you can create a Production Thing in your account. The example shows how to configure the BeagleBone Black with a connectivity library to connect to CloudPlugs IoT. Once all the software is configured and the sensor is connected, the BeagleBone Black will upload and publish data every minute.
This guide has the same objectives as the Arduino tutorial. However, the BeagleBone Black provides native support for Analog I/O and there is no need to use an external ADC (Analog-to-Digital Converter).
Requirements
You will need to set up your BeagleBone Black and sensor hardware, your CloudPlugs account and your BeagleBone Black software so you can monitor published data from the CloudPlugs IoT web desktop.
Hardware
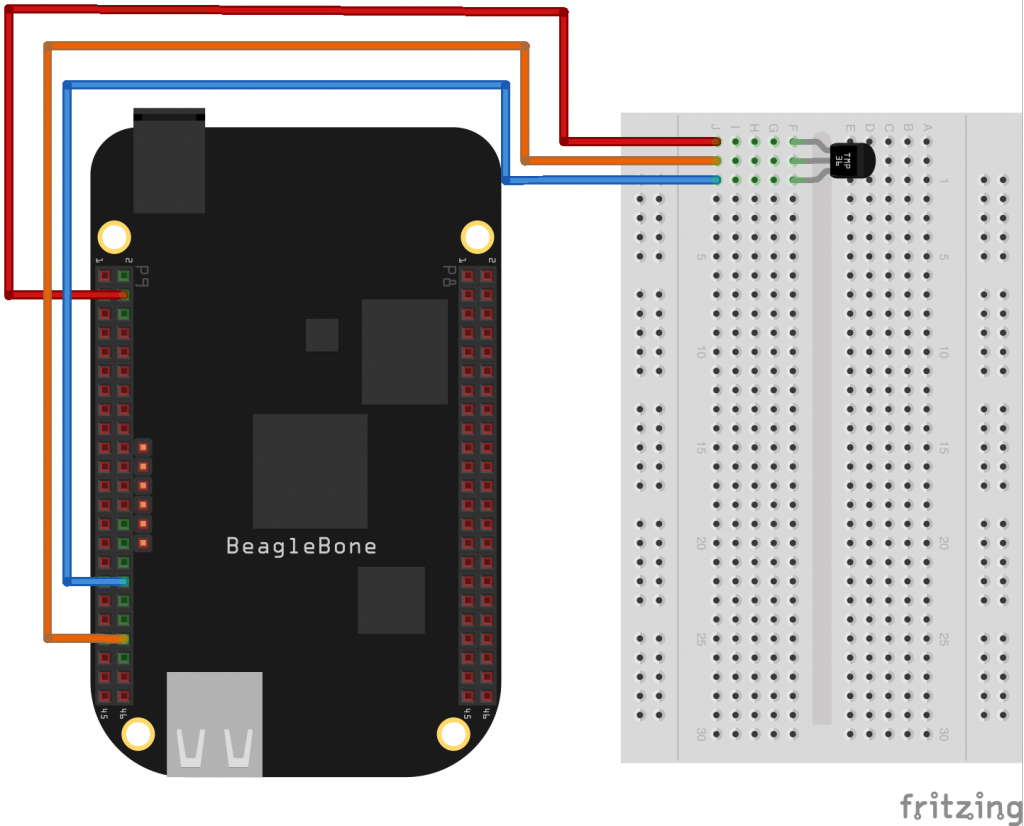
We will use the Beaglebone Black ADC (Analog-to-Digital Converter), to connect the temperature sensor TMP35/36/37.
Here is an image of the circuit that needs to be wired.
It is important to make sure that the sensor operates within the appropriate ranges of temperature and voltage as follows:
- The temperature range for the TMP36 is -50⁰C to 280⁰C.
- The analog inputs of the Beaglebone Black operate at 1.8V.
- The TMP36 has a theoretical maximum output of 3.3V.
- There is potential damage to the Beaglebone Back if the voltage exceeds 1.8mV.
- The TMP36 outputs 1.8mV at 130⁰C (366⁰F).
- DO NOT operate the TMP36 at more than 130⁰C or 366⁰F.
Note: There is currently a bug in the ADC driver of Linux Kernel version 3.8.6 . You’ll need to read the values twice in order to get the latest value.
Configuring the hardware
You must first enable support for Analog I/O into the BeagleBone Black kernel through a few simple steps:
- Open a root shell (root@boaeglebone:~#)
- From the Gnome UI go to “Applications -> System Tools -> Terminal“
Now, type the following command:
root@beaglebone:~# echo cape-bone-iio > /sys/devices/bone_capemgr.*/slots
Let’s verify that the driver shows the Analog I/O ports correctly. Enter this command:
root@beaglebone:~# find /sys | grep AIN
/sys/devices/ocp.2/helper.14/AIN0
/sys/devices/ocp.2/helper.14/AIN1
/sys/devices/ocp.2/helper.14/AIN2
/sys/devices/ocp.2/helper.14/AIN3
/sys/devices/ocp.2/helper.14/AIN4
/sys/devices/ocp.2/helper.14/AIN5
/sys/devices/ocp.2/helper.14/AIN6
/sys/devices/ocp.2/helper.14/AIN7
root@beaglebone:~#
If you get a similar output only after having issued the previous “echo” command, your ADC driver is configured correctly.
You must insert the “echo” command in the boot script so the setting persists after the BeagleBone Black reboots.
Software
- Use the CloudPlugs Python library.
- Use the CloudPlugs IoT Web Desktop to configure your device in the cloud.
Connecting the the BeagleBone Black and the sensor using the Python Library
Here are a few simple steps you need to follow to connect the sensor and to start publishing data as a Production Thing device:
- Register at www.cloudplugs.com
- Enable IO support on your BeagleBone Black.
- Enable the Python library to access IOs.
- Login to the CloudPlugs IoT platform either through the website or through http://platform.cloudplugs.com.
- Create a Production Template.
- Create a Serial Number and Enter its enroll password.
- Retrieve the Plug-ID and activation/connection password using the manual method.
- Download the Python library and uncompress it into your preferred folder on the BeagleBone Black
- Use one of the examples included in the Python library. In the BeagleBone root shell go to the folder where you downloaded the CloudPlugs python library and use your preferred command-line editor to edit the file sample.py.
- Edit the source code with the changes shown below
- Change AUTH_PLUGID to the Plug-ID retrieved in 7 above.
- Change AUTH_PASS to the connection authentication password retrieved in 7 above. Leave AUTH_MASTER as False.
- Connect your hardware.
- Connect the TMP36 to the BeagleBone Black ports (optionally wiring it with a breadboard).
- Power to the 3.3V port and ground to GND.
- Analog input to analog port AIN0.
- Connect the BeagleBone Black board to your network using an ethernet cable. You can power it using a micro USB cable connected to your computer or using the board’s external power adapter.
-
Now Run from the command-line:
root@beaglebone:~# python ./sample.py -
Temperature data will be published every minute and can be visualized in the Data panel of the Production Thing of your board. To change temperature values easily, lightly press the sensor between your fingers.
-
Congratulations! you have successfully connected a Thing (temp sensor) through your BeagleBone Black to the cloud.
Source Code
Use the following source code.
#!/usr/bin/python

import time
import os
import sys
import json
import Adafruit_BBIO.ADC as ADC

# Importing and setting up CloudPlugs python library
from cloudplugs import CloudPlugs
AUTH_PLUGID = 'dev-534bebb7705fdf9f2c32adea'
AUTH_PASS = 'password'
AUTH_MASTER = False
cps = CloudPlugs()
cps.set_auth(AUTH_PLUGID, AUTH_PASS, AUTH_MASTER)

# setup ADC
ADC.setup()

# Define analog reading channel delay
DELAY = 5

# Function to extract temperature from
# TMP36 data, rounded to specified
def ReadTemp(places):
  reading = ADC.read('AIN1')
  millivolts = reading * 1800  # 1.8V reference = 1800 mV
  temp_c = (millivolts - 500) / 10
  temp_c = round(temp_c,places)
  print 'temp_c [%d]C\r'%temp_c
  return temp_c

while True:
  # Read the temperature sensor data
  temp       = ReadTemp(2)
  cp_res = cps.publish_data("beagle_weather", { "data":{ "temperature":temp }})
  time.sleep(DELAY)
The MCP3008 is a 10bit ADC, so it’s able to give back numbers ranging from 0 to 1023. This interval is linearly related to the voltage. A reading of 0 means that we’re reading 0V and a reading of 1023 means the input is 3.3V. This range for us (standing to the TMP36 specifications) would equate to a temperature range of -50 to 280 degrees Celsius.