Location Triggers
Overview
Location Triggers generate actions based on the location of devices with respect to a geo-fence. Devices must publish location information as a JSON structure into a channel for the trigger to be effective.
Location is published as a JSON structure such as:
{
"x": -2.29459890001234,
"y": 48.85821230001234
}
Where x is longitude and y is latitude.
Location is displayed as an Additional Property.
The geo-fence is established by defining geographic areas that may be constructed as polygons or circles relative to a starting address. The address input for circular geo-fences is always at the center of the map in which the geo-fence(s) will be drawn.
The standard trigger actions (email and sms notifications, HTTP requests, Publish data and JIRA trouble tickets can be programmed for a Location Trigger under any one of the following conditions.
- Device Enters the perimeter of the geo-fence defined.
- Device Leaves the perimeter of the geo-fence defined.
- Device remains Inside the perimeter of the geo-fence defined. This action will be triggered only if there is a previous data point inside the geo-fence perimeter.
- Device remains Outside the geo-fence of the geographic area defined. This action will be triggered only if there is a previous data point outside the geo-fence perimeter.
Example
Here is a full example on how to create and test a location trigger on a channel called location. We will create two geo-fences, one will be a polygon and the other a circle. We will make the overlap so at some point, the device which we will call a truck will be inside both of them. In the example, we will publish location data as follows:
- Location 1 is outside the perimeters of the geo-fences.
- Location 2 is inside the polygonal geo-fence.
- Location 3 is inside both geo-fences.
- Location 4 is outside the polygonal geo-fence but inside the circular geo-fence.
- Location 5 is outside both geo-fences.
The following steps show how to create and test a geo-fence.
- Open the Trigger (
 ) panel from the device’s General (
 ) tab.
 - Click on the New trigger (
 ) button.
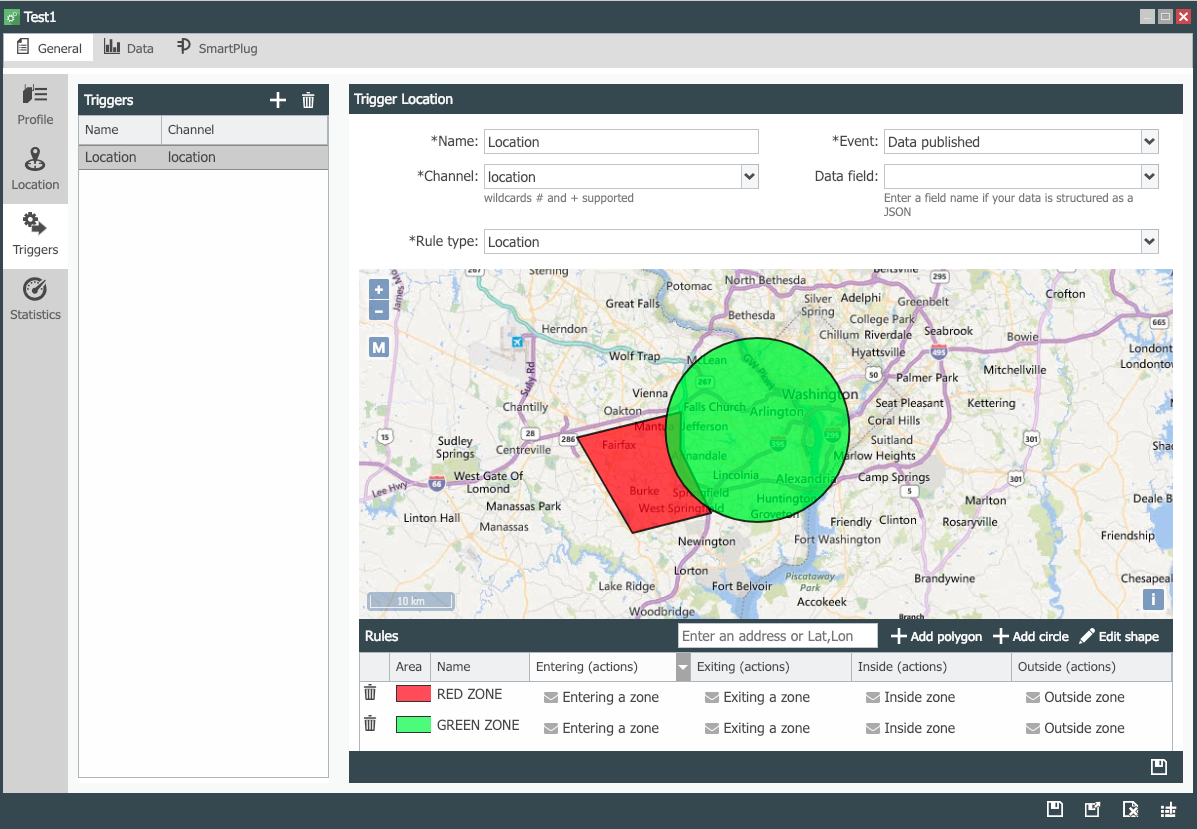
 - Give the Trigger a Name , set Event to Data published.
- Set Rule Type to Location. For best programming, make the device window as large as possible.
- Zoom into the map to get close to the area where you want to create the geo-fences. In this example, we zoomed into the Washington D.C. vicinity.
- Click on Add a polygon and draw the polygon with the mouse. Each mouse click sets a polygon vertex.
- Click on Add a circle. Place the mouse on where you expect the center of the circle to be and drag out to draw the circle. If you drew the wrong circle, delete the geo-fence and start over.
- Snap a picture of the map with the geo-fences.
 |
|---|
You can use the General (![]() ) -> Location (
) -> Location (![]() ) panel to get the location coordinates for the 5 locations we will use for the test. Simply look at the snap taken before,
and move the location cursor to areas that match the exercise. Copy those coordinates, paste them on the Publish data panel and fix the JSON to the format {"y": latitude, "x": longitude}.
This is how we generated the data in the section below.
) panel to get the location coordinates for the 5 locations we will use for the test. Simply look at the snap taken before,
and move the location cursor to areas that match the exercise. Copy those coordinates, paste them on the Publish data panel and fix the JSON to the format {"y": latitude, "x": longitude}.
This is how we generated the data in the section below.
| 9. Under Entering (actions) for Area->RED ZONE create an E-Mail notification action called Entering a Zone with subject and body shown in the image to the right. Position your cursor on Area->RED ZONE Entering (actions) and select the newly created action from the dropdown menu. | 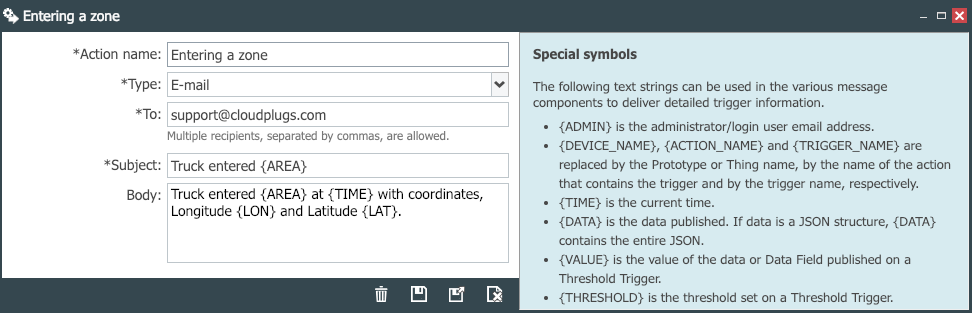 |
| 10. Under Exiting (actions) for Area->RED ZONE create an E-Mail notification action called Exiting a Zone with subject and body shown in the image to the right. Position your cursor on Area->RED ZONE Exiting (actions) and select the newly created action from the dropdown menu. | 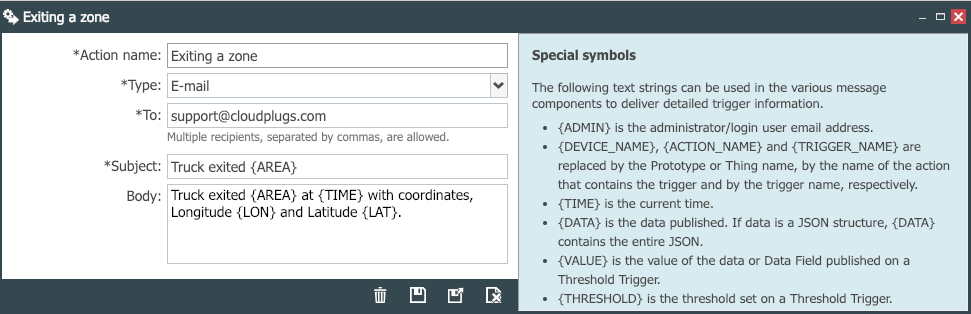 |
| 11. Under Inside (actions) for Area->RED ZONE create an E-Mail notification action called Inside Zone with subject and body shown in the image to the right. | 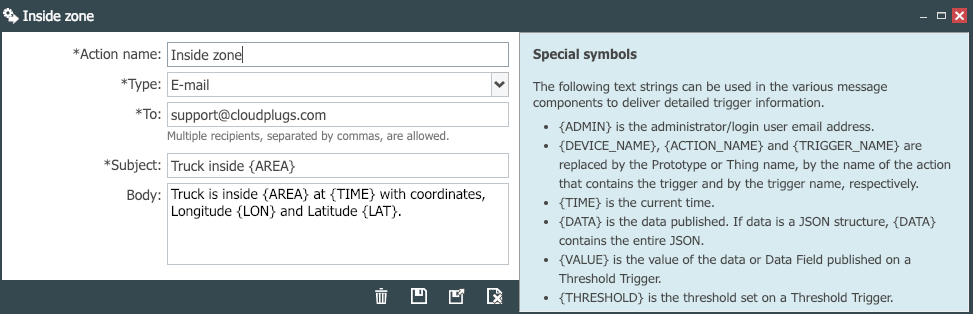 |
| 12. Under Outside (actions) for Area->RED ZONE create an E-Mail notification action called Outside Zone with subject and body shown in the image to the right. | 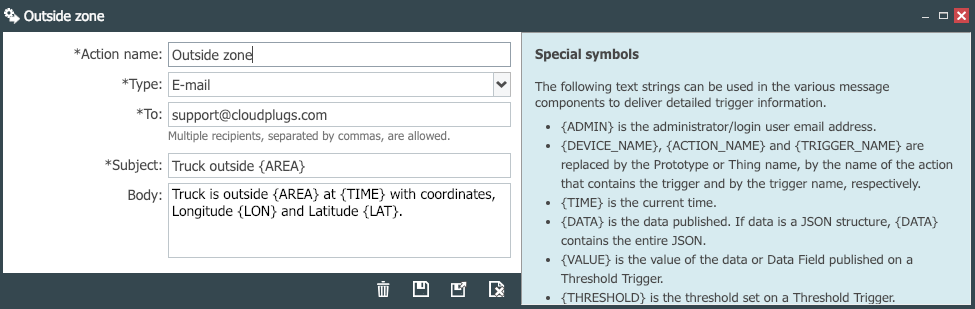 |
| 13. Repeat for Area GREEN ZONE. Note that since the actions are already created, you can simply find them in the list of action and add them to the trigger. | |
| 14. Publish { “x”: -77.34541367397381, “y”: 38.86225426260716 } on the location channel. Since this is the first data point, no action is triggered. | 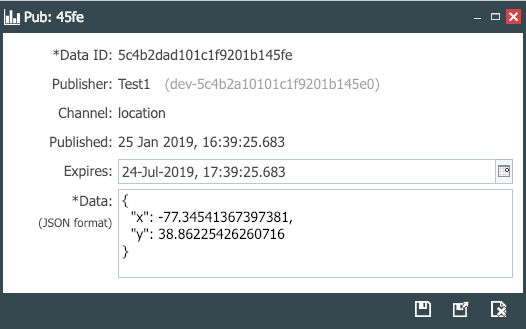 |
| 15. Publish { “x”: -77.34541367397381, “y”: 38.86225426260716 } again on the location channel. | |
| 16. Verify that the e-mail notifications: i) Truck is outside RED ZONE, and ii) Truck is outside GREEN ZONE are received. These are sent because the first location data received is outside the areas configured. The Publish Data -> Views/Charts panel will show the location on the map. |   |
| 17. Publish { “x”: -77.30009507045838, “y”: 38.81732854729662 } on the location channel. | 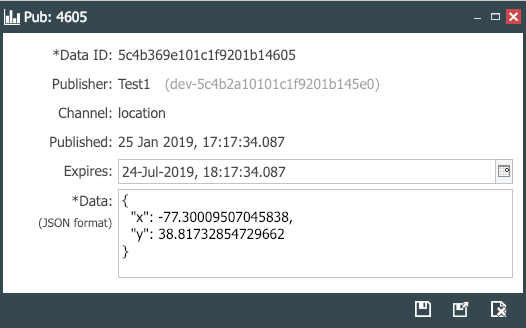 |
| 18. Verify that the e-mail notifications i) Truck is outside GREEN ZONE and ii) Truck entered RED ZONE are received. |   |
| 19. Publish { “x”: -77.2376103292413, “y”: 38.86786798260567 } on the location channel. | 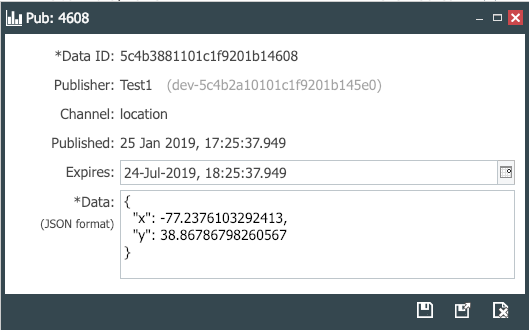 |
| 20. Verify that the e-mail notifications i) Entered GREEN ZONE and ii) Truck inside RED ZONE are received. |   |
| 21. Publish { “x”: -77.1397633443838, “y”: 38.88016315365616 } on the location channel. | 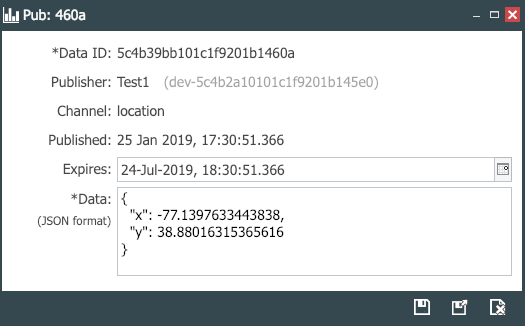 |
| 22. Verify that the e-mail notifications i) Truck inside GREEN ZONE and ii) Truck exited RED ZONE are received. |   |
| 23. Publish { “x”: -76.64005707607295, “y”: 38.96149818807443 } on the location channel. |  |
| 24. Verify that the e-mail notifications i) Truck exited GREEN ZONE and ii) Truck outside RED ZONE are received. At this point, the truck is outside both geo-fences. |   |
| 25. The history of the published data looks like this. Clicking on any data circle shows the number of the data point published and its time of publication. | 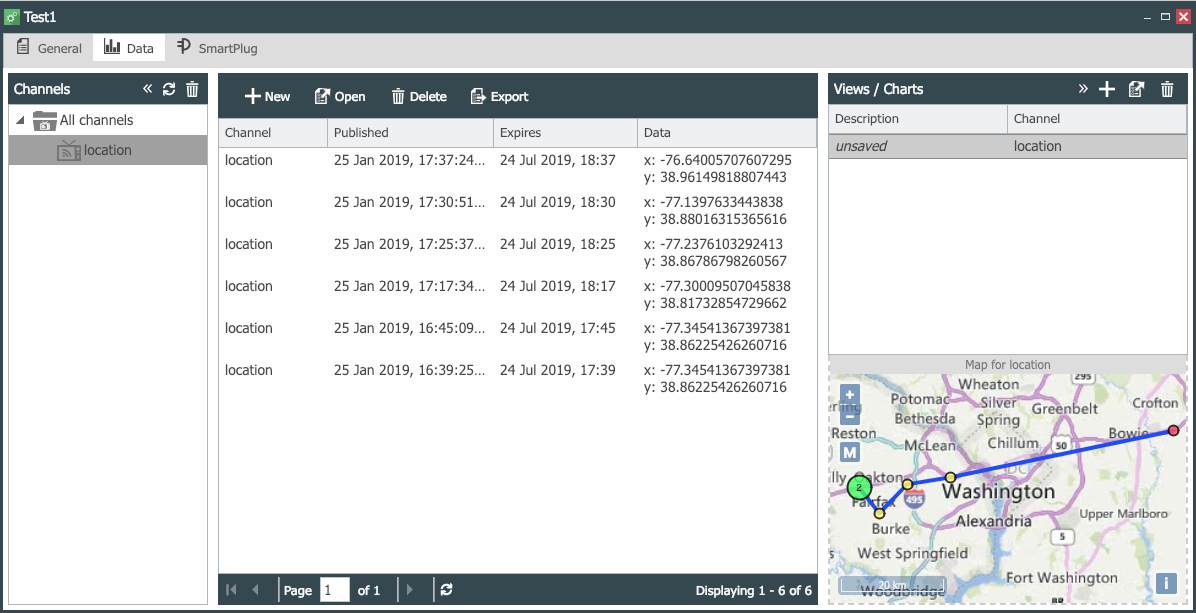 |